Unlock PDF Files

How to Unlock PDF Files Easily with PDFBear

Whether you’re working or studying, you will come across hundreds to thousands of PDF files in your lifetime. PDF documents are the most used file format out there because it’s not only easy to share or send to other people, but receiving them won’t hassle you either. PDFs take up much less space compared to other file types, so you’ll be saving a lot of disk memory with them. Furthermore, you don’t really need a special app, software, or reader to access PDF files. After downloading a PDF file, you can easily read it on almost any device! And that’s really the magic of PDF files, the versatility, convenience, and compactness of the files. This is why many choose this file type over any other.

[td_block_ad_box spot_id=”custom_ad_2″ tdc_css=””]

But there will definitely come a time where you’ll run across a PDF file that’s locked or password protected. This can be for various reasons, but mostly, to protect the PDF file from being read or accessed by just anyone. However, if you are the owner or recipient of the PDF file and you need to access that file several times, it can get annoying having to enter the password over and over again. So, we’d like to help you out by sharing with you how to unlock PDF files easily with PDFBear. Keep on reading to find out more.

What is PDFBear?

Well, you might be wondering exactly is PDFBear? It’s actually a free online software as a service (or Saas) tool that you can use to convert your files to PDF format, or PDF documents to other file formats. Other than just unlocking PDF files, depending on your purpose, you can easily choose what you would like to do with your various documents. It’s a versatile online converter tool that requires no file extensions or special software to download, you can just convert your files directly from your web browser. And you’ll be happy to know that PDFBear won’t require any payments either! The website is completely free to use without the need for any added subscriptions and it’s also easily navigable. You won’t need any time to adjust to the website or learn anything to start using it because everything is laid out very neatly. Using PDFBear is straightforward and simple!

Unlock your PDF files with PDFBear

Choose the file you want to unlock

You can either click “Choose Files” on the PDFBear unlock PDF web page or click and drag the file from a folder to your browser to upload it. Then, wait for the file to upload completely. The upload will only take you a few seconds until it’s ready to unlock.

Enter the password of the PDF file and unlock

Once the file has been uploaded to the PDFBear website, all you have to do is enter the password. After entering the password of the PDF file, click “Unlock PDF” to unlock the file. This step won’t take much time, so there’s no need to worry about having to wait long.

Download your password-free PDF file

After you have unlocked your PDF file, the PDFBear website will then decrypt your file. After the decryption has finished, you can then download your newly-unlocked PDF file. Now you can finally access your PDF document without having to repeatedly input a password every time you have to open it. Easy!

Easy does it with PDFBear

And that’s all that there is to it! It doesn’t take you much time to unlock password-protected PDF files with PDFBear. There’s absolutely no hassle in using this easy to use SaaS tool because it only takes you a few moments to get the file that you need! It’s quick and simple, as a converter tool should be! There are no other unnecessary steps you need to do and there are no other downloads you need to make. All you ever need with PDFBear is a web browser and internet connection. That’s the beauty of PDFBear because it offers great service without the need for other extra things. So go ahead, unlock those PDF files and convert other files all to your liking and needs! Try out PDFBear and you’ll see why you haven’t used it before. Check out its other useful features too!
[td_block_ad_box spot_id=”custom_ad_3″ tdc_css=””][td_block_11 category_id=”3″ limit=”1″ td_filter_default_txt=”” tdc_css=””]
Recognize an SMS Fraud

How to Recognize an SMS Fraud

As new communication technology constantly evolves, cases of fraud are also increasing. Many businesses use mobile phones to connect with customers and facilitate a variety of transactions. When a customer chooses to pay online or use a credit card, they receive a text message to authorize the payment. On the other hand, a business owner will also get a payment confirmation via an SMS message on their phone. However, the challenge is that fraudsters can tamper with this system and create fake SMSes confirming non-existing payments. The good news is that with the right application, it is possible to recognize such cases. As such, read on to learn how to recognize an SMS fraud.

[td_block_ad_box spot_id=”custom_ad_2″ tdc_css=””]

Type of Phone Number

You can check the number of digits on the phone number that sends you suspicious texts to verify if they are scams. Legitimate phone numbers usually have 10 digits or less while marketing messages usually consist of a shortcode with six digits. You should be concerned if you receive a text from a number with more than 10 digits. Apart from that, you need to check if the message is relevant to you.  

Choose a Reliable App

Smart technology also comes with new apps that consist of advanced security features. You can integrate text phone verification service in your business with a special app that can help you verify the authenticity of the SMSes that you receive from different clients. This type of app helps to notify customers, confirm transactions, while at the same time preventing fraud. You can also use the app to send SMS pin codes as well as a one-time pin (OTP) to verify phone numbers. It also helps confirm account logins to keep scammers at bay. This app can only be accessed by the authorized account holder which makes it difficult for scammers to steal from your account using text scams. 

Request for Information About Your Account

Scammers use many tricks such as sending fake messages about your bank account. For instance, they can send you a text message saying they have observed something fishy on your account or notify you that your account has a problem. You can also receive a text with a fake invoice and once you respond, they steal your information. No bank will ever send this kind of text, so you should be wary about any suspicious messages. Scammers will ask you to provide personal details to claim a gift and they will only steal this information before vanishing into thin air. 

Scammers can also trick you into providing personal information by promising gift cards, coupons as well as free prizes. They can also promise to give you a low-interest credit card then, later on, ask you to provide your account number or password. Once you provide the information, they can use it to access your bank account or email. They can also sell your details to other scammers. Therefore, you should be wary of people who offer you generous deals that are too good to believe. 

Text Refund

The other trick comes as a text refund informing you that you have been overcharged after buying something. Many people can be easily tempted to respond but this will be a big scam. If you send bank details in the hopes that the scammers will deposit the refund, then you would have sold out important information. You should never send your banking details to anyone via a text message.

Family Issues

Other scammers will use the trick of sending messages to unsuspecting people informing them about family problems. If you are the recipient, you are likely to fall for the trick thinking that your loved one is in danger, therefore, you send money as requested. You need to verify the authenticity of the text before sending any money since this can be a fraud. If the text mentions the name of someone you might know, try to reach out to the person directly before you send money. It is a good idea to contact the authorities before you send cash to unknown people. 

With new information and communication technology, the chances of potential scams are also on the rise. Spam texts are a new form of fraud that some people easily fall for. The goal of these scam texts is to steal your personal information, or even money. However, there are certain measures that you can take to recognize SMS fraud. Generous deals offered through text messages are suspicious and you should not easily fall for them. You should also make it a policy to avoid any text that calls you to action; texts that ask you for personal information such as banking details should always be discarded. If you are operating a business, you can use an app that can help you verify phone numbers to avoid falling victim to these frauds. 

[td_block_ad_box spot_id=”custom_ad_3″ tdc_css=””][td_block_11 category_id=”3″ limit=”1″ td_filter_default_txt=”” tdc_css=””]
equip emotes in COD Mobile-

How to equip emotes in COD Mobile?

There has been a significant increase in the number of COD Mobile players after the Season 9 update, as the developers have completely redesigned the game, bringing many new features to it. Call of Duty is a well-known gaming series, while has also its mobile version, COD Mobile, which has become quite popular among gaming fans and features to modes, Multiplayer and battle royale.

[td_block_ad_box spot_id=”custom_ad_2″]

Emotes are prevalent in many games and COD Mobile is not an exception. The game has a variety of emotes, which players can get from the store through crates or events within the game. From exclusive bundles, skins even emotes can also be obtained in COD Mobile. The game includes a variety of emotes that can be used in both Multiplayer and battle royale mode and usually are used by players to show their dominance over other opponents. Anyway, for those who do not know how to equip these emotes, you have come to the right article.

HOW TO EQUIP EMOTES IN COD MOBILE?

Follow the steps below to create equip emotes in COD Mobile:

  • Step1: Open COD Mobile and click at the ‘Loadout‘ icon at the bottom of the main menu.
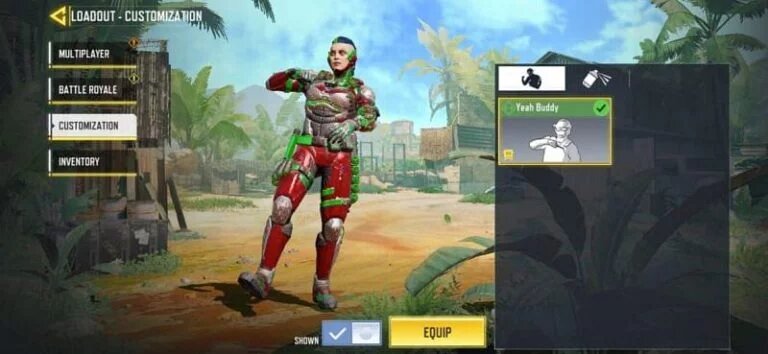
  • Step 2: Once you open Loadout, click the ‘Customization’ button.
  • Step 3: After that the emotes you have available will appear on the screen.
  • Step 4: Click the Equip button, once you have selected the emote you want.
Loadout Customization interface in Call of Duty Mobile

How to use emotes in COD Mobile?

To use emotes in COD Mobile, follow the steps given below:

  • Step 1: While in the game, click the ‘Thumbs-up’ icon present beside the settings button.
  • Step 2: When the emote loadout opens up, click the desired emote
  • Step 3: Now the character will perform the emote

> Check next: How to get god mode in GTA 5?

So simple. Keep in mind that this article, while it may seem unnecessary to a part that often plays the game, is aimed at beginners. We can all get confused sometimes. So what do you think about this? Let us know your thoughts in the comments section below, follow us on Twitter and Facebook for more news and updates.

neoAdviser

[td_block_ad_box spot_id=”custom_ad_3″ tdc_css=””][td_block_11 category_id=”3″ limit=”1″ td_filter_default_txt=”” tdc_css=””]
Bulk Delete Facebook posts

How to bulk delete your old Facebook posts

The social network Facebook has become a daily part of many people for some time now and most likely most of them have so far made “tons” of posts. For those who find the old posts inappropriate now, they may delete them one by one and this process can be very lengthy and tedious. Fortunately, Facebook now lets you delete or archive than in bulk. Facebook seems to have realized that most people want to bulk delete old posts and has recently launched a new feature that allows its users to delete multiple posts in bulk. Here’s the how-to guide to delete a piece of Facebook history in bulk through a very simple process.

[td_block_ad_box spot_id=”custom_ad_2″]

> Check out: The best way to post panoramic photos on Instagram

How to delete your old Facebook posts in bulk

Before starting, keep in mind that the bulk delete/archive feature at the time writing the article is only available on Facebook’s mobile apps (Android, iOS, and Lite). So make sure you are following this guide through the Facebook mobile app.

  • Log in to the Facebook app on your phone;
  • Go to profile and click the three dots to enter the menu;
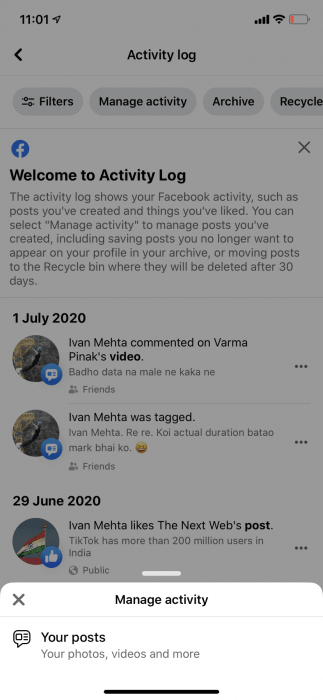
  • Click on Activity Log> Manage Activity> Select “Your Posts”;
Activity Log Facebook
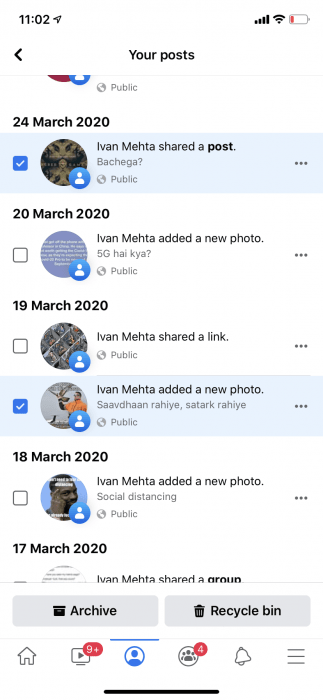
  • Click the small box next to your posts to archive or delete posts;
  • Click the “Trash” or “Archive” accordingly.
Archive/Delete Bulk Posts Facebook

Facebook saves the deleted posts in the recycle bin for 30 days before they are permanently deleted in case a post is deleted by mistake. The archived/deleted posts will show up at Your Posts section.

> Check next: How to automatically delete your location, search and web history from Google

So, that’s all about how to bulk delete your old posts on Facebook. It’s a bit disappointing that the bulk delete post option is not available on the Facebook desktop site. Hope you found this article useful. Feel free to comment your opinions down in the comments section belowfollow us on Twitter and Facebook for more news and updates.

neoAdviser

god mode GTA V

How to get god mode in GTA 5?

How to access God Mode?

The GTA franchise has had a long history with cheat codes and a tradition that Rockstar still upholds in its games. Not many games as big as GTA today allow players to have cheat codes in order to make the game easier, or just more interesting. Players have used game hacks and cheat codes in GTA games since the beginning, even GTA V has some fun cheat codes.

> Check next: Top 3 Best Offline Games Like GTA

Access God Mode on GTA 5

God Mode, as it has become known, is a cheat code available at all games, including the GTA franchise. However, the game allows God Mode to be activated for only 5 minutes.

  • Xbox 360 / Xbox One: Right, A, Right, Left, Right, RB, Right, Left, A, Y.
  • PS3 / PS4: Right, X, Right, Left, Right, R1, Right, Left, X, Triangle.
  • PC: PAINKILLER.
  • Cell Phone: 1-999-724-654-5537.

This cheat code allows the player to make their character unbreakable and reduce damage in GTA V. However, it can only be activated for 5 minutes, and players must re-code for this cheat after a while. When the code is entered, the player is essentially invincible and can cause immortal amounts of chaos. God Mode has always been one of the most popular cheats in all types of games.

Previously, the GTA franchise allowed players to enter cheat codes on the PC in the game or in the Pause menu, simply by pressing it. However, cheat codes must be entered on the console when playing GTA V. To bring the console during the game, press the “~” Key on your keyboard while playing the game. This will bring up the console that can be used to enter cheat codes.

sources (1,)

> Check next: How to use emotes in GTA Online

So what do you think about this? Let us know your thoughts in the comments section below, follow us on Twitter and Facebook for more news and updates.

neoAdviser

Google People Card

Now you can add your own details on Google Search: Here’s how to!

People Cards will help you build up your online presence, but for now, it is offered only in India

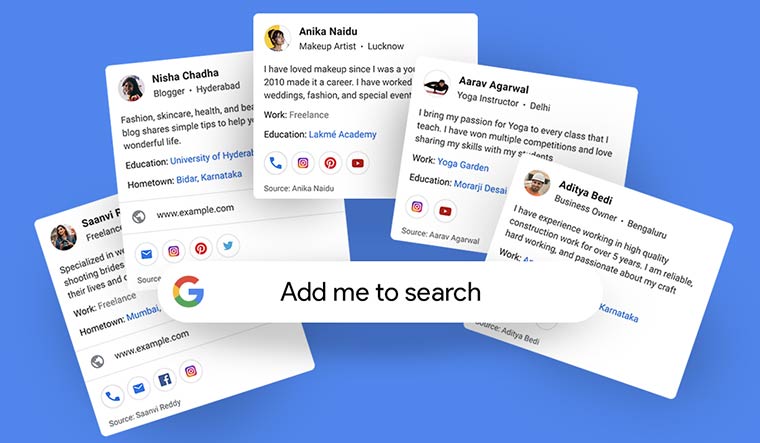
When searching for a celebrity in Google Search, in addition to various links, a module with information and data about him will also be displayed. To enable this Google takes data from trusted sources and compiles the character card.

[td_block_ad_box spot_id=”custom_ad_2″]

And if you search for your name, if you like the rest of us are not famous, all that appears are the links of your social networks, someone with a name similar to yours and some embarrassing video that you posted on YouTube when you were 10 years old and now you have forgotten the code.

The above module, like that for the celebs, Google will soon make it available to general people as well. Starting today, the company has launched “People Card“, a type of digital business card, where every time you or someone else searches, a module with data and direct links to social networks or websites related to you will also appear. This module may include name, job, residence, address, telephone number, email, etc.

Source of information? You yourself.

You just need to have a Google address and then you can compile the form with all the data you want to share. You will be asked for a phone number to verify it, and if you change your mind you can delete it at any time.

Steps to create People Card on Google

  • Step #1: First sign-in to your Google Account
  • Step #2: Next search for “Add Me To Search
  • Step #3: Next click “Add yourself to Google Search
  • Step #4: Put your phone number to complete the verification process
  • Step #5: Enter 6-digit Unique Code
  • Step #6: Then build your profile on People Card by adding your Location, choosing the image, adding a description of yourself, adding links of your websites or social media profiles, and email addresses, if any.
  • Step #7: Click on Save
  • Step #8: Finally search for your profile name on Google Search to see all the shared information displayed on Google

Do you think this is finally the Google’s solution to take a piece from the huge social media market? We need to wait for a global launch, for now it remains to see how it will go in India.

> Check next: How to Play Call Of Duty Mobile on your PC

So what do you think about this People Cards feature? Let us know your thoughts in the comment section below, follow us on Twitter and Facebook for more news and updates.

neoAdviser

[td_block_11 category_id=”3″ limit=”1″ td_filter_default_txt=””][td_block_ad_box spot_id=”custom_ad_3″]
play Call Of Duty Mobile on your PC

How to Play Call Of Duty Mobile on your PC

You can also play Call Of Duty Mobile on your PC

Not everyone has a smartphone in which you can play Call Of Duty Mobile as it is one of the mobile games which requires a device with high specs. But do not worry because if you have a PC which has the right specifications to handle Call of Duty Mobile, you can play it on your PC without any problems.

[td_block_ad_box spot_id=”custom_ad_2″]

> Check out: How to play PUBG Mobile on your PC

The PC requirements to play Call Of Duty Mobile:

  • OS: Windows 7/8.1/10
  • CPU: AMD/Intel CPU 4 core @3Ghz
  • RAM: 8GB
  • Storage: 5GB (may be larger depending on the software/games you use)
  • GPU: AMD/Intel/Nvidia 1.5 GB dedicated

You must also enable Virtualization. To enable Virtualization follow this tutorial.

To be able to play Call Of Duty Mobile on your PC you will need an Android Emulator. The Android Emulator that can give you the best performance, in this case, is Gameloop which is the official emulator of Call Of Duty Mobile and which you can download here.

  • Once you have downloaded and installed Gameloop, open it and wait for it to launch.
  • Then download Call Of Duty Mobile directly from Gameloop.
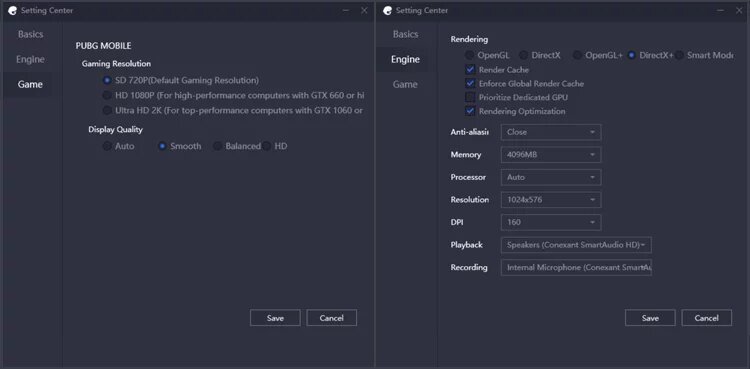
  • While Call Of Duty Mobile is downloading, go to settings, and set them according to the image below.
Gameloop COD Mobile Settings
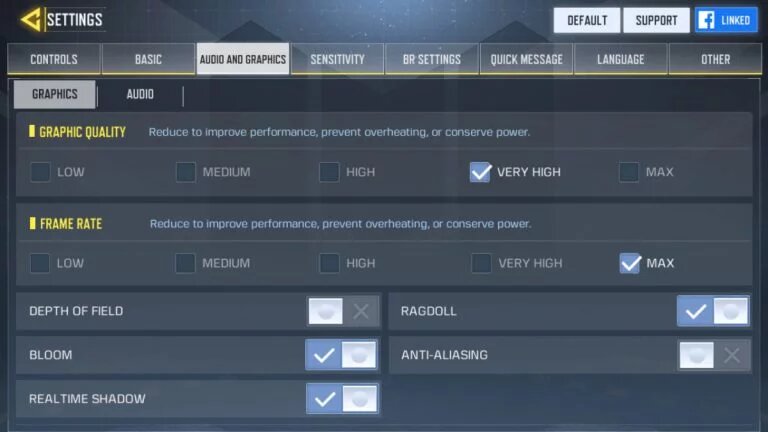
  • Once Call Of Duty Mobile is downloaded and installed login to the game, go to settings and set the settings according to the image below.
COD Mobile Settings
COD Mobile Settings

Once you have done all this you can play Call Of Duty Mobile on your PC and smoothly. It should also be noted that by playing Call Of Duty Mobile on PC, you will be accessing the servers of this game for Android Emulator, and most of the time you will be playing against other people who are also using an emulator.

> Check next: Top 3 Best Offline Games Like GTA

So here’s how to play Call Of Duty Mobile on your PC. Hope you found this article useful! Please let us know in the comment section below, follow us on Twitter and Facebook for more news and updates.

neoAdviser

[td_block_11 category_id=”3″ limit=”1″ td_filter_default_txt=”” tdc_css=””][td_block_ad_box spot_id=”custom_ad_3″ tdc_css=””]
PUBG Mobile on PC

How to play PUBG Mobile on your PC

If you do not have a smartphone with the right settings to play PUBG Mobile, a PC can help you

You may not have a smartphone on which you can play games like PUBG Mobile as this game requires a smartphone with high specs. If you have a PC that can hold an emulator then you can play PUBG Mobile directly on your PC.

[td_block_ad_box spot_id=”custom_ad_2″]

> Check out: Top 15 Best Android Emulators: Experience Android On PC

These are the specs you will need to open the emulator on your PC:

  • OS: Windows 7/ 8.1/10
  • CPU: AMD/Intel CPU 4 core @ 2.5ghz
  • RAM: 4/8 GB
  • HDD: 5 GB (may be larger depending on the software/games you use)
  • GPU: AMD/Intel/Nvidia 1 GB dedicated

You must also enable Virtualization. To enable Virtualization follow this tutorial.

The Android Emulator that can give you the best performance, in this case, is Bluestacks which you can download here.

  • Once you have downloaded and installed Bluestacks, open it and wait for it to launch.
  • Then open Google Play and log in with your Google Account.
  • Once you have logged in to Google Play download PUBG Mobile.
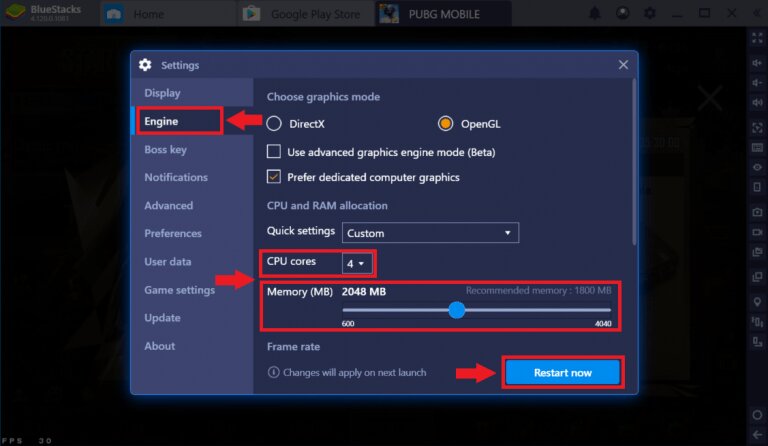
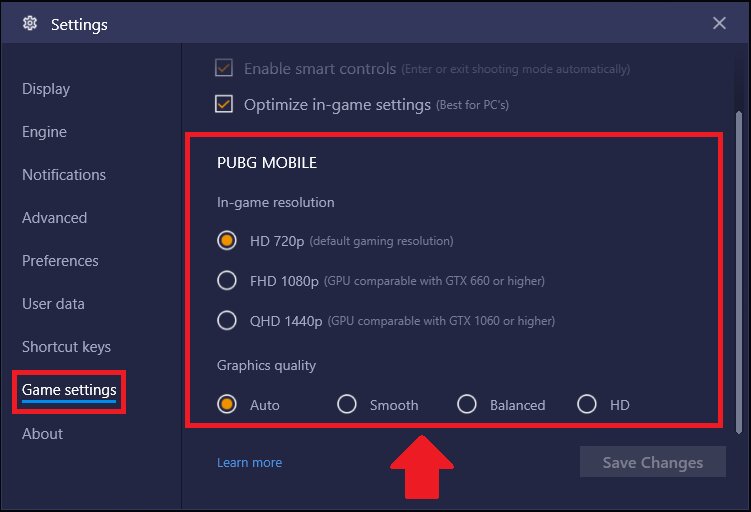
  • While PUBG Mobile is downloading, go to settings, and set them according to the images below.
PUBG Mobile Bluestacks Settings
  • If you have 8GB of RAM, you can change the Memory from 2048 MB to 3072 MB
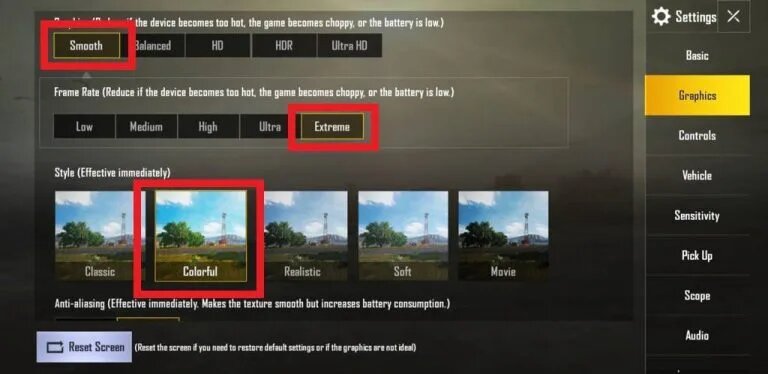
  • Once PUBG Mobile is downloaded and installed, log in and go to settings and set settings according to the image below.

Once you have done all this you can play PUBG Mobile on your PC and smoothly. It should also be noted that by playing PUBG Mobile on PC, you will be accessing emulator servers and most of the time you will be playing against other people who are using an emulator.

> Check next: Top 3 Best PS4 Emulators for Windows PC (2020 Edition)

So here’s how to play PUBG Mobile on your PC. Hope you found this article useful! Please let us know in the comment section below, follow us on Twitter and Facebook for more news and updates.

neoAdviser

[td_block_11 category_id=”3″ limit=”1″ td_filter_default_txt=”” tdc_css=””][td_block_ad_box spot_id=”custom_ad_3″ tdc_css=””]
Maximize The Speed Of Your High Traffic Blog-min

How To Maximize The Speed Of Your High Traffic Blog and Improve Conversion In 2020

Is your blog struggling with a high bounce rate? Is the conversion rate declining? Are you struggling to rank your blog on Google? If you answered yes in all these questions, then it’s time to check your blog’s loading speed and improve it. A fast loading site gives users a good experience, attracts more traffic, and improves conversion.

And if you think your blog’s loading speed doesn’t matter, check the stats.

[td_block_ad_box spot_id=”custom_ad_2″ tdc_css=””]

A Few Website Load Time Statistics Worth Considering

A page that takes more than 1 second to load affects many aspects of your blog in the following ways:

  • Decreases page views by 11%.
  • Reduces customer satisfaction by 16%.
  • Reduces conversion rate by 7%.

Besides, 40% of your blog’s visitors are going to abandon it if its pages take 3+ seconds to load. As you can see, your blog’s load time is a precious element and that’s why you need to keep your site optimized for speed. In this article, you’re going to learn how to increase the speed of your blog and improve customer satisfaction and conversion.

Typically, certain factors can make your site take longer to load. Some are within your control such as image size and the number of redirects while others such as the server load time are out of your control. Start with a fast, yet affordable web hosting plan, such as Bluehost dedicated servers. A dedicated server or VPS account will have its own resources. Compare this to shared servers that are prone to slow loading speeds as many customers are sharing the same memory and processing power.

With a dedicated server, you have all the resources available to your website which helps to increase the speed of your blog and ultimately improve conversion. Before you start fixing the speed of your blog, you need to understand what a good load time is.

What is considered a good load time?

Generally, Google favors sites that take less than 3 seconds to load. If your blog pages take more than 10 seconds to load then you’re going to see a huge bounce rate of up to 123%. You will lose a lot of revenue on a blog that takes longer to load.

So, to stay on the safe sides, follow these tips to increase the speed of your blog.

1. Talk to Your Hosting Provider

As mentioned above, some factors affecting your blog’s load speed could be within or without your control. The last thing you want to do is to struggle to fix the other factors only to realize that your hosting provider is the key culprit.

So, before you start addressing the issue, let your hosting provider know that your blog is taking a long time to load to see whether they can help. If the problem originates from your hosting provider’s end, they will share tips and ideas to speed up your site.

2. Host Your Blog With The Right Provider

Typically, there’s no right or wrong web hosting provider but we recommend choosing a web hosting company that’s right for your needs.

Well, it’s easy to get tempted to choose the cheapest hosting option out there. There’s nothing wrong with that. After all, that’s what your budget can afford. However, for a high traffic blog, you should choose a web hosting company that can support your blog’s huge traffic.

Ideally, you have three options to choose from when it comes to deciding who and where to host your blog:

  • Shared web hosting.
  • VPS hosting.
  • Dedicated server hosting.

With shared and VPS web hosting, many customers share resources and this could have a toll on your blog’s load speed. Dedicated servers offer ample space and you get full control over your hosting. Although it’s costly, this is the suitable hosting option for a high traffic blog.

3. Use a Fast-Loading Theme

The internet has a wealth of themes you can use on your blog some of which are stunning and impressive-looking but can be a needle in your butt when it comes to speed as some are poorly coded.

A good rule of thumb is to choose a simple theme that’s optimized for speed. Before you choose a theme for your blog, make sure you test its speed.

4. Be Careful With Plugins

Similar to themes, there are a ton of plugins out there but you don’t need them all. In fact, some are poorly coded and may take too long to load which can slow down your blog. When choosing plugins, always consider ease of use, user experience, and performance. You can also run a speed test of each plugin you want before installing it on your blog.

5. Compress Images to Maximize the Speed of Your High Traffic Blog

Undoubtedly, images add attractiveness to your content and can help to increase engagement. In fact, some studies suggest that images increase your content readership by 80%. But if you don’t optimize your images for speed, then you’re going to not only decrease your content engagement but also your conversion rates.

You may want to compress your images either before or after uploading them on your blog. The image file format also matters a lot here. Generally, JPEG and PNG are the recommended image formats to use on your blog but you must keep them in the recommended size.

You can use Pingdom to see how big or small your images are and then optimize them for speed. If your blog is hosted on the WordPress platform, WP Smush is a good plugin to use for image compression. For non-WordPress users, Compressor.io is a great tool for image compression as well.

In Conclusion…

As you can see, optimizing your blog for speed is not only challenging but a hectic endeavor that can help improve your blog’s overall performance.

These are just a few tips on how to maximize the speed of your high blog traffic and improve conversion. There are many blog speed optimization tips such as the use of a CDN, minimizing HTTP requests, and many others.

Always keep your blog speed on check then look for possible issues and see how you can fix things the best way.

[td_block_ad_box spot_id=”custom_ad_3″ tdc_css=””][td_block_11 category_id=”3″ limit=”1″ td_filter_default_txt=”” tdc_css=””]
The best way to post panoramic photos on Instagram

The best way to post panoramic photos on Instagram

When Instagram first hit smartphones, every uploaded photo had to be in a square shape

This is not a problem in terms of photos and selfies, but for panoramic photos, Instagram has always encountered difficulties. Now, you can upload any photo to Instagram. However, not all will look good. Below is an explanation of the best way to post panoramic photos on Instagram on your iPhone and Android devices, along with an iPhone app that will make the photos look better.

[td_block_ad_box spot_id=”custom_ad_2″]

> Check next: How to automatically delete your location, search and web history from Google

How to post panoramic photos on Instagram

The simplest way to post panoramas is:

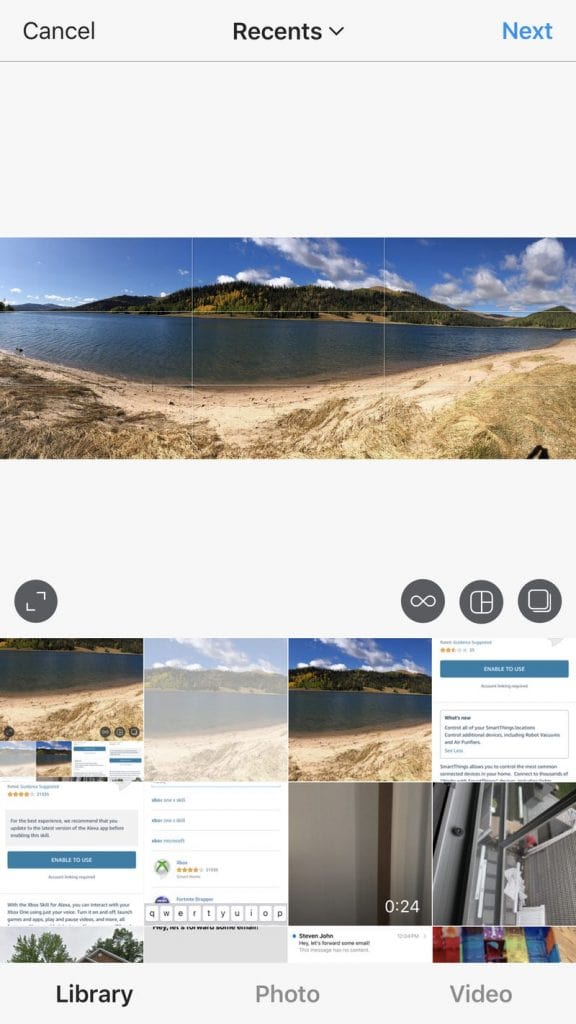
  • Open Instagram on your iPhone or Android, and press the plus icon below the screen to upload photos.
  • Once your photo gallery opens, select the panoramic photo you want to post
  • Touch the image with two fingers, and then reduce the photo so that the whole photo looks panoramic.
  • Add filters and post as usual.

The result is a rectangular photo with white space at the top and bottom. This method can adjust the size of the photo, but for full-size panoramic photos, it may not be possible to post the full photo.

Here is a program like Photoshop to cut the photo. If you have an iPhone, there is an app that will do all the work for you automatically: “Unsquared for Instagram“.

Download the app and give permission to access the photos. Then follow these steps:

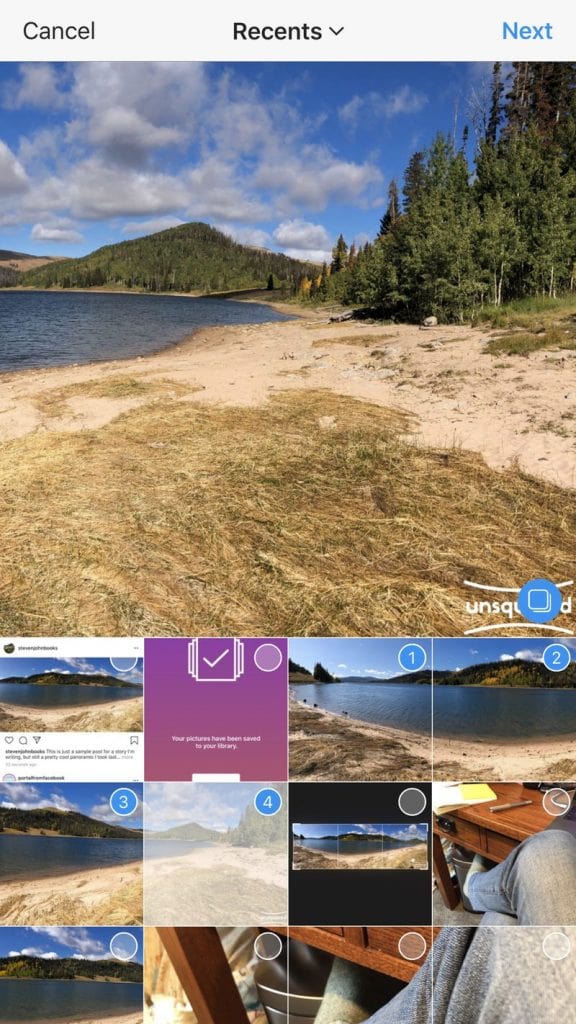
  • Open the Unsquared app and click the photo stack icon at the bottom right.
  • Click the photo from the gallery you want to use, and then click the blue sign.
  • The photo will be presented with the Unsquared sign on it.
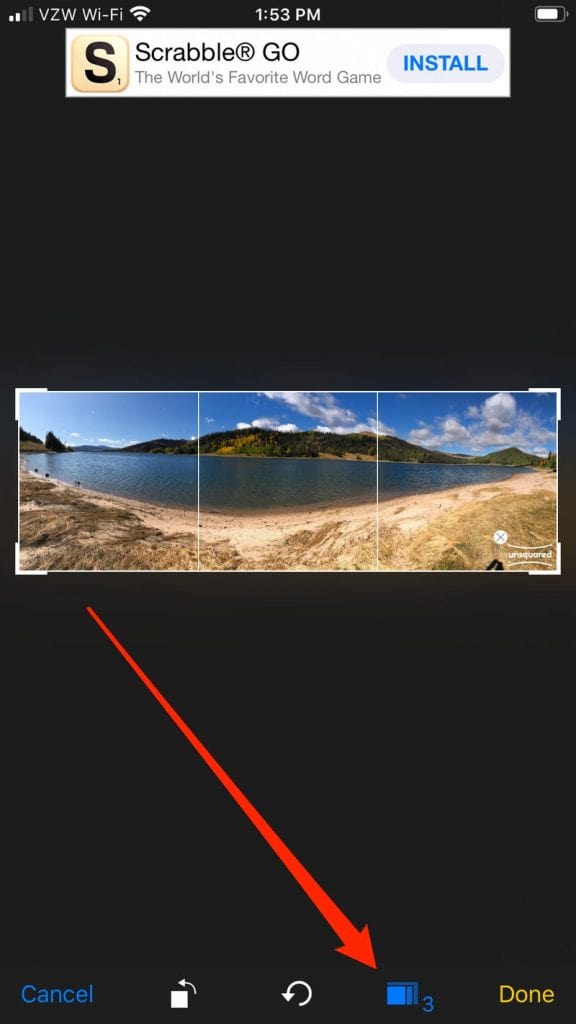
  • Press the blue icon that looks like a series of squares at the bottom of the screen, and you can now choose how many photos you would like the panoramic photo to be shared.

If you want to include each part of the photo, divide it into 3 parts. However you can split it into as many pieces as you want, but you can lose the top and bottom of the photo.

  • Once done, press “Done”. Separate photos will appear in your gallery, and you can post them on Instagram

sources/ businessinsider.com

> Check next: How to search for specific words in a YouTube video

So, that’s all about how to post panoramic photos on Instagram. Hope you found this article useful. Feel free to comment your opinions down in the comments section belowfollow us on Twitter and Facebook for more news and updates.

neoAdviser

[td_block_11 category_id=”3″ limit=”1″ td_filter_default_txt=””][td_block_ad_box spot_id=”custom_ad_3″]