Android Vs Android One Vs Android Go

Android Vs. Android One Vs. Android Go

Many of our readers ask what changes exist between Android, Android One and Android Go. If we are going to buy a product with these platforms what are the changes from a normal smartphone with the Android operating system above? Although the users of the three versions may seem to look the same, this does not stand absolutely on the part of mobile manufacturers.

[td_block_ad_box spot_id=”custom_ad_2″]

Android Vs. Android One Vs. Android Go

Below, the neOadviser will present you the main features of any type of operating system.

> Check out: Aptoide: How Was Born, How It Works And Is It Safe?

Android

Android is the basic ecosystem of most of the phones that are on the market today. Its clean version is called AOSP (Android-Open-Source-Project) and contains all the code you wrote but no Google personalization and even classic Google applications (Gmail, Youtube, Play Store, etc.). Android, as most users know, is Google, which is within Nexus and Pixels, and contains all the GApps, Google personalization and advanced operating system features without changing the UI graphic portion.

Android, like the AOSP version and the “Google” version, can be fully customized by partners that can modify the interface, graphics, apps, and many other parts of the code to optimize the ecosystem for a product, particular market category or needs them.

Android AOSP does not need real certification from Google, and if you want to use the GApps package, you have to go through Google’s approval, regardless of the applied customization.

However, we add that the Android “Google” that is present in Pixel can not be applied identically to other partners, as Google holds the exclusivity of some features such as Pixel Launcher and Google Now sideways (examples that may change over time and with new concessions).

Android One

This is an Android platform that, unlike the first, can not be customized by partners. The interface, features, and features currently run directly from Google based on the devices selected to officially access the Android One package. Manufacturers and partners can install some apps but can be uninstalled and updated through the Play Store without any problems from the users.

That’s because all Android One devices are tracked directly by Google, which updates them, releases new distributions, and considers them very close to Nexus experience for support and update speeds.

> Check Out: Download Modded Games On Your Android Device (How To)

Android One was born with the goal of bringing Android’s experience into emerging markets and increasing ecosystem expansion.

The main purpose was transformed over time because Android One’s phones are of great quality and available in many markets.

Android Go

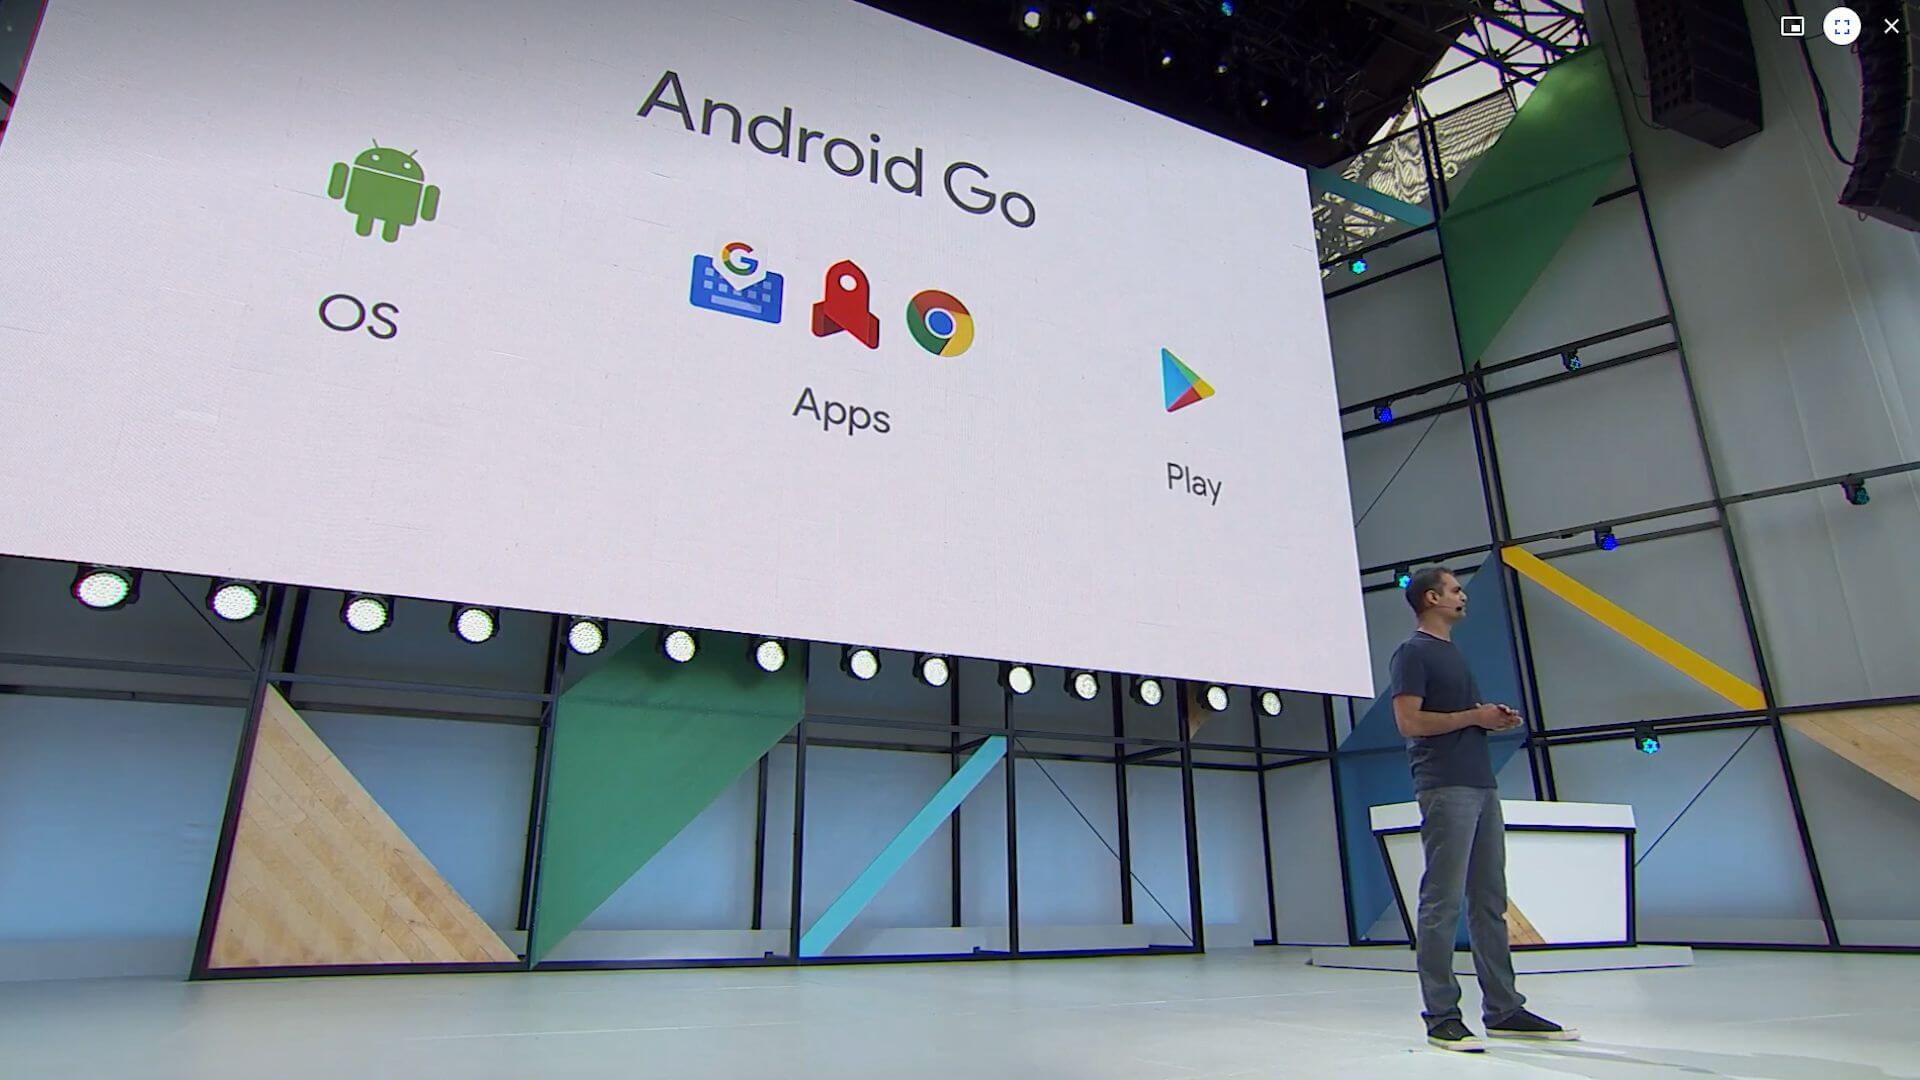
This is a real version of Android Oreo Lite. Based on the latest release of the ecosystem Google, Android Go, will reach 2018 and try to do what failed to bring Android One to emerging markets. Unlike Android One, the Go version is deeply different because:

    • Can be installed on devices with 1GB RAM or less (512MB)
    • there is another set of Google apps that have been optimized:
      • to consume less data from the internet
      • to get less RAM
      • to get less internal memory
  • uses all the Lite apps that developers have built in the Play Store (it’s suggested installing this type of app, but potentially you can also install the normal version on condition that you have the available memory)
  • will use Youtube Go and other optimizations from Google
  • will allow the integration of operator and customer plans throughout the ecosystem

Additionally, Android Go will receive the same type of support with monthly updates and distributions that are followed directly by Google. Just like for Android One, Android Go will not be able to be customized at system level and interface from partners.

> Read Next: Benefits of rooting Android phone or tablet

That’s all! Hope you found this article useful. Please let us know your thoughts in the comment section below,follow us on twitter and facebook for more news and updates.

neOadviser

[td_block_11 category_id=”3″ limit=”1″ td_filter_default_txt=””][td_block_ad_box spot_id=”custom_ad_3″]
Take Scrolling Screenshot Of A Website Using Firefox Quantum?

How To Take Scrolling Screenshot Of A Website Using Firefox Quantum?

Have you try Firefox Quantum a revamped Mozila Firefox version? What if you may know now that Firefox 57 has a arrived with an amazing tool with which you will be able to take scrolling screenshots or a full page screenshot from a website.

[td_block_ad_box spot_id=”custom_ad_2″]

If you use the latest Firefox browser (Firefox 57 and Up), making full page screenshot or scrolling screenshot is just a few click task. The best thing is that it is not needed to take multiple images screenshots.

> Check Out: How To Change Your Outlook.com Account Password (2019)

How to take scrolling screenshot using Firefox Quantum?

The Mozilla Firefox tool is available for all the platforms, like Apple MacOS, Microsoft Windows and Linux.

Follow theses steps to make scrolling screenshot:

  1. Open the website in Firefox browser.
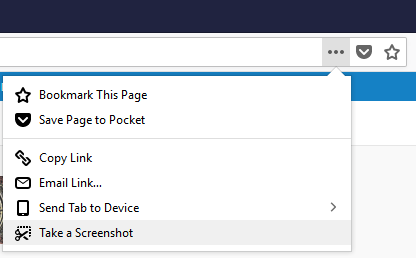
  2. Next in the right-hand side, click the Page Actions (three dots) button.
  3. Click “Take a Screenshot” in the drop-down menu.

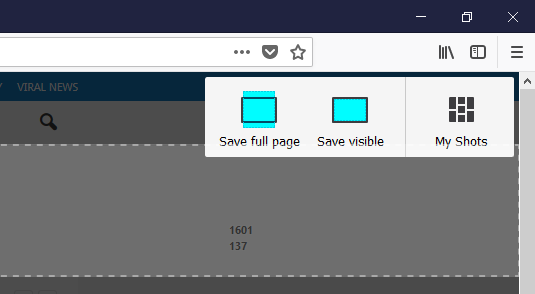
    take scrolling screenshot using Firefox Quantum
    take scrolling screenshot using Firefox Quantum

4. Next, for the full page screenshot of the site, click “Save full page option” in the top-right corner.

To capture the part showed and the screen choose “Save visible”. You can also choose also to select any particular area of the page using the mouse. The tool will help you to capture only what’s required.

5. For saving the scrolling screenshots, you can choose to download it on your device clicking on download button, or you can choose to upload it to Mozilla’s cloud storage (It’ll expire in 14 days).

> Read Next: How to make bootable usb flash drive

So, that’s how you can capture long screenshots easily by using Firefox Quantum. The uploaded screenshots can be accessed in My Shots, where you can share, download or delete then.There are some others Firefox add-ons to help you capture full page screenshots like Easy Screenshot, Nimbus Screen Capture, etc. Hope you found this article useful. Please let us know your thoughts in the comment section below,follow us on twitter and facebook for more news and updates.

neOadviser – How To

[td_block_11 category_id=”3″ limit=”1″ td_filter_default_txt=”” tdc_css=””][td_block_ad_box spot_id=”custom_ad_3″]
Add all friends to facebook group By Single Click

Add all friends to Facebook group By Single Click (How To)

Facebook groups are really a great place to discuss your unique topic with your friends and other members of that group. Group differs from Facebook Pages cos members outside the group can not interfere without the Admin permission. There are different types of groups like public, close, or secret. A great thing for Facebook Groups will be to add all members to the group just by a single click and not one by one to save some time. In a recent post, we have already shared tow methods on how to Invite All Friends To Like A Page On FacebookThe process shared there is only to use for Facebook Pages.

[td_block_ad_box spot_id=”custom_ad_2″ separator=””]

> Check out: How To Merge Facebook Pages: All You Need To Know

Steps To Add All Friends To Facebook Group At Once. (Two Methods)

So, today, in the article below we are going to share tow simple tricks on How To Add All Friends To Facebook Group At Once in a single click. So imagine if you have an account Profile with more than 5000 friends, adding than one by one to the group manually will be really time-consuming. But don’t wary! We got this. So make sure to follow the methods shared below to add all friends to Facebook groups with a single click.

Method #1. –  Add all friends to Facebook group Using Browser Script

  • Log to the Facebook account whose friends you want to invite.
  • Open the Facebook Group in which you want to add friends.
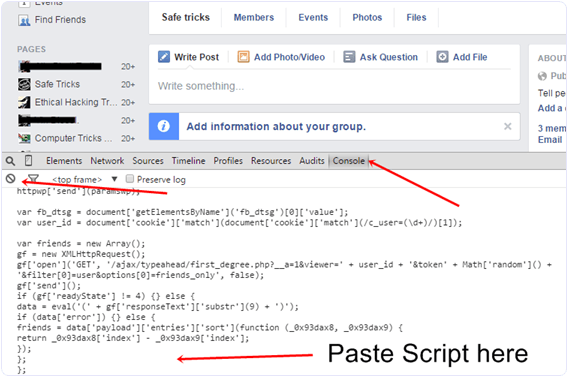
  • Next Click F12 button to open debugger, next select console box.
  • Copy the script from the below given button.
  •  Copy the whole provided code and then paste it into console box.
Add all friends to Facebook group Using Browser Script
  • Press enter and a process will start to send invitation.

Method #2. – Add all friends to Facebook group Using Chrome Extension.

In case the script above doesn’t work then another great way is by installing Google Chrome extension.

  • First, go and download the below-given extension on your chrome browser.

  • Once downloading and installing, open your Facebook group where you want to add friends.
  • Simply click on the visible icon on the top right corner of the browser to perform this task.
  • In a few min the process of adding friends will begin.

Note: – The script is totally safe so don’t worry about it. It will not compromise the security or mess with your account. But in case you have many friends, due to Facebook policy, your account may get blocked or you may be blocked of using groups for some time.

> Read Next: How To Accept All Friend Requests On Facebook At Once 

So, that all about How To add all friends to Facebook group By Single Click. Hope you found this article useful. Please let us know your thoughts in the comment section below, follow us on Twitter and Facebook for more news and updates.

neoAdviser

[td_block_11 category_id=”3″ limit=”1″ td_filter_default_txt=”” tdc_css=””][td_block_ad_box spot_id=”custom_ad_3″ separator=””]
Avengers 4 Endgame 4K Wallpapers Download (Mobile & PC 2019)

Avengers 4 Endgame 4K/HD Wallpapers Download (Mobile & PC 2019)

As long as Avengers 4 Endgame official trailer goes online, many fans of Marvel are searching for the best Avengers Endgame 4 HD wallpapers for PC, Android and iPhone. 

[td_block_ad_box spot_id=”custom_ad_2″]

Avengers 4 Endgame trailer, alongside, has for sure added to many questions in the mind of everyone.  Here, in this post we are sharing some awe-inspiring Avengers: Endgame wallpaper 4k/HD for you to download an make the screen of your device enchanting.

> Check Out: 4K/HD Wallpaper Of Game Of Thrones Season 8 (+Season 7)

Avengers 4 Endgame 4K/HD Wallpapers Download (Mobile & PC 2019)

In the new and most waited upcoming Avenger’s Endgame  we are going to see the new character “Captain Marvel”. So here in our collection of Avengers Endgame 4K/HD Wallpapers  we also have added some Captain Marvel Wallpapers. The good news about the upcoming Avengers Endgame is that it will be released on April 26th, 2019.So while waiting, go and download these HD/4K wallpapers of Avengers Endgame to make you device screen looks charmy.

Top 20+ Best Avengers Endgame 4K/HD Wallpapers For Android and iPhone

> Read Next: Download Modded Games On Your Android Device (How To)

So, these are Top 20+ Best Avengers Endgame 4K/HD Wallpapers. If you have any other favorite, please let us known the comment section below, follow us on twitter and facebook for more news and updates.

neOadviser

[td_block_11 category_id=”3″ limit=”1″ td_filter_default_txt=”” tdc_css=””][td_block_ad_box spot_id=”custom_ad_3″ tdc_css=””]
Download Modded Games On Your Android Device (How To)

Download Modded Games On Your Android Device (How To)

Now-days hundreds of apps are developed for Android devices and we all want to try then on, but most of then are not free. There are many ways or methods used to Hack apps, like ex. you can hack game’s premium features, money, etc. However, with these methods, you can just directly download modded apk on any device. Today, in the article below, we are going to share some methods to download or grab any modded APK to any of your android devices. You will also get paid apps for free. Go through the article to know more about it.

[td_block_ad_box spot_id=”custom_ad_2″]

> Check out: How to Find Direct Download Link to Any Movie (Two Methods)

Download Modded Games On Your Android Device (How To)

With these methods, you will download or grab modded apk directly on your device so you will not need any other app to hack your apps/games. The other best thing is that you will not need to root your android device. So, follow the article below to download directly modded games on your Android device.

Download Modded Games On Your Android Device – Using TuTuApp

  • Step 1. Firstly, download and install TuTuApp on your Android device.
TuTuApp
TuTuApp
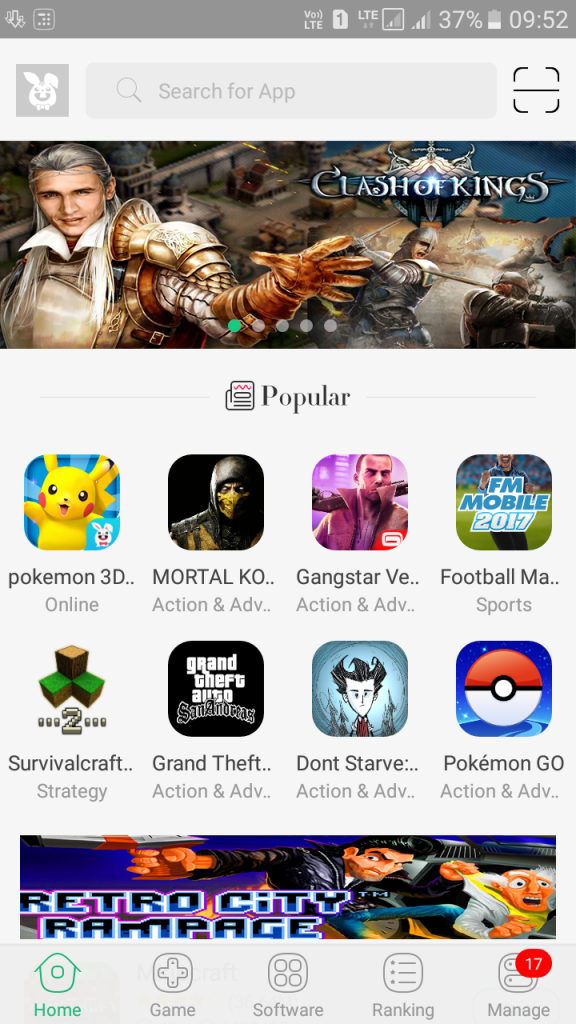
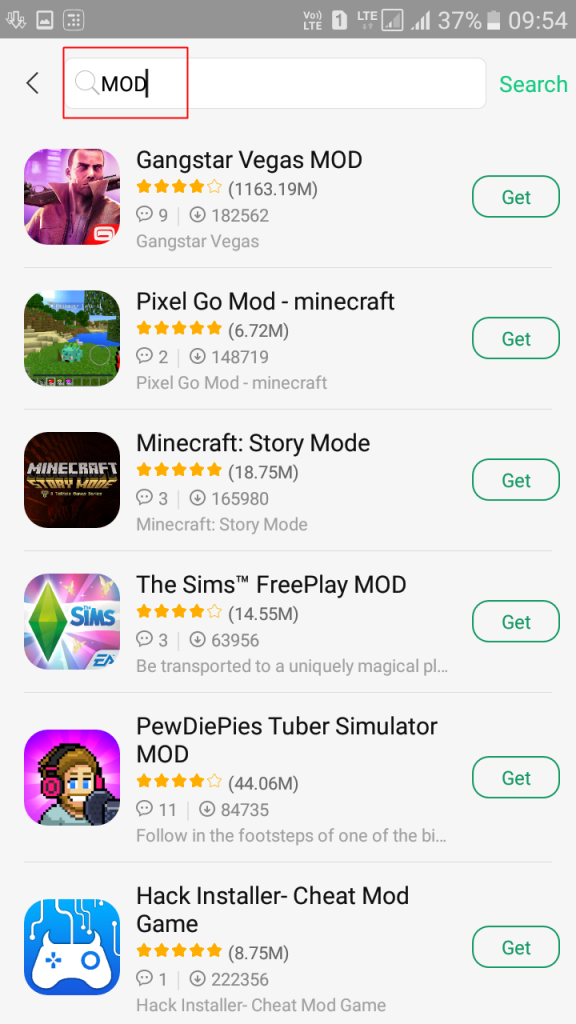
  • Step 2. Open it on your device; you will get a screen like below.

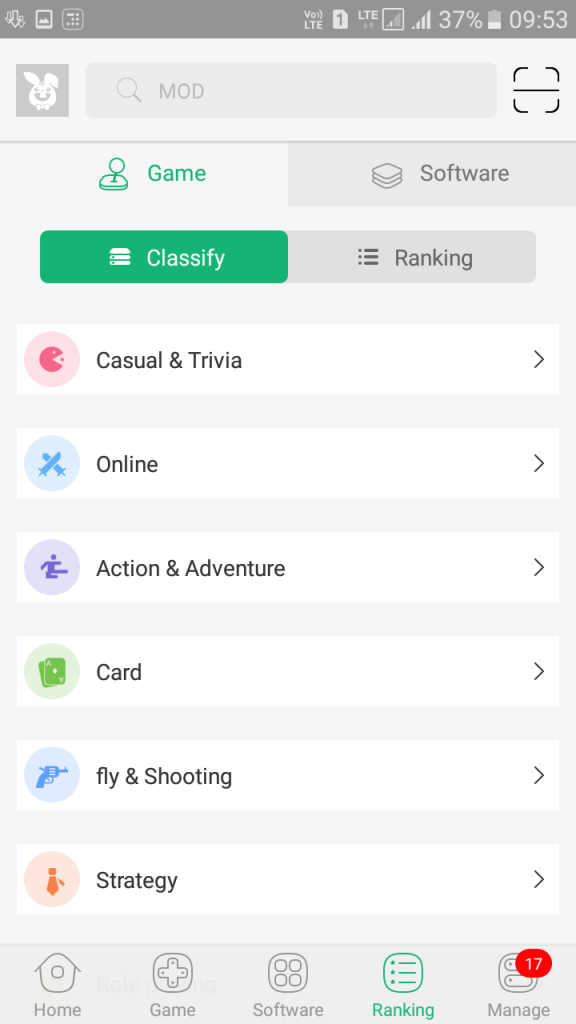
  • Step 3. So here you can now browse through various categories like Google Play Store but with the difference that here all the apps/games are free.

  • Step 4. If you want to download and install modded apk, simply browse in the app to discover various modded apps or you can search even for “MOD” in the search bar.

So that’s all. Simply search, download and install any modded apk without the heed of other apps like Lucky Patcher.

> Check out:  How To Partition A Hard Disk Without Formatting (Two Ways)

Download Modded Games On Your Android Device – Using Blackmart Alpha

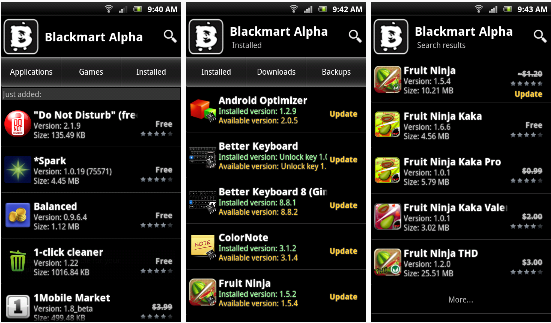
Blackmart Alpha is a marketplace where you will find hundreds of Apps and games to download on your Android device. This is the best Google Play Store alternative for you to have on your smartphone.

Blackmart Alpha provides many paid games and Apps for free, which is a really great feature. We can even say that almost every paid app that is available on Google Play Store is available here for free.

The app is not available to download from Google Play Store. To find the apk file of this app just do a google search and find it. Before installing make sure to enable “Unkown source download”, on your device.

> Check next: How to use your Android smartphone as a webcam for your PC

So that’s all about how to download paid apps and games for free. Also, you can directly download modded apk to your Android device. Hope you found this article useful. Please let us know your thoughts in the comment in the section below, follow us on Twitter and Facebook for more news and updates.

neoAdviser

[td_block_11 category_id=”3″ limit=”1″ td_filter_default_txt=””][td_block_ad_box spot_id=”custom_ad_3″]
Root Android without PC

How to Root Android Without Pc (100% Working) (2019)

Google released the Android 8.0 update for all supported Android devices and also launched Google Pixel 2 ships with Android 8.0. The update is available for all to download as fastboot flashable factory images, but there’s no sign of Android Orio OTA updates yet. But if you are a developer, you can install a beta version of any Android OS before the official release. But for that, you have to Root your Android device. Now, what is rooting?

WHAT’S ROOTING?

Rooting means getting superuser permissions to your Android Device. With this superuser privileges, you can access all Android system files and folders. Also, you can install custom ROMs, enhance performance, increase battery life, and the ability to install Root applications. In other words, you will get instant access to the root directory of your android mobile.Root Android Without PC, it is like Jailbreak for Android.

[td_block_ad_box spot_id=”custom_ad_2″ separator=””]

Earlier, a Rooting process required some tools and complex procedure but now you can Root Any Android Phone within a minute, and that is without PC or Laptop.

The rooting procedure which I have given here doesn’t require PC or Laptop. All you need to do is download a simple Android App and follow mentioned steps. But there are some disadvantages of Rooting like warranty may get void.

HOW TO ROOT ANDROID WITHOUT COMPUTER PC?

Rooting voids warranty, but you can unroot your Android phone & restore to factory settings any time if you know what you do. Hope you have some insight into rooting & its background. There are so many Android Apps which are available on Google Play Store including FramaRoot, Universal Android Root, Towel origin, vRoot that allow users to Root Android Phone without P

Pros:

  • Access all files Android Files and Folders
  • Increase performance by over clockocking
  • Increase battery time.
  • Install custom ROMs
  • Access Root Apps
  • Increase RAM

Cons:

  • Your phone might hard brick
  • Data loss
  • Warranty killed,
  • Random reboot
  • No More Privacy

Ok so if you have decided to Root your Android phone then fine. Below are some cool apps that you can use to Root your Phone. But before going to install them, you have to enable Unknown Sources from Settings > Security if it says Installation is blocked.

POING TO REMEMBER:

Before going to use these apps, first follow some basic steps:

  • Always Take a Complete backup of your Android Phone.
  • Battery Should be 60% or Above.
  • Read all the steps first and then perform Rooting.

1. FRAMAROOT

FramaRoot is one of the best and popular App to Root Android device. FramaRoot is available on Google Play Store.

How to use the Framaroot app:

Step 1: Download Framaroot from here.

Step 2: Install it on your android phone > Open Framaroot app.

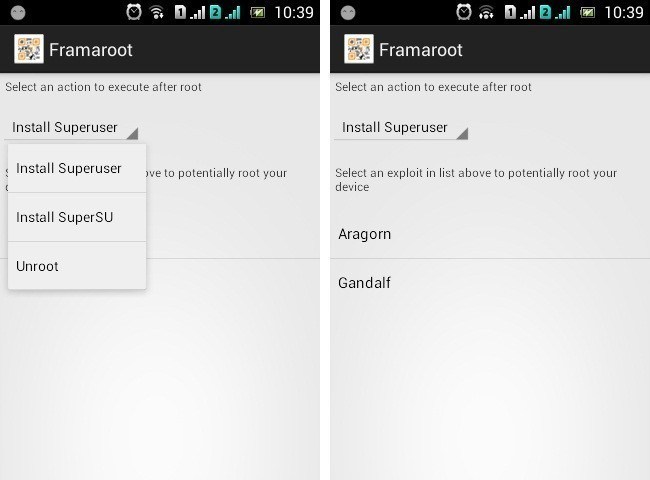
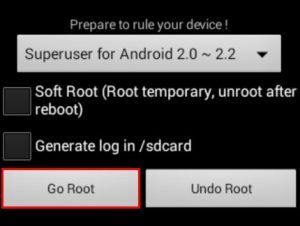
Step 3: Click install superuser and select any exploit.

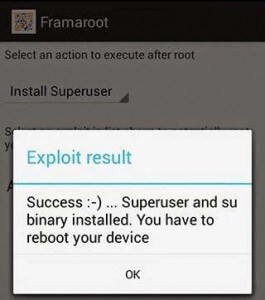
Step 4: You will see Success Message.

2. UNIVERSAL ANDROID ROOT

Universal Android Root is one of the simplest app to root android mobile safely. Steps to root the phone using Universal AndRoot:

Step 1: Download Universal Root.

Step 2: Install it > Open it.

Step 3: Click on Root to begin rooting process.

3. IROOT

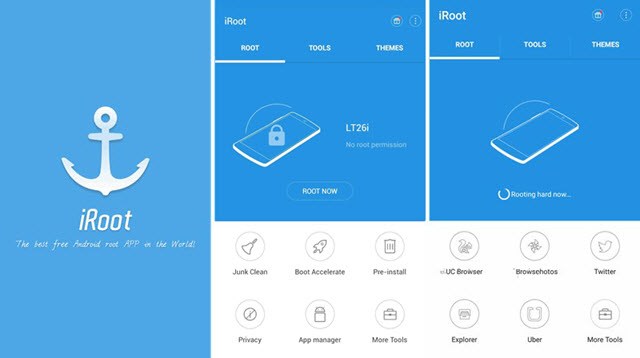
iRoot is a Chinese app, and it is a simple app to Root your Android phone within a minute.

Step 1: Download iRoot from here.

Step 2: Install it and then Open iRoot app.

Step 3: Click on I Agree and then click on Root button.

Step  4: Wait for sometime, and it’s done.

4. Z4ROOT

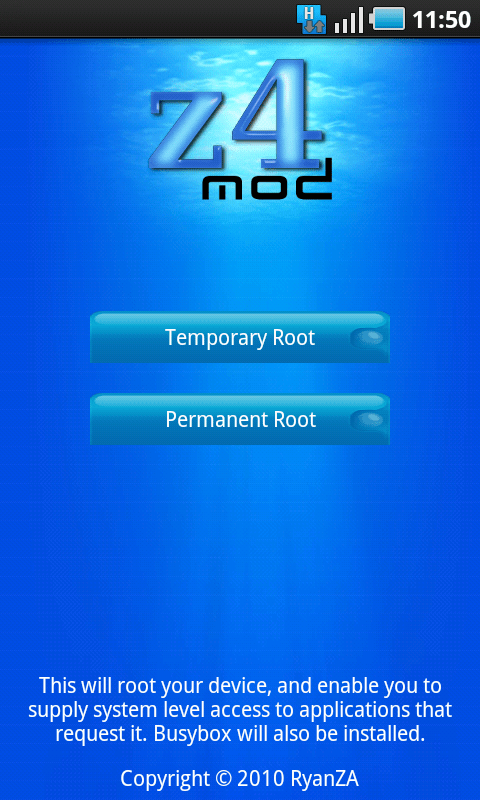
Z4Root is the oldest app to root android without a computer. Follow these steps:

Step 1: Download Z4Root apk file from here.

Step 2: Install it and open it from the app drawer

Step 3: Click on Root button.

Step 4: Wait for sometime and its done.

5. TOWEL ROOT

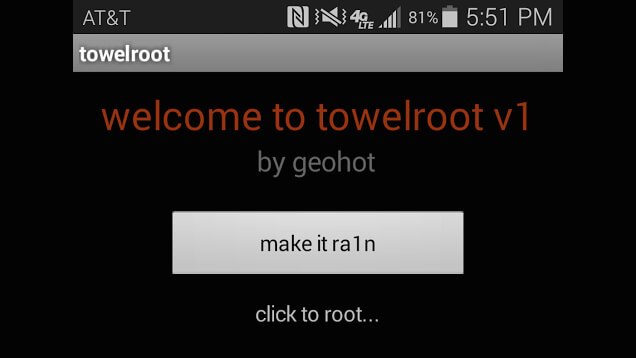
Towel Root is one of the lightweight Android App to Root Android devices easily.

Step 1: Download Towel Root app from here.

Step 2: Once you have downloaded, Install it and Open Towel Root.

Step 3: Click on Make it Rain.

Step 4: Now, Just wait for sometime.

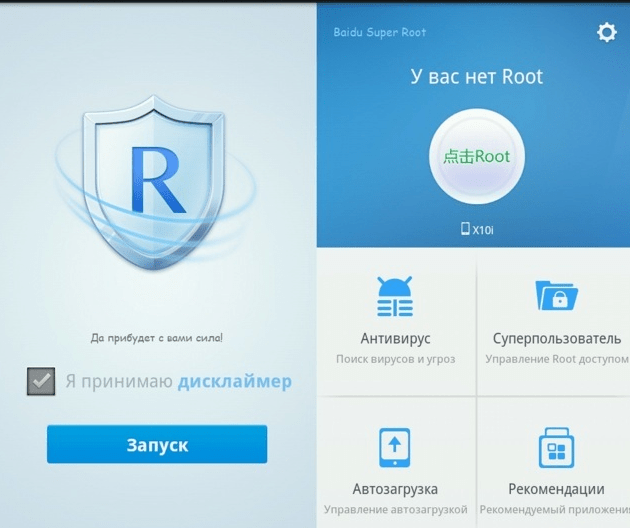
6. BAIDU ROOT

BaiduRoot is available for both PC and mobile to root android phone.

Step 1: Download Baidu Root

Step 2: Install APK > Open Baidu Root app

Step 3: Click on Root button and wait till it reaches to 100%.

Step 4: Restart your android phone.

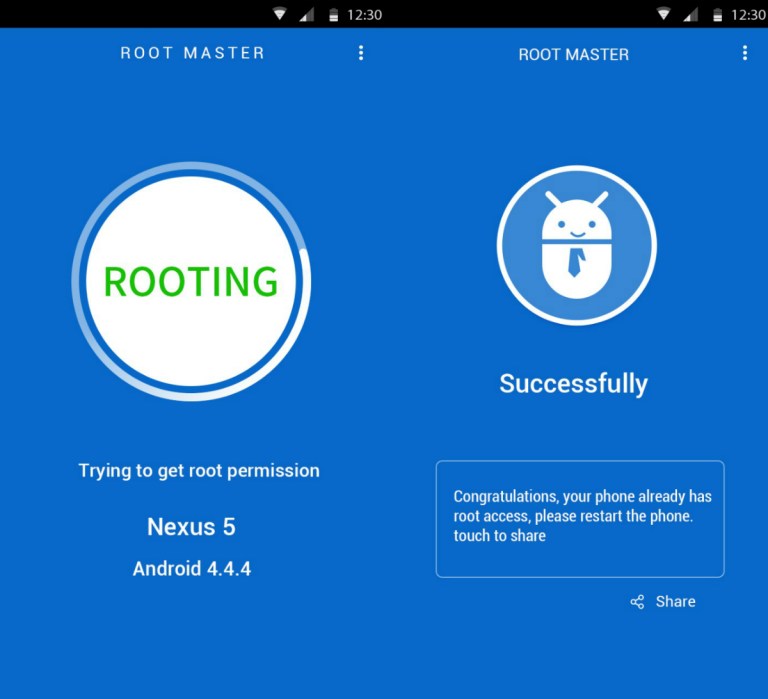
7. ROOT MASTER

Step 1: Download Root Master app from here.

Step  2: Install APK > Open Root Master app

Step 3: Click on Tap to root.

Step 4: Wait for sometime and its done.

8. KINGROOT

How to root Android Using Kingroot

  • Download kingroot in your phone and open it
  • Now click Green root Button
  • Wait a minute for finish this process
  • After finish, reboot your android and done

HOW TO CHECK IF YOUR PHONE IS ROOTED OR NOT?

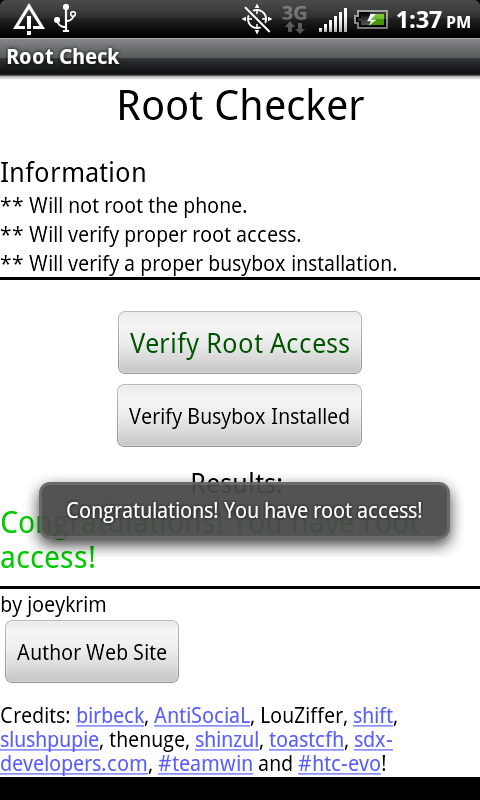
There is an app called Root Checker that you can use to check if your Android Phone is rooted or Not.

Using root Checker App

Step 1: Download Root Checker App (link)

Step 2: Open it, & Click on Check Button

tep 3: When asked for permission, click on grant.

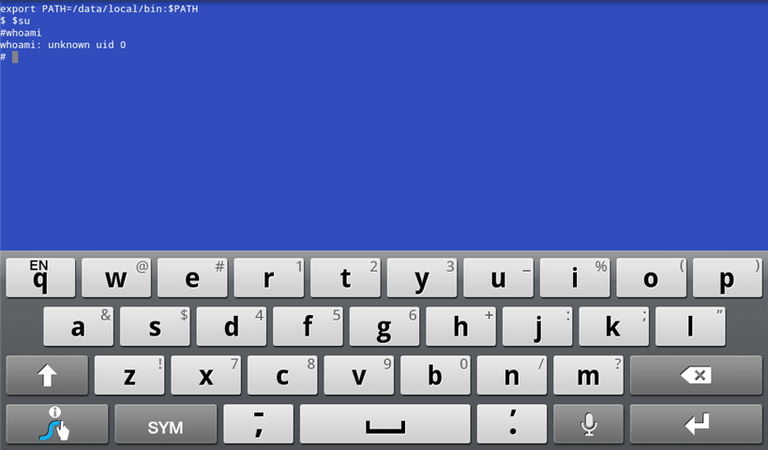
Check root Access With Terminal Emulator

Step 1: First Download Terminal Emulator From Here

Step 2: Install > Type su and press enter

Step 3: If there’s a pound sign (#) then your device is rooted.

The most recent version is now able to play most of the apps, including top 3D games. After the download completes, the same computer is currently prepared to share. All these things are vital if you need to continue to keep your PC free of threats from both the web and offline sources.

You may conduct a android backup. All you have to know is you can save full backups of your phone and restore it at any moment. In case you haven’t done so already go on and plug the USB drive into your system. You may be pretty impressed with the operation of your Android phone.

source/ tricksmaze.com

So, which APK rooted your android phone without a computer? We would love to hear about it in comments below. If you’re having any difficulty in any of the above methods, then feel free to comment below.

[td_block_ad_box spot_id=”custom_ad_3″ separator=””][td_block_11 category_id=”3″ limit=”1″ td_filter_default_txt=”” tdc_css=””]
unroot your Android phone

How to unroot your Android phone or tablet [2019]

Rooting your phone and unlocking its true potential is one of the best parts of the Android ecosystem, and just one of the things that sets it apart from Windows 10 Mobile and iOS. Of course, it isn’t for everyone. For one, the process is a bit complicated. Not to mention the fact that you could potentially harm your device, and tinkering with a handset can void the warranty, resulting in an unfortunate situation.

[td_block_ad_box spot_id=”custom_ad_2″ separator=””]

Don’t want to be part of the root club anymore? Being in Google’s protective arms is definitely nice, and it is an inconvenience that root generally gets in the way of updating your software over the air. Additionally, when it comes to selling a phone, many buyers want the “out of box” experience, as if the phone were brand new, which root technically detracts from.

The thing is, there’s plenty of tutorials out there for rooting a smartphone, but not as many show you how to unroot. Let’s fix that!

See also – Benefits of rooting your phone

Unroot by using SuperSU

Many users take advantage of SuperSU, a popular tool for managing rooted devices. Among its many features is the ability to unroot your device.

The process is as simple as they get. Just open the SuperSU app and head over to the Settings tab. Scroll down and select “Full Unroot”. Follow instructions and let the phone do its thing. After it takes care of business, just restart the phone and you will be back to normal.

Unroot by using an app

Not using SuperSU? There’s a slight chance you might still be able to unroot your phone by taking advantage of a simple app. The only caveat is that these applications don’t seem to work well with every smartphone out there. It’s kind of a hit or miss.

The most popular option is Universal Unroot, which can easily get rid of root privileges in Android devices. Sadly, there’s plenty of downsides. For starters, a bunch of Samsung devices won’t work, due to a complication with KNOX. LG devices will be unrooted, but they will still show as rooted afterwards, thanks to LG’s eFuse.

I will say this is a bit of a gamble, as it costs $0.99, but that might be worth it if you don’t want to play around with your phone too much

Unroot by using a file manager

Root access might seem like a complicated set-up, but it’s really nothing but a bunch of files on your phone. Get rid of them and root will also go away.

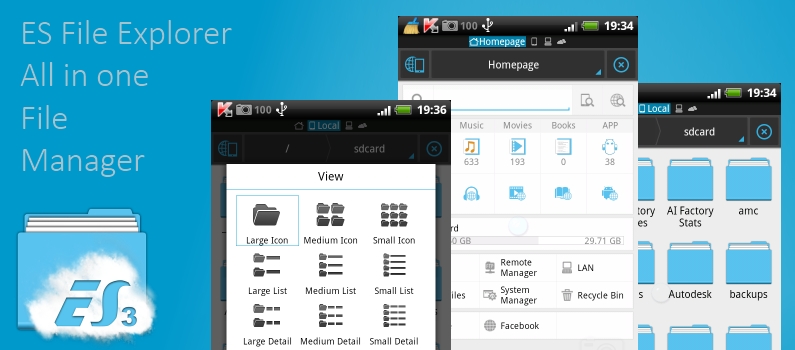
To do this, you will need a file manager with root access. My favorite one happens to be ES File Explorer (just turn on root access in the settings).

  1. Access your device’s main drive and look for “system”. Select it, and then tap on “bin”. From there, delete “busybox” and “su”. By the way, these might not be there. If that is the case, move on to the next step.
  2. Go back to the system folder and select “xbin”. If the files are there, go ahead and delete both “busybox” and “su”.
  3. Go back to the system folder and select “app”.
  4. Delete “superuser,apk”.
  5. Restart the device and it will all be done.

Unroot by installing an OTA update!

Remember we told you root gets in the way of updating? Well, that is only if you want to update the traditional way, you can still push updates manually. We won’t get into those details right now, but the trick here is that software updates tend to break root access. Most users have to root again, but if you don’t want root it’s easy to simply install your next update.

The obvious downside is that you do have to wait for an update to arrive. Oh, and don’t forget to uninstall SuperSu and any other root-related apps. Alos keep in mind that this will only work when using the stock recovery on your device.

Unroot by installing stock firmware

Taking the phone back to its original firmware is usually the best way to unroot a phone. There’s no ifs or buts here, it will work regardless of your device, ROM, kernel or recovery. This is because the firmware has all the necessary software packaged together.

The only sad part is that we can’t quite give you a tutorial. Phones have different ways of accomplishing a firmware install, so you will have to do a bit of research on how to do this to your specific smartphone. Users will need to download their specific firmware files, use USB Debugging and possibly download some PC software.

Wrapping it up

So there you have it, guys. Now you have the necessary tools for getting your phone away from the potentially dangerous world of rooting. Remember smartphone hackery is not exactly for everyone!

> Read Next: Cellphone Battery – that’s what you need to know (8 Tips)

Have any of you guys tried these methods? Hit the comments to let us know your experiences. I have personally only used the last option. I feel like clean starts are always better, but I do have to say it makes me work and research much harder. Any other tips you can think of? Share them down in the comments below.

surce/ androidauthority.com

[td_block_11 category_id=”3″ limit=”1″ td_filter_default_txt=”” tdc_css=””][td_block_ad_box spot_id=”custom_ad_3″ separator=””]
Benefits of rooting Android

Benefits of rooting Android phone or tablet [Advantages]

Rooting… a world not every user dares venture into. We wouldn’t blame you if you are wary of doing this. It’s intimidating when manufacturers keep telling you tinkering with a phone can void your warranty and/or harm your device. And it’s true – you may be left on your own if something goes wrong and you decided to play around with your phone’s stock software.

[td_block_ad_box spot_id=”custom_ad_2″]

With that said, we can also tell you there are plenty of reasons why rooting may be the best thing you can do to enhance your smartphone experience. Are you thinking of taking the road less traveled but need a little push? Below we talk about some of the key benefits of rooting.

Disclaimer: Just be sure you do your research well and be careful if you decide to unlock your phone’s full potential by rooting. As mentioned above, these procedures can void your warranty and/or brick your handset. No one but you will be responsible, should it come to that.

TipAlready rooted but looking to go back to a ‘normal’ state? Here’s our guide on how to unroot your phone or tablet

Get rid of pesky bloatware

Here’s a big benefit of rooting: you can get rid of that bloatware!

The first benefit of accessing administrator privileges over Android is full control over the applications installed on your handset. No longer do you have to suffer from the cluttered app drawers and reduced memory space taken up by pre-installed carrier and manufacturer applications, you can instantly cut the bloatware and keep only the apps that you really want.

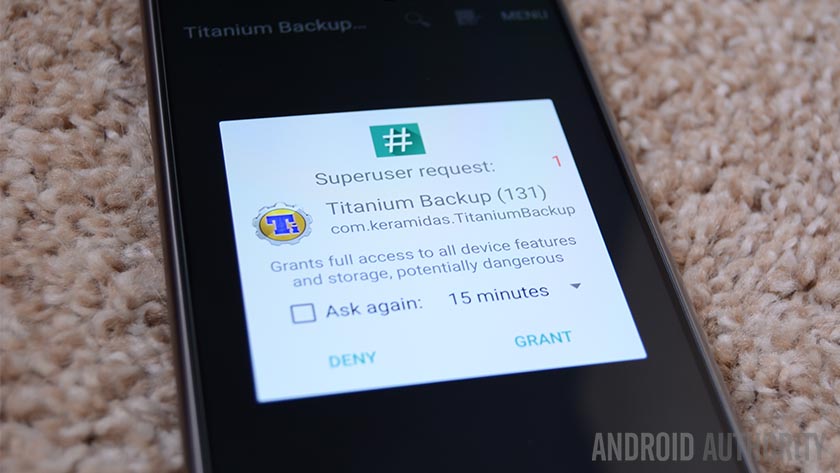
Even if you’re up to date with Android 4.1 or above (which should apply to everyone pretty much anymore), which grants users the ability to disable these pre-installed apps if you don’t want to see or use them, you can’t permanently remove them. They’re still there eating up your memory space. Rooting is the only way to permanently get rid of these pesky apps, but please don’t uninstall something crucial or your handset may stop working properly. Apps like Titanium Backup are particularly helpful for organizing and culling this bloatware.

Real backups

This brings me nicely on to the next major benefit of rooting Android, improved backup and restore options. Yes, the cloud can back up some of your settings and app downloads, but that is not really a true backup; it’s just a list of things for the phone to download and change. Want to keep everything the way it was? You will need to root.

As already mentioned, Titanium Backup is one of the most popular backup apps used by rooters, and this, or a similar app, is essential if you’re going to start tinkering around with Android software. But as well as acting as a safety net in case you uninstall something important, Titanium Backup can also be used to backup your user data… any and all user data.

Even better, once rooted you can create complete backups of your entire handset using the ClockworkMod Recovery option, providing you with extra protecting in case of a major malfunction. Recovery can only be accessed before booting into Android, but it provides additional backup options in case, for whatever reason, Android fails to boot properly or experiences a crippling error. This makes ClockworkMod Recovery an essential tool for those looking to install custom versions of Android.

You don’t wait around for manufacturers and carriers for updates

Once you’re fully backed up you’re ready to move up to one of the other major benefits of rooting – installing different versions of Android.

We all know manufacturers are often pretty slow at delivering the latest Android offerings even to their flagship handsets, let alone aging devices. Some are getting better at it, but this is still an ongoing issue for many users. So if you’re not a Nexus or Pixel device owner, rooting opens the door to much faster Android updates, thanks to the developers who put time into porting the latest updates to various handsets.

Pretty much every semi-popular handset has a decent following of developers working on porting the latest versions of Android to their handsets, most of which can be found over at the XDA Forums. The only sacrifice here is that you won’t receive official manufacturer versions of Android, so you might not enjoy all the features your phone came with, but if we were really too worried about that we probably wouldn’t be rooting  in the first place.

We can’t forget those custom ROMs

If stock Android isn’t your thing, there are also tons of other customized ROMs offering unique features and improvements to the default Android experience.

I’m sure you’ve all heard of the biggest names, like Lineage OS, Paranoid Android and MIUI, to name just a few of the most popular ones. Many custom ROMs are actually at the forefront of innovation on Android, offering several features that aren’t available anywhere else.

But as well as these big third party developments, you’ll also find a lot of smaller developers tweaking away at the core Android experience, offering ROMs with vastly superior battery life or overclocked processor speeds. Not to mention that most custom ROMs are updated to the latest version of Android very quickly too, bringing you the best of both worlds

Overclocking and underclocking

Remember when all phones were slow? Well, not all, but they all needed that extra push. A very popular thing to do among root users was overclocking the processor to make things more snappy. Even mid-end smartphones are pretty fast now, so there is not much of a need, but some of you may still want to speed things up.

But even if overclocking is no longer as popular, you will find that altering processor speeds is definitely convenient. Got a super powerful phone and want to save battery? Why not underclock the processor? Sometimes we don’t need all the power our specs have to offer, and we could really use saving resources. That makes this one of the most unsung benefits of rooting.

Apps that do more

As rooting opens up administrator type privileges on your handset you’ll instantly have access to all the core files on your handset. File browser apps can take full advantage of this, allowing you to move stuff around on your internal memory if so require.

App wise, we’ve already touched on Titanium Backup, but there are far more apps that can make use of root permissions, and simply aren’t available with a non-rooted device. Fans of custom ROMs can even use a ROM manager to install and update their operating system without the need to flash zip files from Recovery.

Rooting is sometimes criticized for compromising handset security, but security apps, such as Cerberus and Avast, use root functions to bury themselves deep down into the operating system, making them hard for would be thieves to remove. These apps can also be granted permissions that aren’t available on unrooted devices, such as access to GPS data even when the device is locked.

There’s also additional gesture apps, data syncing software and even theme managers to customize the look of your handset.

Dress to impress

My final reason for rooting your handset is the wider range of customization and theming options, after all who doesn’t want their home screens looking snazzy.

Although there are options to tweak themes and whatnot that don’t require rooting, usually through third part launchers such as Apex and Nova, rooting gives you access to the important files needed to make changes in folders that are usually hidden from users. Access to the /system/fonts folder allows users to install and replace custom fonts. You can also flash zip files from Recovery to install themes too. But if all that folder browsing isn’t for you, there are also a some great root-only theme applications to choose from.

Wrapping up

As you can see there’s plenty of benefits of rooting Android. If those aren’t enough reasons to root your handset, then I don’t know what is. Why do you root your device?

source/ androidauthority.com

[td_block_11 category_id=”3″ limit=”1″ td_filter_default_txt=”” tdc_css=””][td_block_ad_box spot_id=”custom_ad_3″]
Make a Keylogger

How To Make a Keylogger Using Notepad?

Keylogger is a simple surveillance tool which records all the keystrokes typed by a user.

A Keylogger can be quite dangerous as it can record all the keystrokes and track the activities of the individuals and get the open websites recorded. So, what happens is, your account would get easily hacked and accessed by hackers.

Here I am going to share some methods for notepad Keylogger which are just for the educational purpose not to be used in any terms of professional or basic hacking. Do not use these methods to make a Keylogger in notepad to harm anyone.

[td_block_ad_box spot_id=”custom_ad_2″]

Make a Keylogger Using Notepad

Step 1: Firstly open the notepad in your Windows OS.

Step 2: Once the notepad opens, you need to copy and paste the below-given codes into it to make a keylogger in notepad. Make sure that there are no empty or extra spaces between the characters and sentences:

@echo off
color a
title Login
cls
echo Please Enter Your Email Address And Password
echo.
echo.
cd “C:Logs”
set /p user=Username:
set /p pass=Password:
echo Username=”%user%” Password=”%pass%” >> Log.txt
start >>Program Here<<
exit

Step 3: Once you have written the code, then you would need to save the given notepad file as logs.bat in the given desktop.

Step 4: After that, you would need to create a new folder called logs. Here one thing that you need to keep in mind is that the keylogger would only work if the folder has the name ‘logs’. It is important to make a keylogger in notepad.

Step 5: Then you would need to cut this folder and get it pasted into the C drive.

Step 6: Now what you need to do is test the file Log.bat and you would need to enter the username as well as the password. After that, you have to open the folder stored on the C drive and check whether all the given saved key logs are present as a normal text. This is created automatically. It is the important steps in notepad keylogger method.

Step 7: If it is done, then you have successfully developed the notepad keylogger to make a keylogger in notepad.

Frankly, with the above step, you can easily record all the various keystrokes of the keyboard which have been entered or used in the batch file. Plus you can even surprise your friends by telling them that their username and password is present in the notepad. We hope you understand the method on how to make a keylogger notepad given above. You can easily use this notepad keylogger if you follow every step from above.

source/ technotification.com

[td_block_11 category_id=”3″ limit=”1″ td_filter_default_txt=”” tdc_css=””][td_block_ad_box spot_id=”custom_ad_3″]
5 new WhatsApp features that will be released in 2019

5 new WhatsApp features that will be released in 2019

The highly popular communication application purchased by Facebok in 2014 today counts 2 billion active users per month. WhatsApp is definitely one of the most used today.

[td_block_ad_box spot_id=”custom_ad_2″]

Provides text, audio and video calling, as well as sending of diverse images and content.

During 2019, the application will be equipped with some wonderful functions. Some of them are like “WhatsApp Dark Mode” and new “Sticker”. These are the five new WhatsApp functions that will be released in 2019.

> Check Out: How to Download Stickers in WhatsApp

1. Lock through fingerprint scanners

There has been speculation about a fingerprint scanner application system. Each time you try to open the application and view the messages on the screen, you will be asked to place your fingertip. This feature can be disabled manually.

2. WhatsApp Dark Mode

This feature will be very useful during late night talk with your friends and family. Automatically identifies when turning off the lights and passing the darker interface. Most of this feature benefit your eyes.

3. Fantastic sticker

Users will be able to search for the latest stickers from the search panel. Also look for stickers even when writing messages.

> Check Out: Sticker Studio: Now you can convert any photo to sticker for WhatsApp.

4. Constant audio messages

This fantastic feature is useful for those who often communicate with audio. Automatically will play the next audio message after the existent has finished. So why not press the other audio message after finishing the first.

5. Displaying videos to notifications

This feature shows a brief glimpse of a video that may have been sent directly from the notification panel. The current versions of WhatsApp present only images and GIFs in the Notifications panel. The feature also applies to YouTube videos. You can also play videos directly from the WhatsApp app without going to the YouTube app.

> Read Next: The two fastest browsers in the world,Android and iOS!

Hope you found this article useful.Please feel free to let us know your thoughts in the comment section below,follow us on twitter and facebook for more news and updates.

neOadviser

[td_block_11 category_id=”3″ limit=”1″ td_filter_default_txt=”” tdc_css=””][td_block_ad_box spot_id=”custom_ad_3″ tdc_css=””]