Bulk Delete Facebook posts

How to bulk delete your old Facebook posts

The social network Facebook has become a daily part of many people for some time now and most likely most of them have so far made “tons” of posts. For those who find the old posts inappropriate now, they may delete them one by one and this process can be very lengthy and tedious. Fortunately, Facebook now lets you delete or archive than in bulk. Facebook seems to have realized that most people want to bulk delete old posts and has recently launched a new feature that allows its users to delete multiple posts in bulk. Here’s the how-to guide to delete a piece of Facebook history in bulk through a very simple process.

[td_block_ad_box spot_id=”custom_ad_2″]

> Check out: The best way to post panoramic photos on Instagram

How to delete your old Facebook posts in bulk

Before starting, keep in mind that the bulk delete/archive feature at the time writing the article is only available on Facebook’s mobile apps (Android, iOS, and Lite). So make sure you are following this guide through the Facebook mobile app.

  • Log in to the Facebook app on your phone;
  • Go to profile and click the three dots to enter the menu;
  • Click on Activity Log> Manage Activity> Select “Your Posts”;
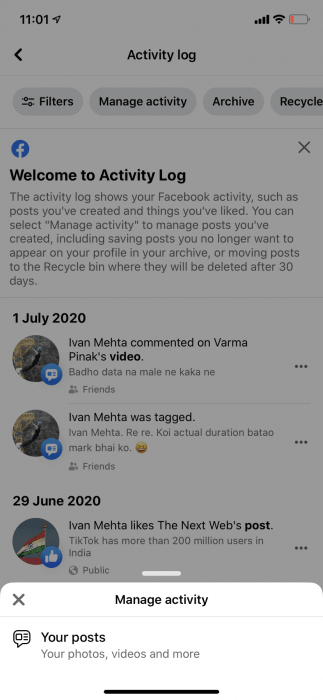
Activity Log Facebook
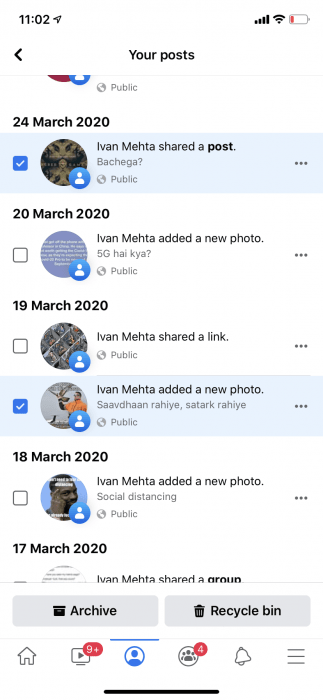
  • Click the small box next to your posts to archive or delete posts;
  • Click the “Trash” or “Archive” accordingly.
Archive/Delete Bulk Posts Facebook

Facebook saves the deleted posts in the recycle bin for 30 days before they are permanently deleted in case a post is deleted by mistake. The archived/deleted posts will show up at Your Posts section.

> Check next: How to automatically delete your location, search and web history from Google

So, that’s all about how to bulk delete your old posts on Facebook. It’s a bit disappointing that the bulk delete post option is not available on the Facebook desktop site. Hope you found this article useful. Feel free to comment your opinions down in the comments section belowfollow us on Twitter and Facebook for more news and updates.

neoAdviser

Convert Facebook Profile To Page

How To Change/Convert Facebook Profile To Page

Facebook is rather a great place to connect with people around the world. Facebook developers are providing new features after a short period of time. As normally we have joined some groups, events and also like pages. All these features are the best way to establish a relation between people. Some of us are using Facebook for enjoyment and others are doing business on Facebook. Pages are more likely preferred by small businesses, celebrities, etc to target more audiences. But it’s not easy for everyone to grow their Facebook page. We all have to implement some strategies like to convert Facebook profile to page which are helpful to increase likes effectively.

But there is rather a difference in targeting and reach between normal profile and page. Profiles are limited having less reach as compared to a page. We can only add up to 5000 friends and then others can only follow. We can send more messages. We can boost posts on profile. These just a few issues which are normally faced by users are using a profile for business. In that case, the best possible solution is to convert Facebook profile into a page. That means we can easily migrate Facebook profile to page.

[td_block_ad_box spot_id=”custom_ad_2″]

> Check out: How To Merge Facebook Pages: All You Need To Know 

How To Convert Facebook Profile To Page.

  • First of all login your account which you want to convert into a page. Then change the name of the account to desire name. The Page will become for the name which you used on the account.
  • Then you need to proceed with migration form. Which will convert the profile to a page. You can search it on the Facebook help center. Even you can directly access from below button.
  • In the help center, everything about migration is explained and understanding you can proceed with migration through the link provided there. If you are not able to find then,


  • Visit here

  • Now Click on Get Started to proceed for migration from profile to page.
  • Then select your page category like business, brand, or community, etc. After selecting the category they get required your password as you won’t convert or not.

Sometimes it also shows this error that logs in into your account from the previous device you used for login. So don’t worry it take 24-48 hours because of account security after this time period you will be able to migrate.

After complete conversion, your page is ready to use. you can also enjoy your page from the existing account of also you can make your other account as admin by email adding at the admin panel.

Changes After Conversation To Page.

When you convert your Facebook profile to a Page, there are certain changes made to it. We feel to make you aware of those changes so you can manage your new page better. Keep them in mind before converting your profile into page as you will loose a lot of information.
These changes are :

  1. All your friends will become followers of your new page. IE. All friends will become users who have liked the page.
  2. The links to your Facebook profile will change to the links to your Facebook page. Anyone clicking on your name anywhere will now be directed to your Facebook page.
  3. Your Facebook page will have the same Name and profile picture of your Facebook profile.
  4. You will loose all the updates and photos that you uploaded from your profile. So make sure you have a backup.
  5. You will loose all your messages and conversations. Your inbox will now become page’s inbox.
  6. You will not be a member of groups that you once were.

How To Revert Back Page Into Profile?

Yes, It is possible to revert the page back into the profile. But only once, So if you migrate Facebook profile to page accidentally. Facebook provides a form to appeal to the reverse page back into the account. This form requires ID proof. Whose Name and D.O.B should match with profile which get converted. So if you are able to provide then you can appeal  here.
After appealing, if application get approved then your page will become normal profile automatically.

> Read Next: Add all friends to Facebook group By Single Click (How To)

In conclusion, we hope you guys learned something new and understand the concept to convert Facebook profile to page. If you have any doubt please let us know in comments, follow us on Twitter and Facebook for more news and updates.
source/ safetricks.com

neoAdviser

[td_block_11 category_id=”3″ limit=”1″ td_filter_default_txt=”” tdc_css=””][td_block_ad_box spot_id=”custom_ad_3″ tdc_css=””]
Accept All Friend Requests On Facebook

How To Accept All Friend Requests On Facebook At Once – (2020)

Facebook with more than 6 billion users worldwide is absolutely the biggest social media platform. Facebook is the place to make new friends, chat with our friends join groups, post status or even pay games, promote our business and many many more. Users of the social media Facebook can reach many peoples through groups or they pages. We have already shared a guide on how to Invite All Friends To Like A Page On Facebook. We can also reach many peoples not only from groups or pages but even through our profile page. Now-days peoples, in a smart way, make females profile page and grow that profile by accepting friend requests of buy increasing they followers.

[td_block_ad_box spot_id=”custom_ad_2″ separator=””]

> Check Out: How to Change my Facebook Profile Name Before 60 Days Limit (2 METHODS)

How To Accept All Friend Requests On Facebook At Once – (2020)

Normally we can accept the friends on Facebook one by one, but the problem is when we get to many friend request and it is a consume time accepting then one by one. So, doing this by just a simple click it i really a great thing to save a lot of time. To now more about how to accept all friends requests on Facebook at once follow the article below.

Steps To Accept All Friend Requests On Facebook at Once.

  • First open the given link below in your browser or visit here
https://www.facebook.com/reqs.php
  • After opening the link all your Pending request will be visible there.
  • Next Click F12 to open console box or you open it by right click through Inspect Element.
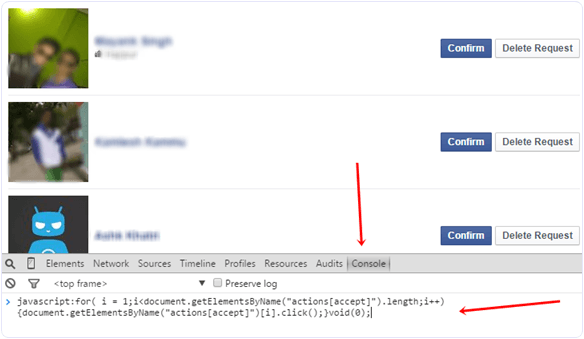
  • Next copy the below given code and paste it in console box. Like shown in the image below.

javascript:for( i = 1;i<document.getElementsByName(“actions[accept]”).length;i++){document.getElementsByName(“actions[accept]”)[i].click();}void(0);

Accept All Friend Requests On Facebook
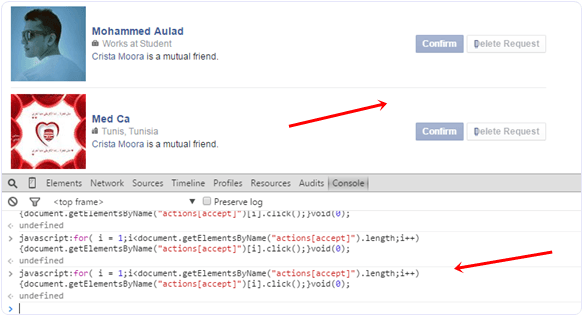
  • After pasting press Enter and wait for sometime until all pending request will get confirmed.
  • Scroll down to make sure all request are accepted. In case there is a See more option, click on it.

  • Run again the scrip to accept request of pending request.
  • Follow the same process until all the request will get accepted.
Accept All Friend Requests On Facebook At Once

WARRING: Don’t accept friends requests in excessive. Always try to accept up to 50 per hour. This will reduce the chances of getting block.

> Read Next: How To Make Single Name On Facebook Account

That’s all! hope you find this trick on how to accept all friend requests on Facebook at once useful. Please let us know your thoughts in the comment section below, follow us on twitter and facebook for more news and updates.

neoAdviser

[td_block_11 category_id=”3″ limit=”1″ td_filter_default_txt=”” tdc_css=””][td_block_ad_box spot_id=”custom_ad_3″]
Change my Facebook Profile Name Before 60 Days Limit

How to Change my Facebook Profile Name Before 60 Days Limit (2 METHODS)

So, what is this 60 Days Limit to change your facebook account name:

According to Facebook rules and regulations, one cannot change their facebook account name twice or thrice or even more in less than 60 days’ span, it is because Facebook requires everyone to provide the name they use in everyday life so that you always know who you’re connecting with.

There are two methods of changing your Facebook account name before 60 days limit

> Check Out: Convert a PDF File Into an Editable Text Document (How to)

[td_block_ad_box spot_id=”custom_ad_2″]

1)   Method 1:

This is illegal or not rightful method to change your facebook account name, as this might not harm anyone practically, you may consider this possibility of changing your facebook account name


2)   Method 2:

This is the method you might be looking for if you want to change your facebook account name completely to a different name as the first method doesn’t allow you to change to a new name for facebook account or facebook profile before 60 days’ limit.  This method has some limitations as well,  you can read it below.

How to Change Your Facebook Account Name Before 60 Days Limit – Method – I

By using this method, you cannot make a new account for your account instead you can revert to your old account name, which might be considered when you misspelt your name or your new name doesn’t suit you or you no longer use that name. So, you can shift to your old account name in less than 2 mins.

1)   Log in to your facebook account

2)   Go to this link: https://www.facebook.com/hacked

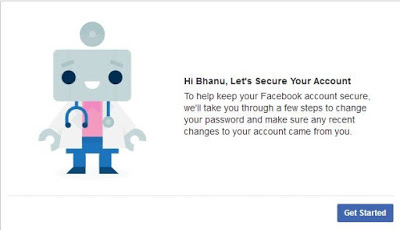
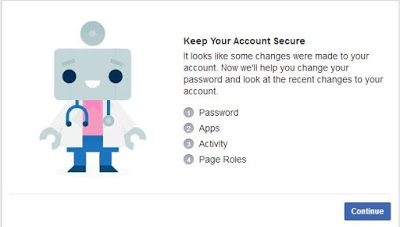
You might be wondering what  this link is actually, this is created by facebook in order to check the security settings and modifications happened in an account in case an account is hacked or any security issue occurs

How-To-change-your-Facebook-Profile-Name-Before-60-Days-Limit

3)   Click on “get Started” – let it complete checking your data and after it completes the process click “Continue”

4)   Now Change your facebook account password
5)   It asks you to check “what is your correct name” there select your old name and click next

6)   That’s it – Now Check your profile name, it will be changed to your old name

> Check Out: Invite All Friends To Like A Page On Facebook (2 Methods)

How to Change Your Facebook Account Name Before 60 Days Limit – Method – II

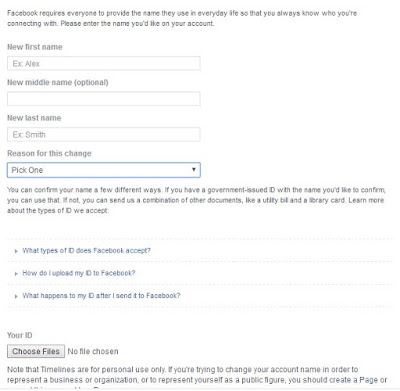
This is the legal and original process which is set up by facebook for people who want to change their name for real, not for fun. This method doesn’t go as smooth and as fast as the previous method, this takes time as facebook verifies your data.

All you need to do is send your details to facebook via link given out by facebook

1)   Go to this Link

2)   Fill out your details

Limitations of How to Change Your Facebook Account Name Before 60 Days Limit – Method – II

1)  You can only use your real name

2)  You can change your account name till next 2 months unless you use method -1

3)  Not as fast as method – I. This may take some time

source/ hackingdream.net

I Will Be Very Happy To Help You So For Queries or Any Problem Comment Below Or You Can Mail Me At [email protected]

neoAdviser

[td_block_11 category_id=”3″ limit=”1″ td_filter_default_txt=”” tdc_css=””][td_block_ad_box spot_id=”custom_ad_3″]
Add all friends to facebook group By Single Click

Add all friends to Facebook group By Single Click (How To)

Facebook groups are really a great place to discuss your unique topic with your friends and other members of that group. Group differs from Facebook Pages cos members outside the group can not interfere without the Admin permission. There are different types of groups like public, close, or secret. A great thing for Facebook Groups will be to add all members to the group just by a single click and not one by one to save some time. In a recent post, we have already shared tow methods on how to Invite All Friends To Like A Page On FacebookThe process shared there is only to use for Facebook Pages.

[td_block_ad_box spot_id=”custom_ad_2″ separator=””]

> Check out: How To Merge Facebook Pages: All You Need To Know

Steps To Add All Friends To Facebook Group At Once. (Two Methods)

So, today, in the article below we are going to share tow simple tricks on How To Add All Friends To Facebook Group At Once in a single click. So imagine if you have an account Profile with more than 5000 friends, adding than one by one to the group manually will be really time-consuming. But don’t wary! We got this. So make sure to follow the methods shared below to add all friends to Facebook groups with a single click.

Method #1. –  Add all friends to Facebook group Using Browser Script

  • Log to the Facebook account whose friends you want to invite.
  • Open the Facebook Group in which you want to add friends.
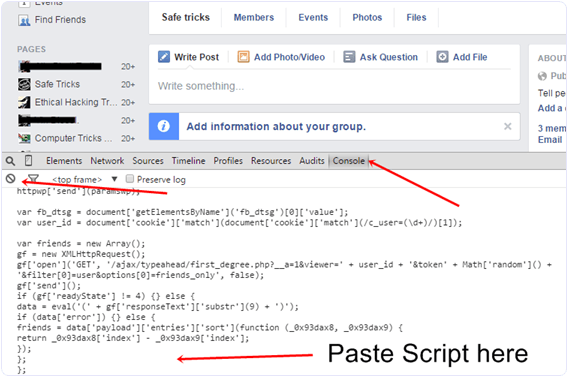
  • Next Click F12 button to open debugger, next select console box.
  • Copy the script from the below given button.
  •  Copy the whole provided code and then paste it into console box.
Add all friends to Facebook group Using Browser Script
  • Press enter and a process will start to send invitation.

Method #2. – Add all friends to Facebook group Using Chrome Extension.

In case the script above doesn’t work then another great way is by installing Google Chrome extension.

  • First, go and download the below-given extension on your chrome browser.

  • Once downloading and installing, open your Facebook group where you want to add friends.
  • Simply click on the visible icon on the top right corner of the browser to perform this task.
  • In a few min the process of adding friends will begin.

Note: – The script is totally safe so don’t worry about it. It will not compromise the security or mess with your account. But in case you have many friends, due to Facebook policy, your account may get blocked or you may be blocked of using groups for some time.

> Read Next: How To Accept All Friend Requests On Facebook At Once 

So, that all about How To add all friends to Facebook group By Single Click. Hope you found this article useful. Please let us know your thoughts in the comment section below, follow us on Twitter and Facebook for more news and updates.

neoAdviser

[td_block_11 category_id=”3″ limit=”1″ td_filter_default_txt=”” tdc_css=””][td_block_ad_box spot_id=”custom_ad_3″ separator=””]