god mode GTA V

How to get god mode in GTA 5?

How to access God Mode?

The GTA franchise has had a long history with cheat codes and a tradition that Rockstar still upholds in its games. Not many games as big as GTA today allow players to have cheat codes in order to make the game easier, or just more interesting. Players have used game hacks and cheat codes in GTA games since the beginning, even GTA V has some fun cheat codes.

> Check next: Top 3 Best Offline Games Like GTA

Access God Mode on GTA 5

God Mode, as it has become known, is a cheat code available at all games, including the GTA franchise. However, the game allows God Mode to be activated for only 5 minutes.

  • Xbox 360 / Xbox One: Right, A, Right, Left, Right, RB, Right, Left, A, Y.
  • PS3 / PS4: Right, X, Right, Left, Right, R1, Right, Left, X, Triangle.
  • PC: PAINKILLER.
  • Cell Phone: 1-999-724-654-5537.

This cheat code allows the player to make their character unbreakable and reduce damage in GTA V. However, it can only be activated for 5 minutes, and players must re-code for this cheat after a while. When the code is entered, the player is essentially invincible and can cause immortal amounts of chaos. God Mode has always been one of the most popular cheats in all types of games.

Previously, the GTA franchise allowed players to enter cheat codes on the PC in the game or in the Pause menu, simply by pressing it. However, cheat codes must be entered on the console when playing GTA V. To bring the console during the game, press the “~” Key on your keyboard while playing the game. This will bring up the console that can be used to enter cheat codes.

sources (1,)

> Check next: How to use emotes in GTA Online

So what do you think about this? Let us know your thoughts in the comments section below, follow us on Twitter and Facebook for more news and updates.

neoAdviser

Google People Card

Now you can add your own details on Google Search: Here’s how to!

People Cards will help you build up your online presence, but for now, it is offered only in India

When searching for a celebrity in Google Search, in addition to various links, a module with information and data about him will also be displayed. To enable this Google takes data from trusted sources and compiles the character card.

[td_block_ad_box spot_id=”custom_ad_2″]

And if you search for your name, if you like the rest of us are not famous, all that appears are the links of your social networks, someone with a name similar to yours and some embarrassing video that you posted on YouTube when you were 10 years old and now you have forgotten the code.

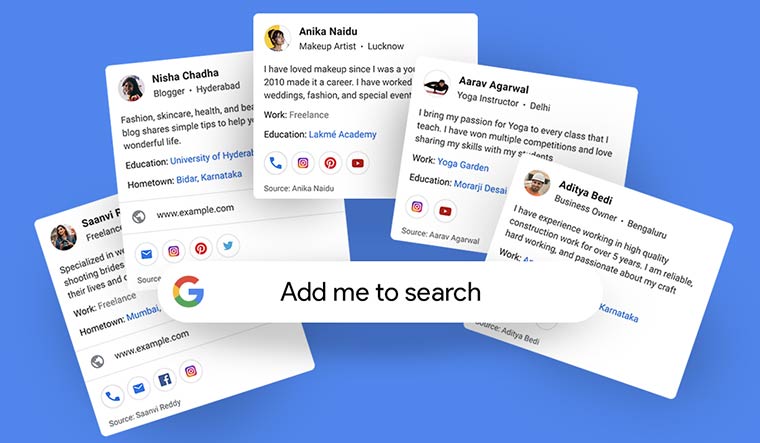
The above module, like that for the celebs, Google will soon make it available to general people as well. Starting today, the company has launched “People Card“, a type of digital business card, where every time you or someone else searches, a module with data and direct links to social networks or websites related to you will also appear. This module may include name, job, residence, address, telephone number, email, etc.

Source of information? You yourself.

You just need to have a Google address and then you can compile the form with all the data you want to share. You will be asked for a phone number to verify it, and if you change your mind you can delete it at any time.

Steps to create People Card on Google

  • Step #1: First sign-in to your Google Account
  • Step #2: Next search for “Add Me To Search
  • Step #3: Next click “Add yourself to Google Search
  • Step #4: Put your phone number to complete the verification process
  • Step #5: Enter 6-digit Unique Code
  • Step #6: Then build your profile on People Card by adding your Location, choosing the image, adding a description of yourself, adding links of your websites or social media profiles, and email addresses, if any.
  • Step #7: Click on Save
  • Step #8: Finally search for your profile name on Google Search to see all the shared information displayed on Google

Do you think this is finally the Google’s solution to take a piece from the huge social media market? We need to wait for a global launch, for now it remains to see how it will go in India.

> Check next: How to Play Call Of Duty Mobile on your PC

So what do you think about this People Cards feature? Let us know your thoughts in the comment section below, follow us on Twitter and Facebook for more news and updates.
neoAdviser

[td_block_11 category_id=”3″ limit=”1″ td_filter_default_txt=””][td_block_ad_box spot_id=”custom_ad_3″]
play Call Of Duty Mobile on your PC

How to Play Call Of Duty Mobile on your PC

You can also play Call Of Duty Mobile on your PC

Not everyone has a smartphone in which you can play Call Of Duty Mobile as it is one of the mobile games which requires a device with high specs. But do not worry because if you have a PC which has the right specifications to handle Call of Duty Mobile, you can play it on your PC without any problems.

[td_block_ad_box spot_id=”custom_ad_2″]

> Check out: How to play PUBG Mobile on your PC

The PC requirements to play Call Of Duty Mobile:

  • OS: Windows 7/8.1/10
  • CPU: AMD/Intel CPU 4 core @3Ghz
  • RAM: 8GB
  • Storage: 5GB (may be larger depending on the software/games you use)
  • GPU: AMD/Intel/Nvidia 1.5 GB dedicated

You must also enable Virtualization. To enable Virtualization follow this tutorial.

To be able to play Call Of Duty Mobile on your PC you will need an Android Emulator. The Android Emulator that can give you the best performance, in this case, is Gameloop which is the official emulator of Call Of Duty Mobile and which you can download here.

  • Once you have downloaded and installed Gameloop, open it and wait for it to launch.
  • Then download Call Of Duty Mobile directly from Gameloop.
  • While Call Of Duty Mobile is downloading, go to settings, and set them according to the image below.
Gameloop COD Mobile Settings
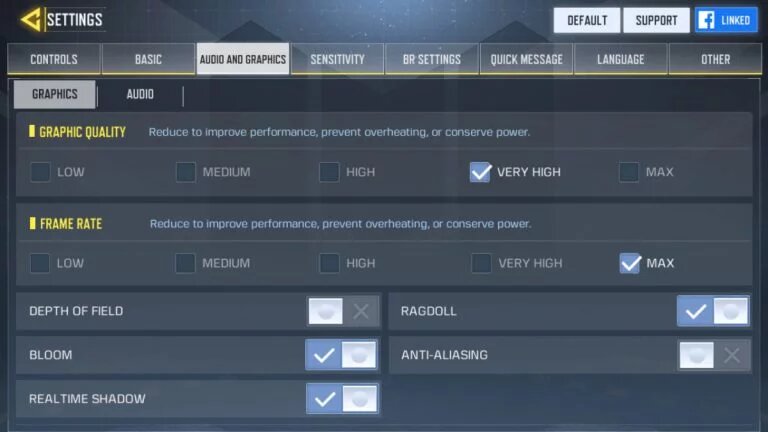
  • Once Call Of Duty Mobile is downloaded and installed login to the game, go to settings and set the settings according to the image below.
COD Mobile Settings
COD Mobile Settings

Once you have done all this you can play Call Of Duty Mobile on your PC and smoothly. It should also be noted that by playing Call Of Duty Mobile on PC, you will be accessing the servers of this game for Android Emulator, and most of the time you will be playing against other people who are also using an emulator.

> Check next: Top 3 Best Offline Games Like GTA

So here’s how to play Call Of Duty Mobile on your PC. Hope you found this article useful! Please let us know in the comment section below, follow us on Twitter and Facebook for more news and updates.

neoAdviser

[td_block_11 category_id=”3″ limit=”1″ td_filter_default_txt=”” tdc_css=””][td_block_ad_box spot_id=”custom_ad_3″ tdc_css=””]
PUBG Mobile on PC

How to play PUBG Mobile on your PC

If you do not have a smartphone with the right settings to play PUBG Mobile, a PC can help you

You may not have a smartphone on which you can play games like PUBG Mobile as this game requires a smartphone with high specs. If you have a PC that can hold an emulator then you can play PUBG Mobile directly on your PC.

[td_block_ad_box spot_id=”custom_ad_2″]

> Check out: Top 15 Best Android Emulators: Experience Android On PC

These are the specs you will need to open the emulator on your PC:

  • OS: Windows 7/ 8.1/10
  • CPU: AMD/Intel CPU 4 core @ 2.5ghz
  • RAM: 4/8 GB
  • HDD: 5 GB (may be larger depending on the software/games you use)
  • GPU: AMD/Intel/Nvidia 1 GB dedicated

You must also enable Virtualization. To enable Virtualization follow this tutorial.

The Android Emulator that can give you the best performance, in this case, is Bluestacks which you can download here.

  • Once you have downloaded and installed Bluestacks, open it and wait for it to launch.
  • Then open Google Play and log in with your Google Account.
  • Once you have logged in to Google Play download PUBG Mobile.
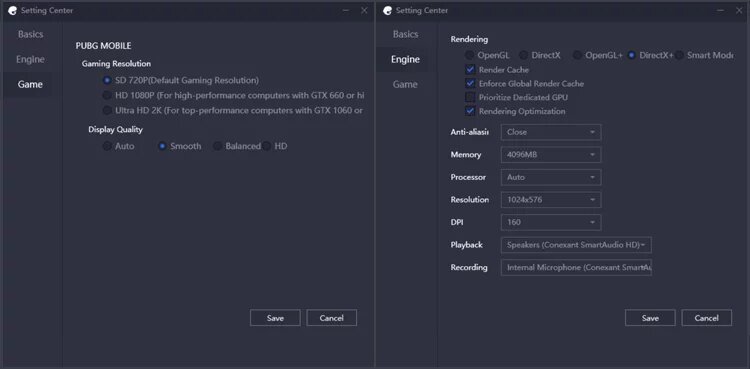
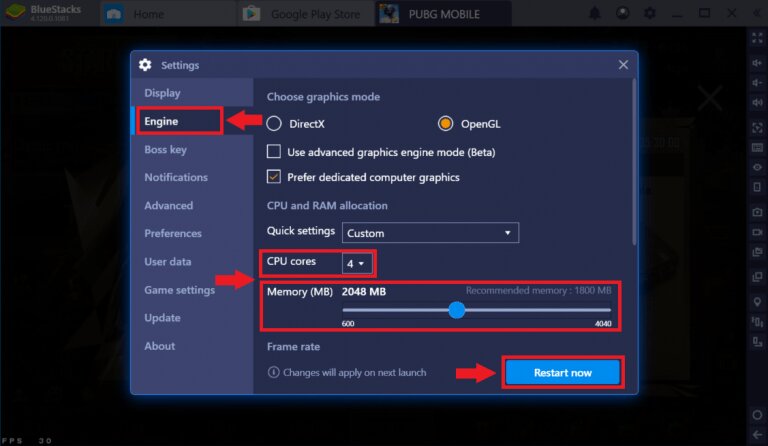
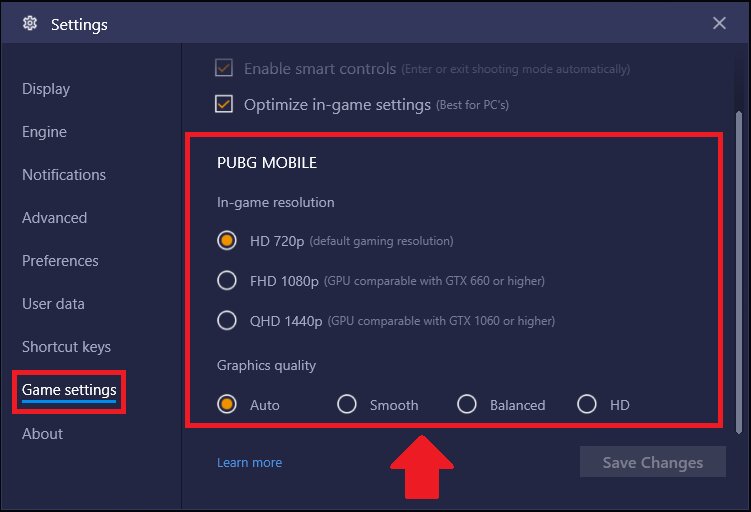
  • While PUBG Mobile is downloading, go to settings, and set them according to the images below.
PUBG Mobile Bluestacks Settings
  • If you have 8GB of RAM, you can change the Memory from 2048 MB to 3072 MB
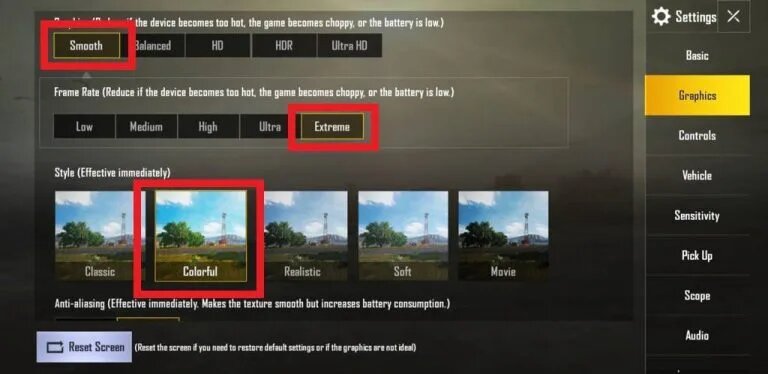
  • Once PUBG Mobile is downloaded and installed, log in and go to settings and set settings according to the image below.

Once you have done all this you can play PUBG Mobile on your PC and smoothly. It should also be noted that by playing PUBG Mobile on PC, you will be accessing emulator servers and most of the time you will be playing against other people who are using an emulator.

> Check next: Top 3 Best PS4 Emulators for Windows PC (2020 Edition)

So here’s how to play PUBG Mobile on your PC. Hope you found this article useful! Please let us know in the comment section below, follow us on Twitter and Facebook for more news and updates.
neoAdviser

[td_block_11 category_id=”3″ limit=”1″ td_filter_default_txt=”” tdc_css=””][td_block_ad_box spot_id=”custom_ad_3″ tdc_css=””]
The best way to post panoramic photos on Instagram

The best way to post panoramic photos on Instagram

When Instagram first hit smartphones, every uploaded photo had to be in a square shape

This is not a problem in terms of photos and selfies, but for panoramic photos, Instagram has always encountered difficulties. Now, you can upload any photo to Instagram. However, not all will look good. Below is an explanation of the best way to post panoramic photos on Instagram on your iPhone and Android devices, along with an iPhone app that will make the photos look better.

[td_block_ad_box spot_id=”custom_ad_2″]

> Check next: How to automatically delete your location, search and web history from Google

How to post panoramic photos on Instagram

The simplest way to post panoramas is:

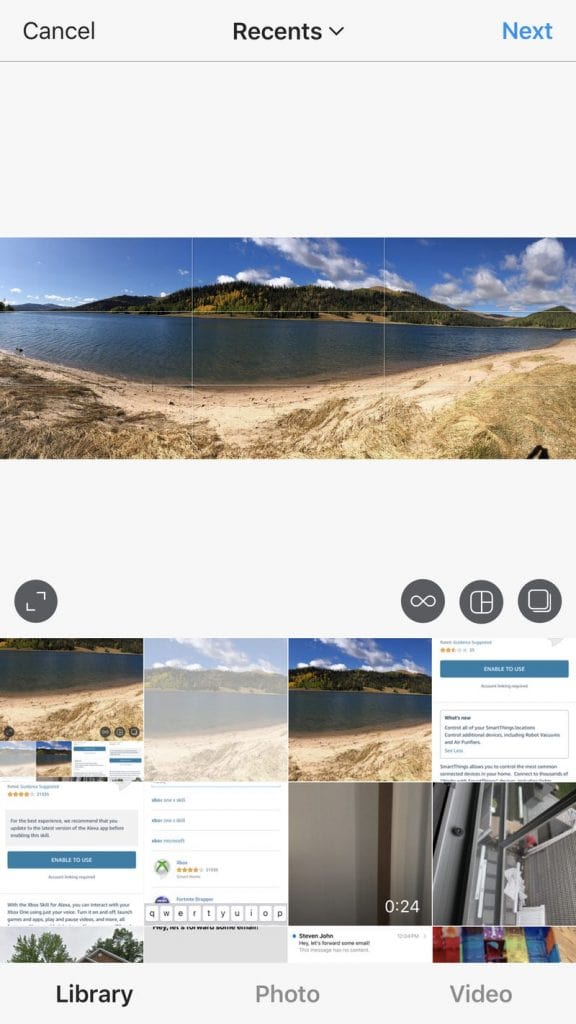
  • Open Instagram on your iPhone or Android, and press the plus icon below the screen to upload photos.
  • Once your photo gallery opens, select the panoramic photo you want to post
  • Touch the image with two fingers, and then reduce the photo so that the whole photo looks panoramic.
  • Add filters and post as usual.

The result is a rectangular photo with white space at the top and bottom. This method can adjust the size of the photo, but for full-size panoramic photos, it may not be possible to post the full photo.

Here is a program like Photoshop to cut the photo. If you have an iPhone, there is an app that will do all the work for you automatically: “Unsquared for Instagram“.

Download the app and give permission to access the photos. Then follow these steps:

  • Open the Unsquared app and click the photo stack icon at the bottom right.
  • Click the photo from the gallery you want to use, and then click the blue sign.
  • The photo will be presented with the Unsquared sign on it.
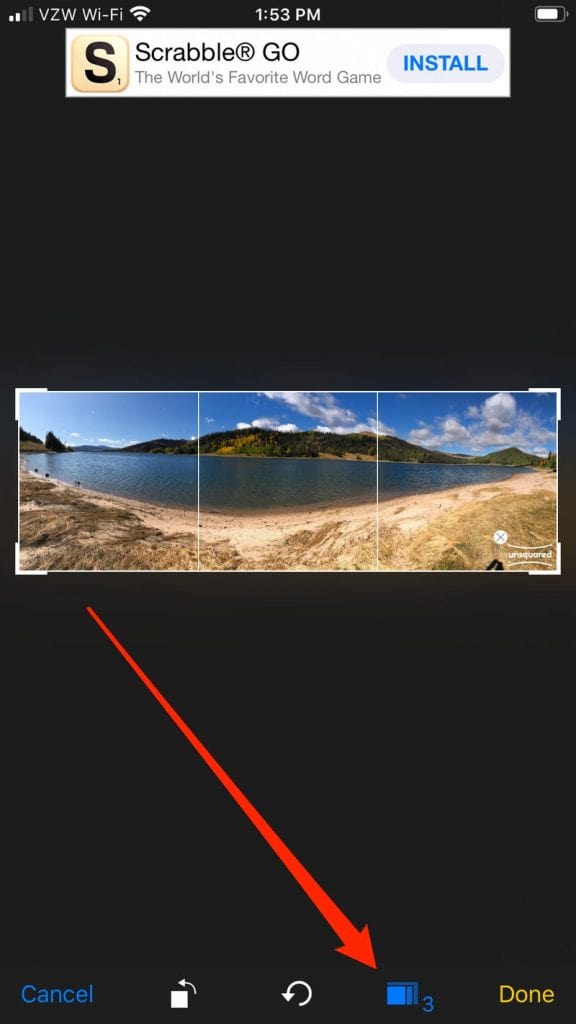
  • Press the blue icon that looks like a series of squares at the bottom of the screen, and you can now choose how many photos you would like the panoramic photo to be shared.

If you want to include each part of the photo, divide it into 3 parts. However you can split it into as many pieces as you want, but you can lose the top and bottom of the photo.

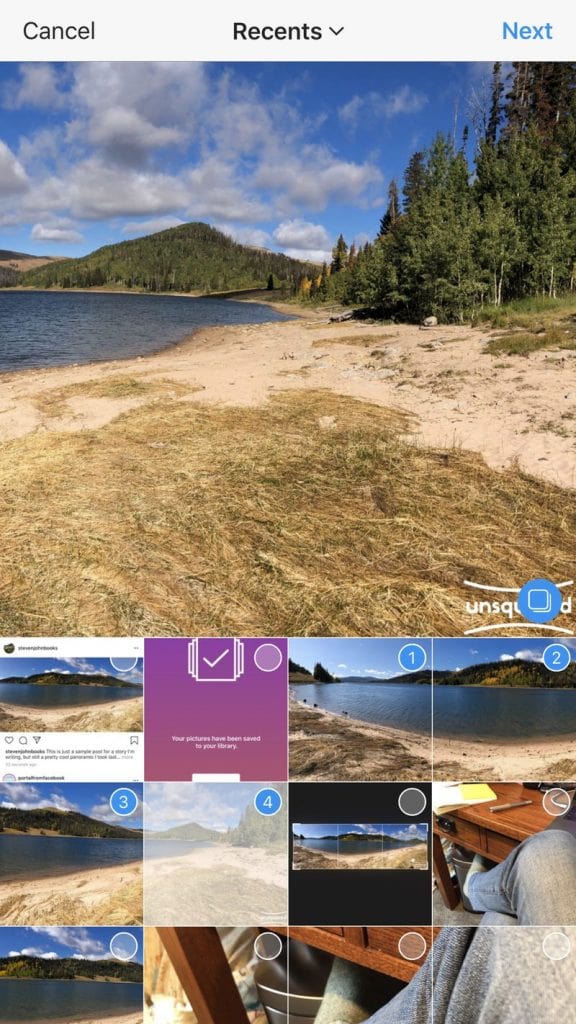
  • Once done, press “Done”. Separate photos will appear in your gallery, and you can post them on Instagram

sources/ businessinsider.com

> Check next: How to search for specific words in a YouTube video

So, that’s all about how to post panoramic photos on Instagram. Hope you found this article useful. Feel free to comment your opinions down in the comments section belowfollow us on Twitter and Facebook for more news and updates.
neoAdviser

[td_block_11 category_id=”3″ limit=”1″ td_filter_default_txt=””][td_block_ad_box spot_id=”custom_ad_3″]
change your Apple ID password-min

How to change your Apple ID password (iOS 10.3 and up/MacOS)

Your Apple ID gives you the ability to connect to your Apple account on some devices, new and old, wherever you are. But this accessibility has a cost, security. The Apple ID password addresses this concern by asking you to set it every time you use a new device. The security measure in question can sometimes be compromised by compromising your sensitive personal data and information. If you want to make your Apple account more secure, then you can change your Apple ID password.

[td_block_ad_box spot_id=”custom_ad_2″]

> Check out: How To Change/Update Your Outlook.com Account Password (Updated)

Here’s how to change the password on iOS 10.3 and up

To change the password on your iOS 10.3 and up device, just simply follow the steps below:

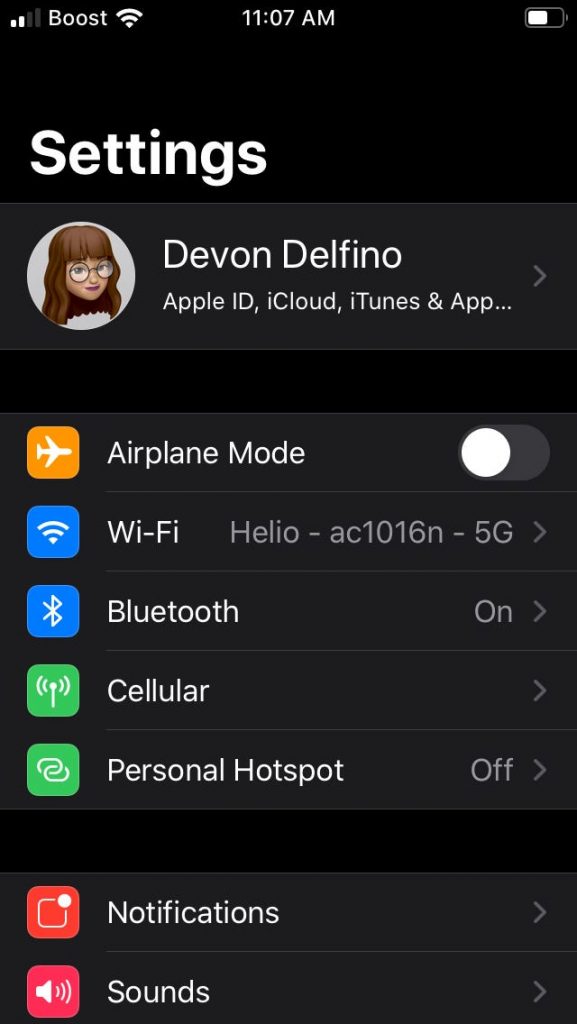
  • Open the Settings app
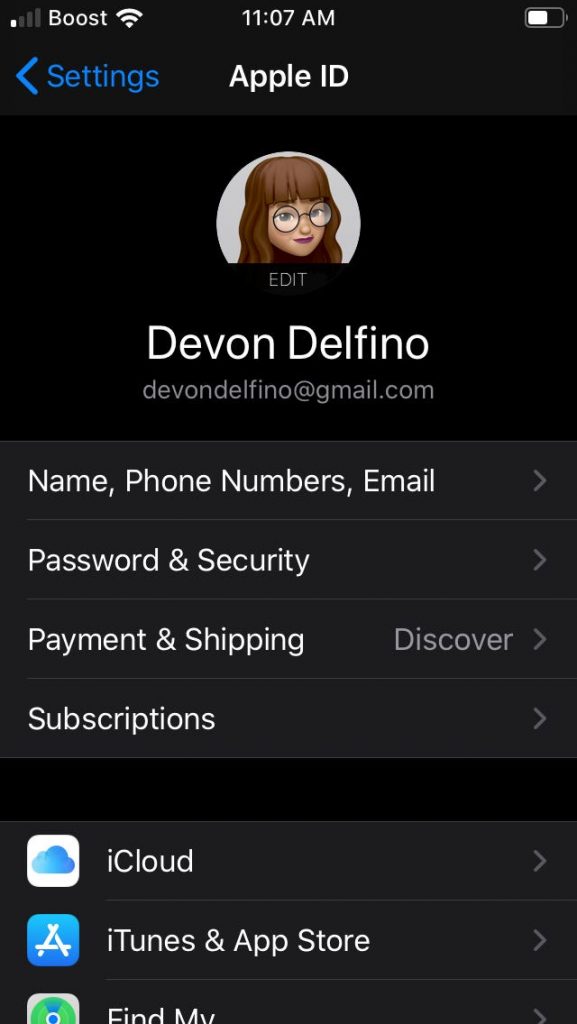
  • Click on your name
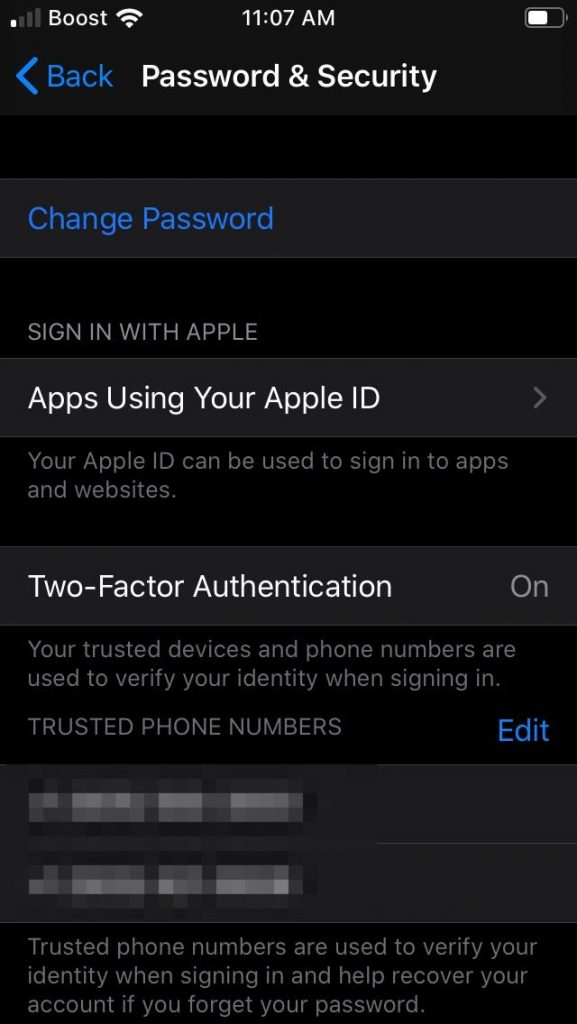
  • Select the “Password and Security” option
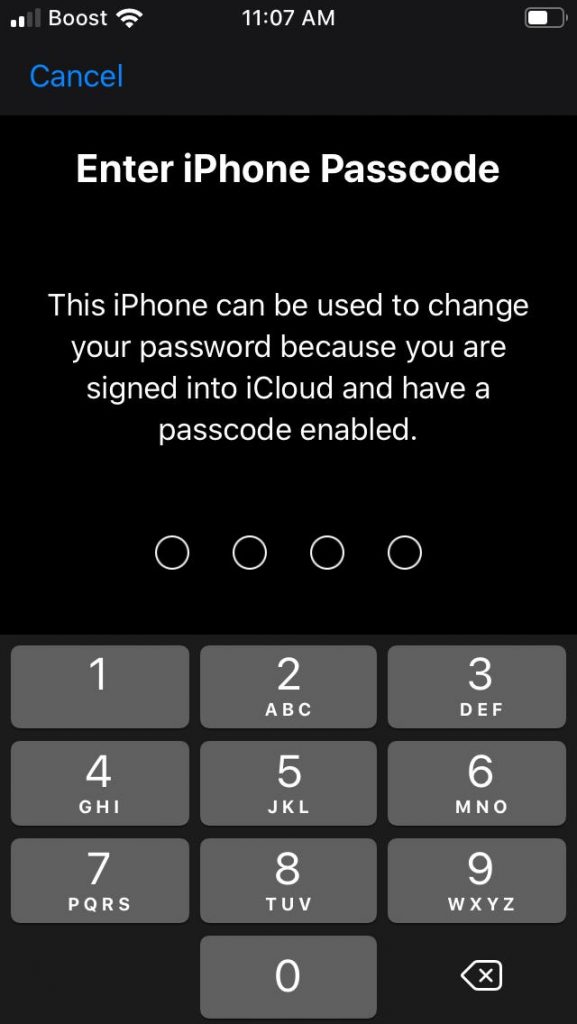
  • Click on “Change Password” at the top of the screen. This option has a blue hyperlink.
  • Enter the new password
  • Click “Change” or “Change Password
  • Log in to your account again using the new password

> Check out: How to search for specific words in a YouTube video

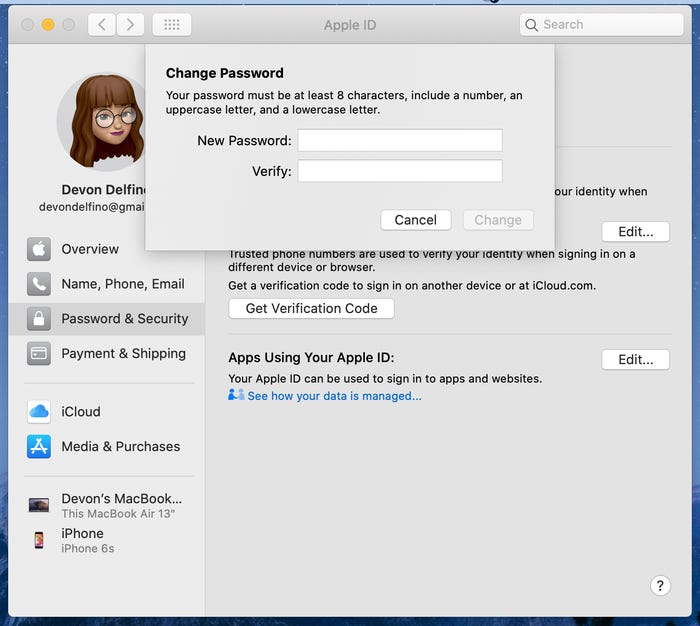
How to change your MacOS Catalina password

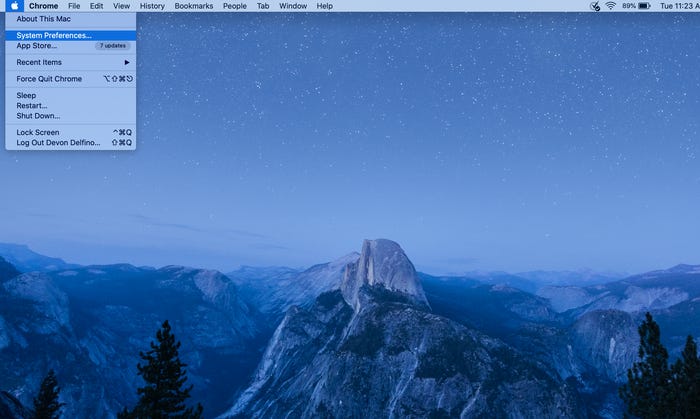
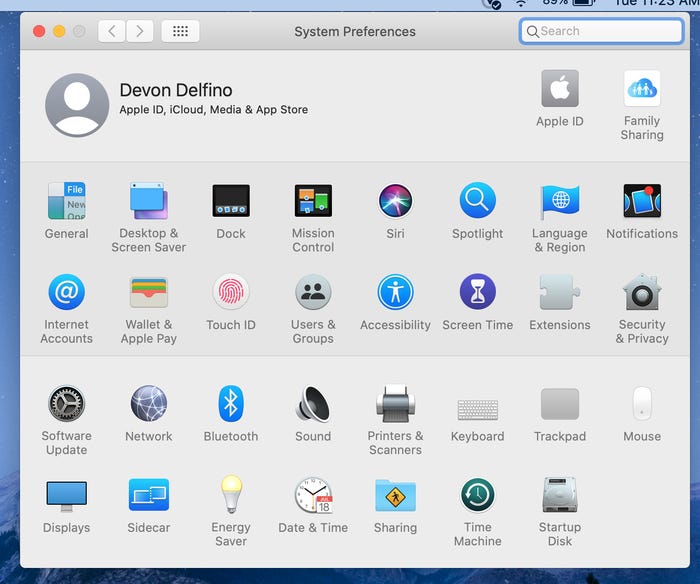
  • Click the Apple icon in the top left corner and select “System Preferences
  • Click “Apple ID
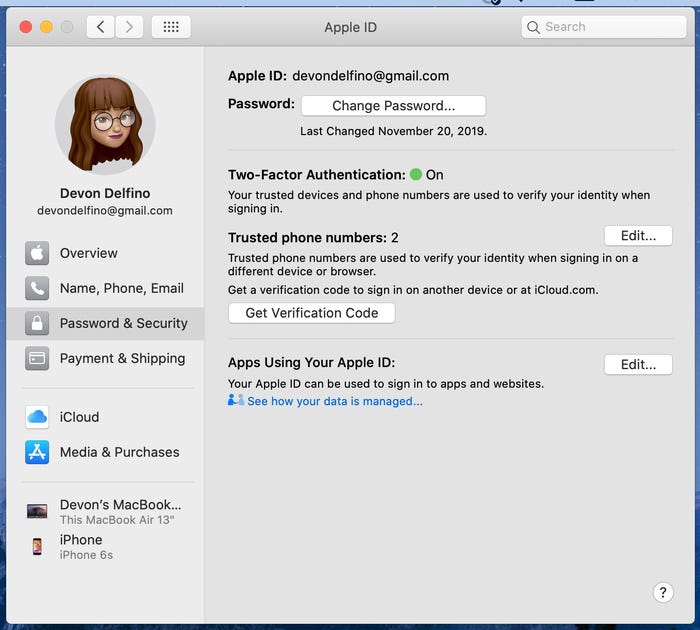
  • Select “Password & Security
  • Click “Change Password
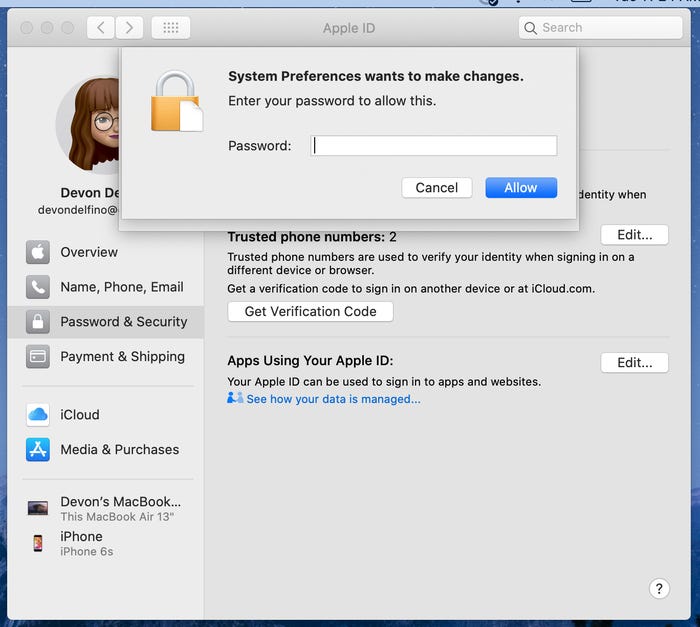
  • Set the password you use to log in to Mac
  • Double-enter the new password and click “Verify

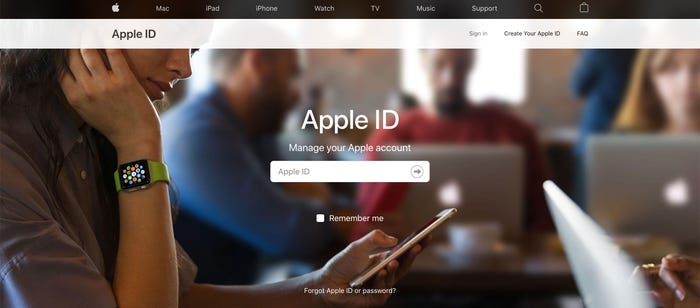
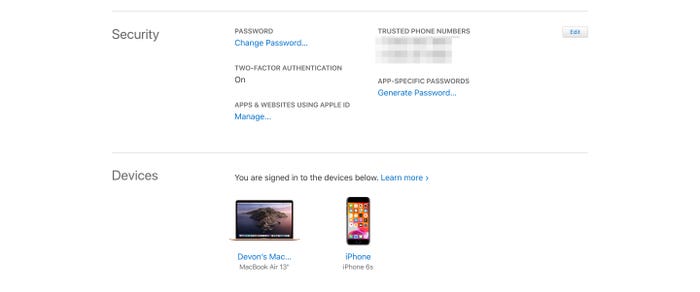
How to change your Apple ID password for your browser

  • Open the browser and go to the Apple ID page
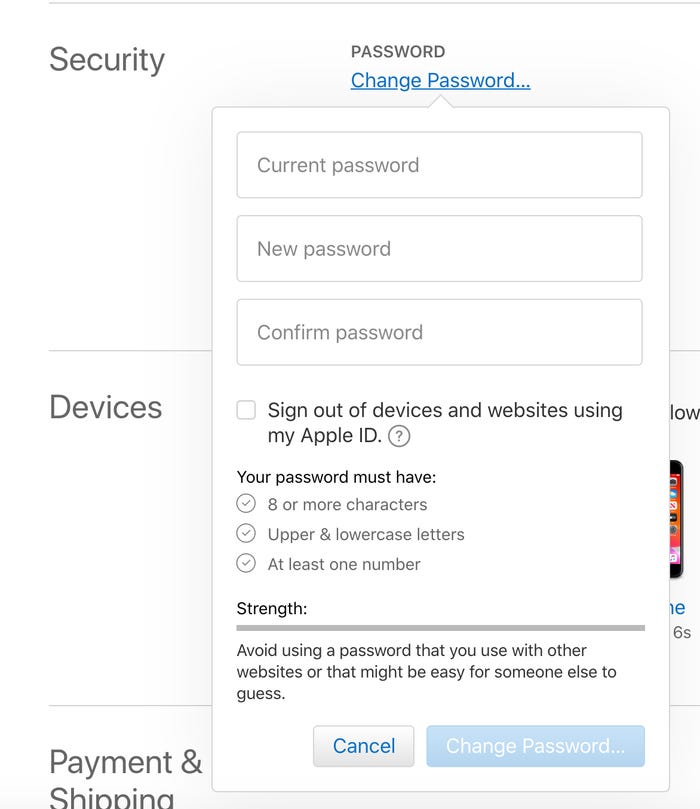
  • Select “Change Password
  • Enter the current password
  • Enter the new password twice
  • Click “Change Password.”

> Check next: How to block YouTube ads quite simply

So, here’s how to change your Apple ID password. Hope you found this article useful. Let us know your thoughts in the comments sections below, follow us on Twitter and Facebook for more news and updates.

neoAdviser

[td_block_11 category_id=”3″ limit=”1″ td_filter_default_txt=””][td_block_ad_box spot_id=”custom_ad_3″]
Search for a specific words in a YouTube video

How to search for specific words in a YouTube video

In this article we show you how to search for specific words in a YouTube video

If you’ve found yourself going through a YouTube video to find a certain piece you want to watch or listen to, then this article is for you. It is a phenomenon that consumes time and nerves for users to find a specific moment in a YouTube video. But you don’t have to.

In this article, we will show you how to search for specific words in a YouTube video.

[td_block_ad_box spot_id=”custom_ad_2″ tdc_css=””]

> Check out: How to block YouTube ads quite simply

Here’s how to search for specific words in a YouTube video

  • Navigate to the YouTube video you want to search for
  • Click on the three horizontal dots below it
  • Click Open Transcript
  • Press Ctrl + F to open the browser search function. Enter the word you are looking for and if it is in the transcript it will be marked
  • Then click the line where it is located to go directly to the part of the video you are looking for

Remember that it all depends on the accuracy and spelling of the subtitles. It is never guaranteed that the subtitles are proper especially if they are generated automatically.

Here’s how to search for words on many YouTube videos

  • Go to YouGlish
  • Put the word or expression you want to search for and press Say it
  • Use the controls below the video to play and skip to the part where the word or expression appears
  • Press Ctrl + Right Arrow to switch to the next video

YouGlish does not work with automatically generated subtitles but only with manual ones.

> Check next: How To Convert Text Into Audio Using Notepad

So, that’s all about how to search for specific words in a YouTube video by using this simple trick. Hope you found this article useful. Feel free to comment your opinions down in the comments section belowfollow us on Twitter and Facebook for more news and updates.
neoAdviser

[td_block_11 category_id=”3″ limit=”1″ td_filter_default_txt=”” tdc_css=””][td_block_ad_box spot_id=”custom_ad_3″ tdc_css=””]
block YouTube ads

How to block YouTube ads quite simply

A Redditor under sub/ in / r /webdev has posted a very simple trick to block YT ads

And who would have thought that a simple website where you could upload videos would one day turn into a source of income and even a career for some others? YouTube and its monetization process can sometimes become annoying from multiple ads, both as a pop-up and even worse when they interrupt the video in the middle just like on TV.

[td_block_ad_box spot_id=”custom_ad_2″]

A Redditor under sub / in / r/webdev has posted a very simple trick to block YT ads. This trick does not require you to be a master in coding or web development. Just add a “.” in the video URL its enough. Once you have opened the video, in the box above the page where the video address is written, after “.com” add a “.” and most or all of the ads will be blocked.

  • So instead of: “https://www.youtube.com/watch?v=”
  • Add: “https://www.youtube.com./watch?v=”

These changes to the URL can be made through the computer, for the smartphone, you will need to open the video in a browser, not from the application. The point is that there is no combination with the host and as a result, the video is transmitted but other contents such as ads fail to connect. And not only blocks ads, but also other things like cookies.

But before you go and watch videos without ads, remember that many of your favorite creators work and benefit from watching those ads. If you continue to watch videos from your favorite YouTube, such support is key.

> Check next: How To Convert Text Into Audio Using Notepad

So, that’s all about how to block YouTube ads by using this simple trick. Hope you found this article useful. Feel free to comment your opinions down in the comments section belowfollow us on Twitter and Facebook for more news and updates.

neoAdviser

[td_block_11 category_id=”3″ limit=”1″ td_filter_default_txt=”” tdc_css=””][td_block_ad_box spot_id=”custom_ad_3″ tdc_css=””]
Convert Text Into Audio

How To Convert Text Into Audio Using Notepad

Everyone loves to hear what is written in a paragraph or in a document. This is the reason why audiobooks are getting popular nowadays. In this article, i will show how you can convert text into audio using the Notepad.

[td_block_ad_box spot_id=”custom_ad_2″ separator=””]

> Check out: How to Scan a Document Using Your Phone or Tablet – The Best way

Why Use Notepad?

Because it is the most commonly used text editor everyone uses. That’s the reason.

How To Convert Text Into Audio Using Notepad

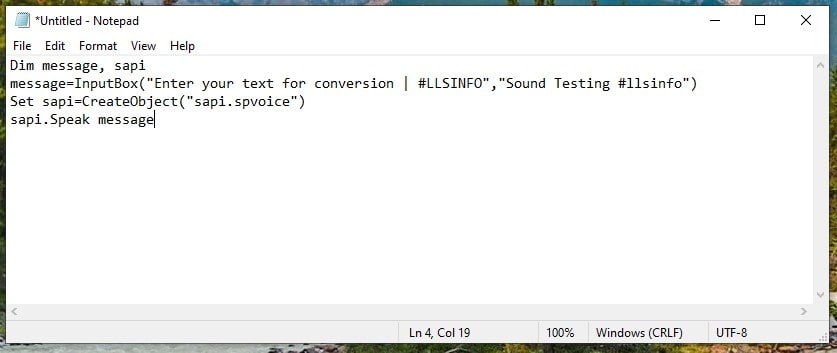
  • STEP 1: Open Notepad. You can do this by searching for “Notepad” in the windows search Or Press “Win+R” and type “Notepad” and press “Enter”.
  • STEP 2: Now, copy the following program and paste it in Notepad–
Dim message, sapi
message=InputBox("Enter your text for conversion | #LLSINFO","Sound Testing #llsinfo")
Set sapi=CreateObject("sapi.spvoice")
sapi.Speak message
Notepad: Paste The Code
  • STEP 3: Now save the code that you have entered above. The code has to be saved in .vbs format. Example sound test.vbs or any other name that you desire and save it.
Save The File as .vbs
  • STEP 4: Now navigate yourself to the location where the code is stored. in my case it was stored on the desktop so i will just go to the desktop and check for it. You can see that the file we saved was in the Visual Studio Script (.vbs) format.
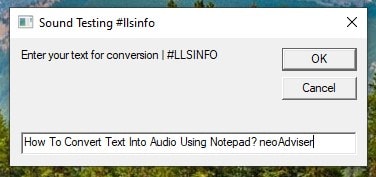
  • STEP 5: Now just “double click” on the saved file and “Enter the text” you want to hear in the text box. The moment you click “OK“. You can hear the text you entered as Audio.

> Check next: Convert a PDF File Into an Editable Text Document (How to)

So, that’s all about how to convert a Text into Audio simply by using Notepad. Hope you found this article useful. Feel free to comment your opinions down in the comments section below, follow us on Twitter and Facebook for more news and updates.
neoAdviser

[td_block_11 category_id=”3″ limit=”1″ td_filter_default_txt=””][td_block_ad_box spot_id=”custom_ad_3″ separator=””]
Flip Clock Screensaver (Windows and MAC)

How to make “Flip Clock” as a Screensaver (Windows and MAC)

If you are bored with the original screensaver of your computer and are looking for another alternative, neoAdviser has the right one. Flip Clock are hourly indicators that change the page whenever the number changes, a very interesting digitalization of an analog camera that other than an accountant’s office can hardly find anywhere else. So here are the simple steps on how to make Flip Clock as default screensaver on your Windows and MAC device. 

[td_block_ad_box spot_id=”custom_ad_2″]

> Check Out: How to Turn Your Windows 10 PC into a WiFi Hotspot

Turn Windows/Mac device into a Flip clock

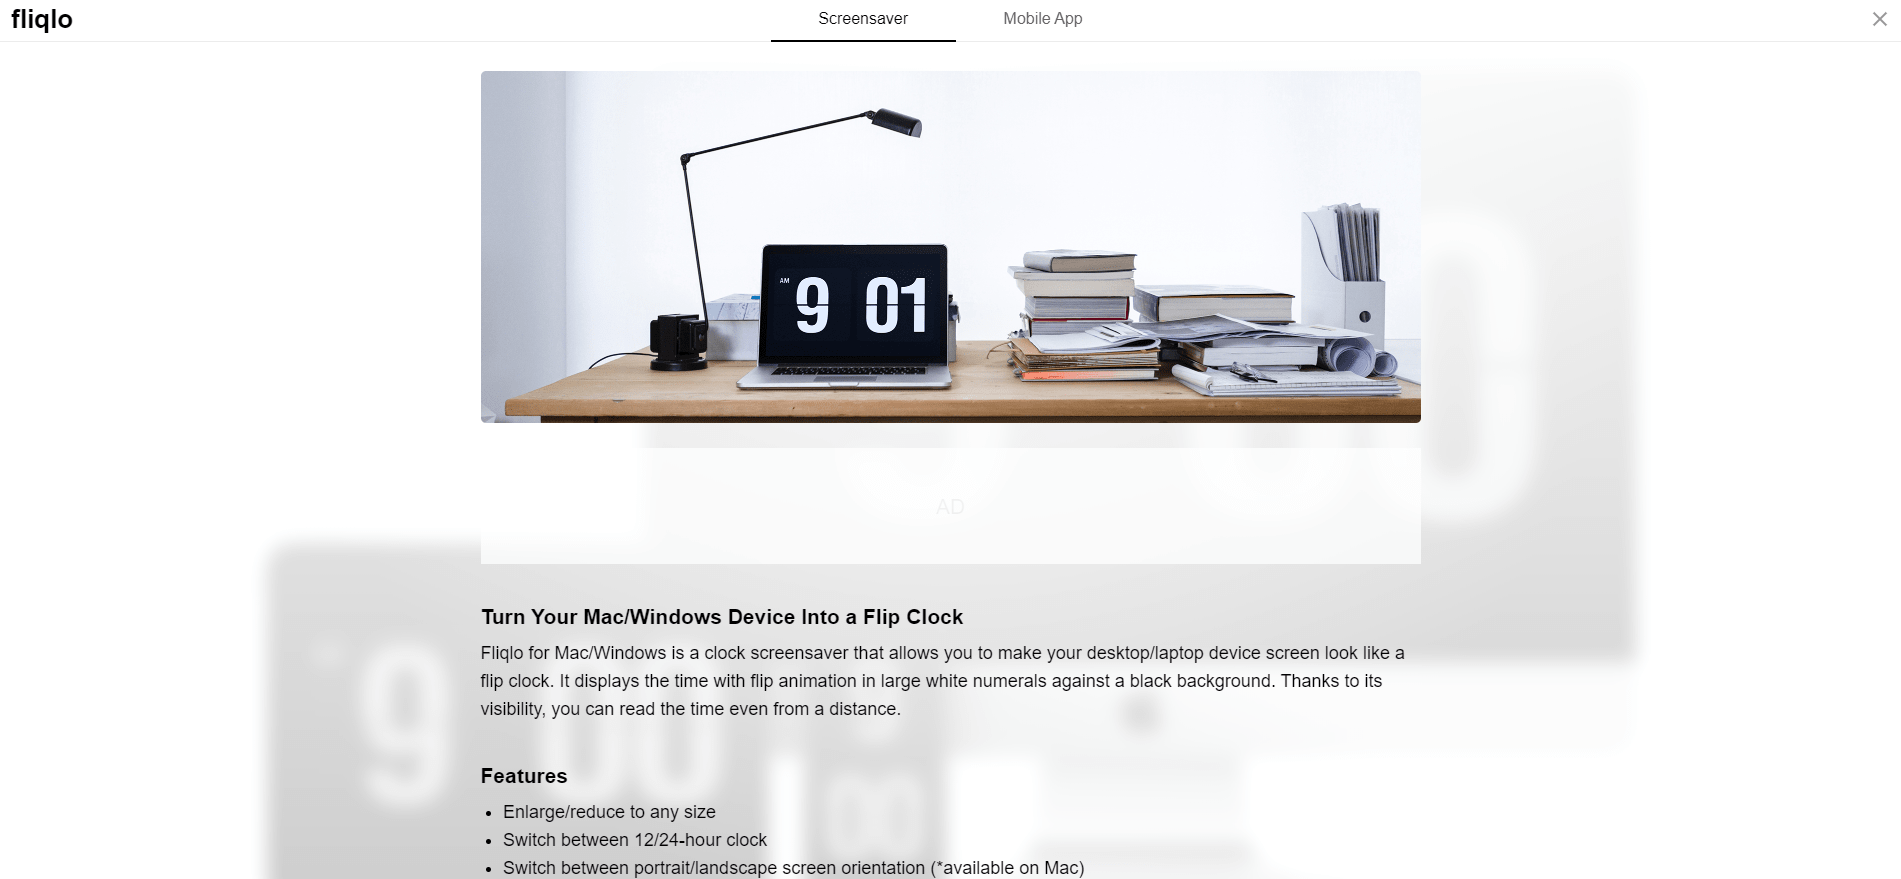
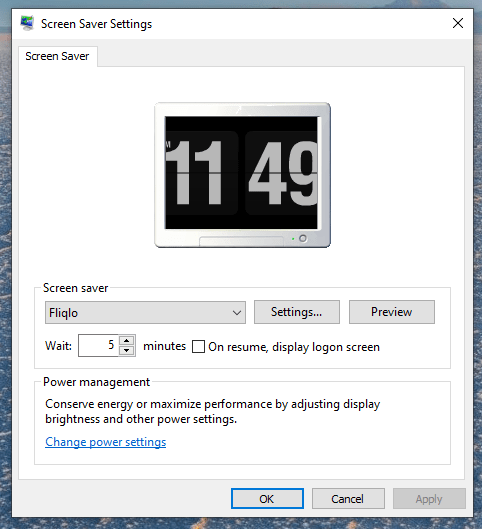
To tun your Windows/Mac device into a Flip Clock we are going to use an app called Fliqlo. Fliqlo is a clock screensaver that will allow you to turn your screen device into a flip clock. The Flip Clock look displays the time in large white numbers with flip animations into a black background.

Fliqlo features:

  • Enlarge/Reduce the size
  • Switch between 12/24 hour format
  • On Mac: Switch between portrait/landscape screen orientation
  • On Mac: Brightness control
  • On Mac: Show/hide background
  • On Mac: Show the clock on a single primary display

How to Make “Flip Clock” as a Screensaver (Windows and MAC)

Steps to make Flip Clock as a screensaver 

  • Step1: Search on Google for “flip clock screensaver” and select the first result, or simply follow this link.
  • Step 2: Click inside the first image to appear and select between “Screensaver” or “Mobile App” at the top. In this case, the first, since we want to change it in the computer, but also because it costs mobile.
  • Step 3: Choose for “Mac” or “Windows” version and download it.
  • Steps 4: Flom the downloaded folder, select “Fliqlo Setup.exe” and open it.
Flip Clock Settings
Flip Clock Settings
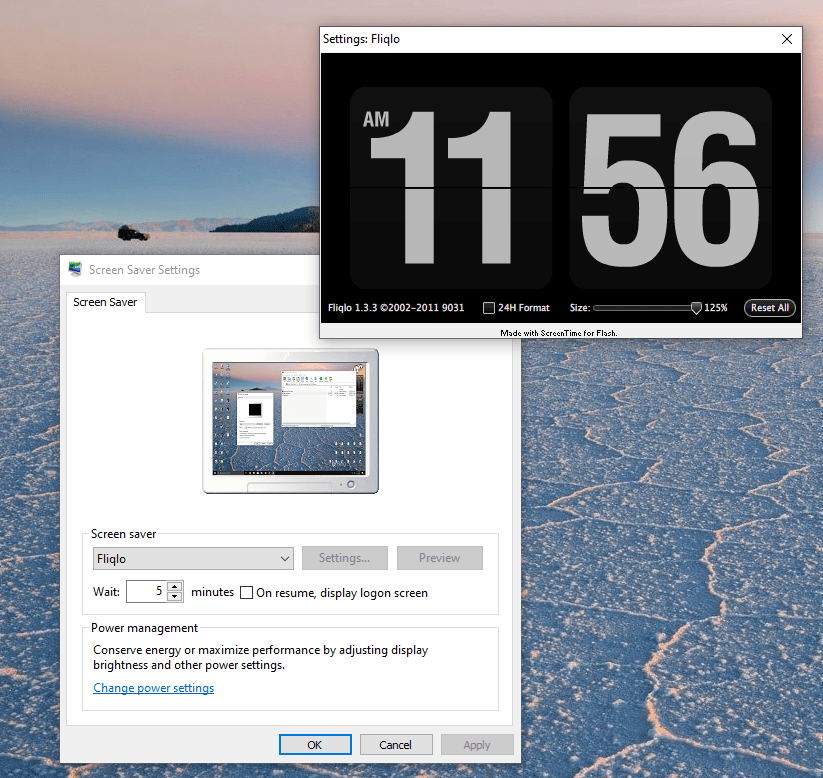
  • Step 5: A window like above will be opened. Under “Screen saver“, just select “Fliqlo“, choose your preferred “Wait time” (the time when the Flip Clock will appear), next “Apply” and “Ok
  • Step 6: At this window, by clicking on “Settings” you will have some limited options like changing the “Format” and the “Size” of the clock in you are using it on windows.
Flip Clock Settings
Flip Clock Settings

> Check Next: How to use your Android smartphone as a webcam for your PC

So, here you have a Flip Clock screensaver for your Windows/Mac device. Hope you found this article useful. Let us know your thoughts in the comments section below, follow us on twitter and facebook for more news and updates.
neoAdviser

[td_block_11 category_id=”3″ limit=”1″ td_filter_default_txt=””][td_block_ad_box spot_id=”custom_ad_3″]